Pioneer PDP-6010FD Owner's Manual - Page 24
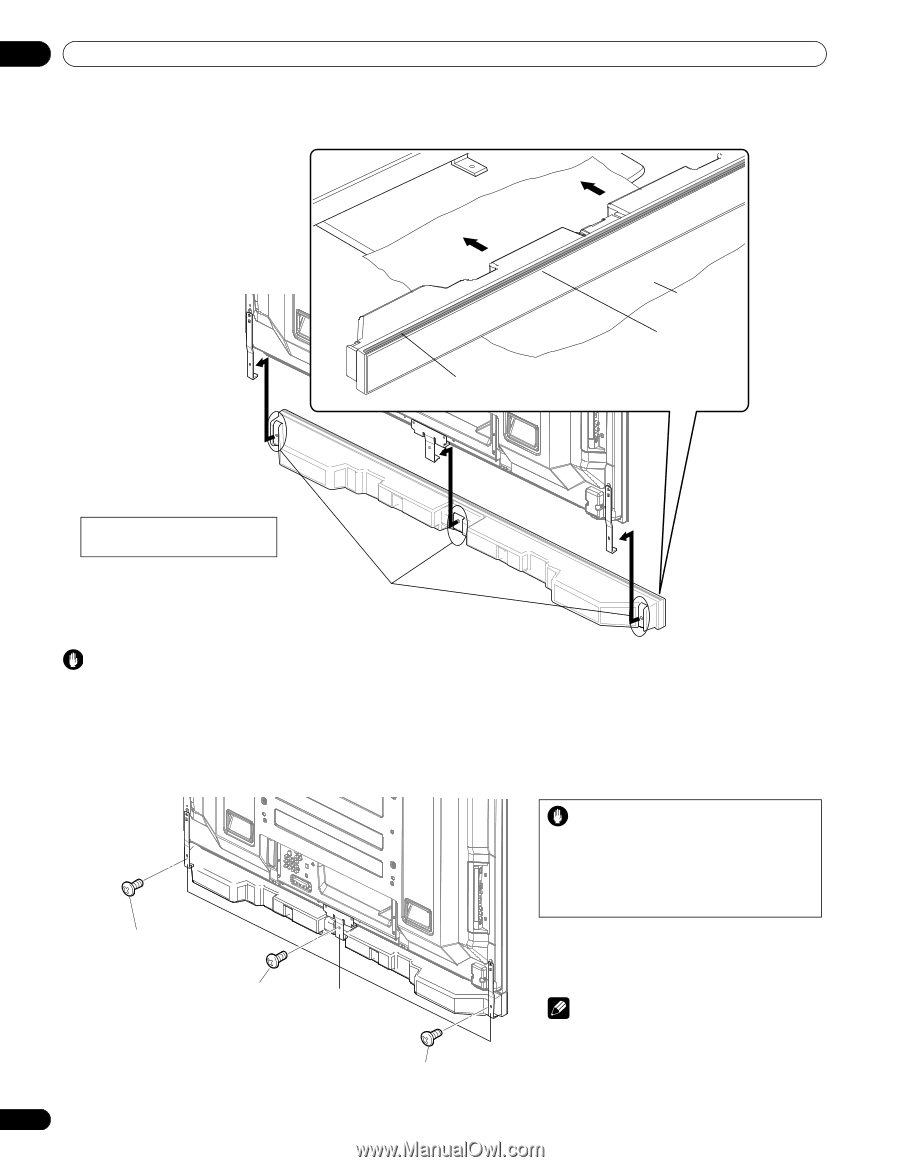
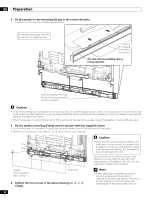
Fit the speaker to the mounting fittings in the correct direction., Tighten from back using
 |
View all Pioneer PDP-6010FD manuals
Add to My Manuals
Save this manual to your list of manuals |
Page 24 highlights
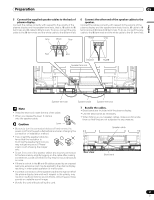
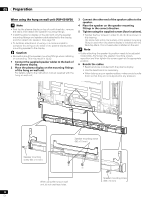
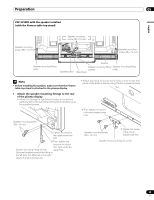
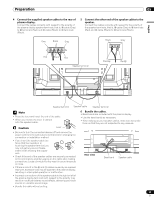
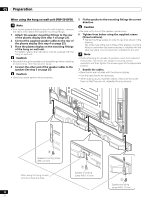
05 Preparation 2 Fit the speaker to the mounting fittings in the correct direction. • Be sure not to mount the speaker upside down. Protective wrapping Front side of the speaker The side with the padding strip is facing upwards. For illustrative purposes, the table top stand is not presented here. Insert the groove on the back of the speaker into the speaker mounting fitting. Caution • To avoid any damage to the speaker and/or table top stand from striking against each other, fit the speaker to the mounting fittings while confirming their locations. As you may easily strike the stand, use the protective wrapping in which the speaker was wrapped between the speaker and stand. • When the speaker mounting fittings do not fit the grooves at the rear of the speaker, adjust the speaker mounting fittings angle. 3 Tighten from back using the supplied screws (three locations). Tighten the three screws in order , , as shown in the drawing. Caution • If you want to move the plasma display, make sure that you remove the speaker first. In 3 addition, do not move the plasma display holding on to the mounting fittings. This can result in injury or damage to the unit. Speaker mounting screw (M5 x 10 mm) 1 Speaker mounting screw When using the (M5 x 10 mm) table top stand, do not use these holes.2 Speaker mounting screw (M5 x 10 mm) The screw hole at the bottom of the speaker mounting fitting is used when the plasma display is installed on the wall. It is not used when installed with the stand. Note • If after attaching the speaker its position needs to be adjusted horizontally or vertically, first loosen the speaker mounting screws, reposition and then tighten the screws again at the appropriate position. 24 En
-
 1
1 -
2
-
3
-
4
-
5
-
6
-
7
-
8
-
9
-
10
-
11
-
12
-
13
-
14
-
15
-
16
-
17
-
18
-
 19
19 -
 20
20 -
 21
21 -
 22
22 -
 23
23 -
 24
24 -
 25
25 -
 26
26 -
 27
27 -
 28
28 -
 29
29 -
30
-
31
-
32
-
33
-
34
-
35
-
36
-
37
-
38
-
39
-
40
-
41
-
42
-
43
-
44
-
45
-
46
-
47
-
48
-
49
-
50
-
51
-
52
-
53
-
54
-
55
-
56
-
57
-
58
-
59
-
60
-
61
-
62
-
63
-
64
-
65
-
66
-
67
-
68
-
69
-
70
-
71
-
72
-
73
-
74
-
75
-
76
-
77
-
78
-
79
-
80
-
81
-
82
-
83
-
84
-
85
-
86
-
87
-
88
-
89
-
90
-
91
-
92
-
93
-
94
-
95
-
96
-
97
-
98
-
99
-
100
-
101
-
102
-
103
-
104
-
105
-
106
-
107
-
108
-
109
-
110
-
111
-
112
-
113
-
114
-
115
-
116
-
117
-
118
-
119
-
120
-
121
-
122
-
123
-
124
-
125
-
126
-
127
-
128
-
129
-
130
-
131
-
132
-
133
-
134
-
135
-
136
-
137
-
138
-
139
-
140
-
141
-
142
-
143
-
144
-
145
-
146
-
147
-
148
-
149
-
150
-
151
-
152
-
153
-
154
-
155
-
156
-
157
-
158
-
159
-
160
-
161
-
162
-
163
-
164
-
165
-
166
-
167
-
168
-
169
-
170
-
171
-
172
-
173
-
174
-
175
-
176
-
177
-
178
-
179
-
180
-
181
-
182
-
183
-
184
-
185
-
186
-
187
-
188
-
189
-
190
-
191
-
192
-
193
-
194
-
195
-
196
-
197
-
198
-
199
-
200
-
201
-
202
-
203
-
204
-
205
-
206
-
207
-
208
-
209
-
210
-
211
-
212
-
213
-
214
-
215
-
216
-
217
-
218
-
219
-
220
-
221
-
222
-
223
-
224
-
225
-
226
-
227
-
228
-
229
-
230
-
231
-
232
-
233
-
234
-
235
-
236
-
237
-
238
-
239
-
240
-
241
-
242
-
243
-
244
-
245
-
246
-
247
-
248
-
249
-
250
-
251
-
252
-
253
-
254
-
255
-
256
-
257
-
258
-
259
-
260
-
261
-
262
-
263
-
264
-
265
-
266
-
267
-
268
-
269
-
270
-
271
-
272
-
273
-
274
-
275
-
276
-
277
-
278
-
279
-
280
-
281
-
282
-
283
-
284
-
285
-
286
-
287
-
288
-
289
-
290
-
291
-
292
-
293
-
294
-
295
-
296
-
297
-
298
 |
 |