Pioneer PDP-6010FD Owner's Manual - Page 72
Select Video or PC
 |
View all Pioneer PDP-6010FD manuals
Add to My Manuals
Save this manual to your list of manuals |
Page 72 highlights
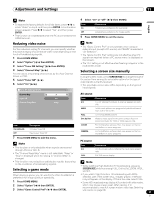
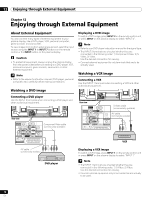
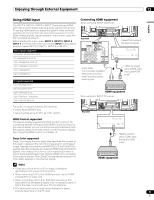
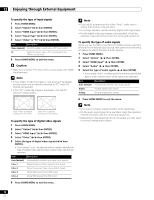
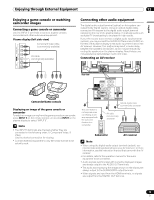
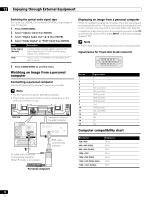
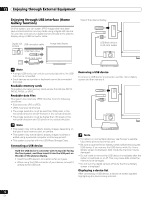
12 Enjoying through External Equipment To specify the type of input signals 1 Press HOME MENU. 2 Select "Option" ( / then ENTER). 3 Select "HDMI Input" ( / then ENTER). 4 Select "Signal Type" ( / then ENTER). 5 Select "Video" or "PC" ( / then ENTER). Item Description Video (default) Select this option except when a PC is connected PC Select this option when a PC is connected to the HDMI input terminal 6 Press HOME MENU to exit the menu. Caution • Make sure to select "PC" when a PC is connected to the HDMI input terminal. Note • In the "Video" mode, the image is "over-scanned" (enlarged), and the mode is automatically switched to "PC" when PC signals are received. • In the "PC" mode, the image is displayed in full size for optimum image quality. Note • If you select a parameter other than "Auto", make such a setting that results in natural color. • If no image appears, specify another digital video signal type. • For the digital video signal types to be specified, check the operation manual that came with the connected equipment. To specify the type of audio signals When you use the INPUT 4 or INPUT 5 HDMI terminal, select the terminal for the desired input source, then perform the following procedure to specify the type of audio signals. 1 Press HOME MENU. 2 Select "Option" ( / then ENTER). 3 Select "HDMI Input" ( / then ENTER). 4 Select "Audio" ( / then ENTER). 5 Select the type of audio signals ( / then ENTER). • If you select "Auto", an attempt will be made to identify the type of audio signals when audio signals are received. Item Auto (default) Digital Analog Description Automatically identifies input audio signals Accepts digital audio signals Accepts analog audio signals when "Video" is selected ("overscan" size screen) when "PC" is selected ("underscan" size screen) To specify the type of digital video signals 1 Press HOME MENU. 2 Select "Option" ( / then ENTER). 3 Select "HDMI Input" ( / then ENTER). 4 Select "Video" ( / then ENTER). 5 Select the type of digital video signals ( / then ENTER). • If you select "Auto", an attempt will be made to identify the type of digital video signals when digital video signals are received. Item Description Auto (default) Automatically identifies input digital video signals Color-1 Digital Component Video signals (4:2:2) locked Color-2 Digital Component Video signals (4:4:4) locked Color-3 Digital RGB signals (16 to 235) locked Color-4 Digital RGB signals (0 to 255) locked 6 Press HOME MENU to exit the menu. Note • If no sound is output, specify another audio signal type. • For the audio signal types to be specified, check the operation manual that came with the connected equipment. • Depending on the equipment to be connected, you also need to connect analog audio cables. 6 Press HOME MENU to exit the menu. 72 En
-
 1
1 -
2
-
3
-
4
-
5
-
6
-
7
-
8
-
9
-
10
-
11
-
12
-
13
-
14
-
15
-
16
-
17
-
18
-
19
-
20
-
21
-
22
-
23
-
24
-
25
-
26
-
27
-
28
-
29
-
30
-
31
-
32
-
33
-
34
-
35
-
36
-
37
-
38
-
39
-
40
-
41
-
42
-
43
-
44
-
45
-
46
-
47
-
48
-
49
-
50
-
51
-
52
-
53
-
54
-
55
-
56
-
57
-
58
-
59
-
60
-
61
-
62
-
63
-
64
-
65
-
66
-
 67
67 -
 68
68 -
 69
69 -
 70
70 -
 71
71 -
 72
72 -
 73
73 -
 74
74 -
 75
75 -
 76
76 -
 77
77 -
78
-
79
-
80
-
81
-
82
-
83
-
84
-
85
-
86
-
87
-
88
-
89
-
90
-
91
-
92
-
93
-
94
-
95
-
96
-
97
-
98
-
99
-
100
-
101
-
102
-
103
-
104
-
105
-
106
-
107
-
108
-
109
-
110
-
111
-
112
-
113
-
114
-
115
-
116
-
117
-
118
-
119
-
120
-
121
-
122
-
123
-
124
-
125
-
126
-
127
-
128
-
129
-
130
-
131
-
132
-
133
-
134
-
135
-
136
-
137
-
138
-
139
-
140
-
141
-
142
-
143
-
144
-
145
-
146
-
147
-
148
-
149
-
150
-
151
-
152
-
153
-
154
-
155
-
156
-
157
-
158
-
159
-
160
-
161
-
162
-
163
-
164
-
165
-
166
-
167
-
168
-
169
-
170
-
171
-
172
-
173
-
174
-
175
-
176
-
177
-
178
-
179
-
180
-
181
-
182
-
183
-
184
-
185
-
186
-
187
-
188
-
189
-
190
-
191
-
192
-
193
-
194
-
195
-
196
-
197
-
198
-
199
-
200
-
201
-
202
-
203
-
204
-
205
-
206
-
207
-
208
-
209
-
210
-
211
-
212
-
213
-
214
-
215
-
216
-
217
-
218
-
219
-
220
-
221
-
222
-
223
-
224
-
225
-
226
-
227
-
228
-
229
-
230
-
231
-
232
-
233
-
234
-
235
-
236
-
237
-
238
-
239
-
240
-
241
-
242
-
243
-
244
-
245
-
246
-
247
-
248
-
249
-
250
-
251
-
252
-
253
-
254
-
255
-
256
-
257
-
258
-
259
-
260
-
261
-
262
-
263
-
264
-
265
-
266
-
267
-
268
-
269
-
270
-
271
-
272
-
273
-
274
-
275
-
276
-
277
-
278
-
279
-
280
-
281
-
282
-
283
-
284
-
285
-
286
-
287
-
288
-
289
-
290
-
291
-
292
-
293
-
294
-
295
-
296
-
297
-
298
 |
 |