Pioneer PDP-6010FD Owner's Manual - Page 83
Useful Remote Control Features
 |
View all Pioneer PDP-6010FD manuals
Add to My Manuals
Save this manual to your list of manuals |
Page 83 highlights
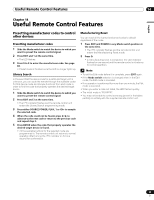
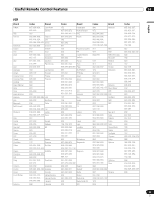
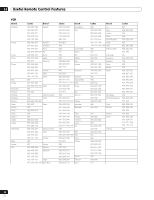
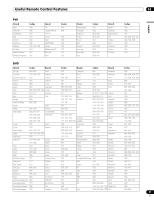
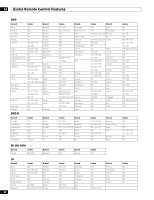
Useful Remote Control Features 14 English Chapter 14 Useful Remote Control Features Presetting manufacturer codes to control other devices Presetting manufacturer codes 1 Slide the Mode switch to match the device to which you want to preset the remote control signal. 2 Press EDIT and 1 at the same time. • The LED flashes. 3 Press 0 to 9 to enter the manufacturer code. See page 84. • Preset mode is finished once the LED no longer lights up. Library Search In the event that the device code for a particular target unit is unknown, you can cycle the remote through the available codes for that device mode and sample functions from each code in order to find the code that properly operates the desired target device. 1 Slide the Mode switch to match the device to which you want to preset the remote control signal. 2 Press EDIT and 3 at the same time. • The LED indicator flashes and the remote control unit enters the Library Search programming mode. 3 Press either SOURCE POWER, PLAY, 1 or CH+ to sample the selected code. 4 When the code could not be found, press / to advance to the next code or return to the previous code and repeat step 3. 5 Press ENTER when the code that properly operates the desired target device is found. • All the available buttons for the selected mode are programmed in. The remote control unit returns to normal operation after turning the LED indicator on for one second for confirmation. Manufacturing Reset You can reset all the learned and preset codes to default regardless of the mode. 1 Press EDIT and POWER in any Mode switch position at the same time. • The LED indicator flashes and the remote control unit enters the Manufacturing Reset mode. 2 Press D. • A manufacturing reset is completed. The LED indicator flashes for one second and the remote control unit returns to normal operation. Note • To exit the Edit mode before it is complete, press EDIT again. • If the Mode switch selection is changed when in the Edit mode, the Edit mode is canceled. • If no operation is performed for more than one minute, the Edit mode is canceled. • When you enter a code not listed, the LED flashes quickly. • The initial mode is "PIONEER". • You may not be able to control some equipment in the tables partially or entirely with the supplied remote control unit. 83 En
-
 1
1 -
2
-
3
-
4
-
5
-
6
-
7
-
8
-
9
-
10
-
11
-
12
-
13
-
14
-
15
-
16
-
17
-
18
-
19
-
20
-
21
-
22
-
23
-
24
-
25
-
26
-
27
-
28
-
29
-
30
-
31
-
32
-
33
-
34
-
35
-
36
-
37
-
38
-
39
-
40
-
41
-
42
-
43
-
44
-
45
-
46
-
47
-
48
-
49
-
50
-
51
-
52
-
53
-
54
-
55
-
56
-
57
-
58
-
59
-
60
-
61
-
62
-
63
-
64
-
65
-
66
-
67
-
68
-
69
-
70
-
71
-
72
-
73
-
74
-
75
-
76
-
77
-
 78
78 -
 79
79 -
 80
80 -
 81
81 -
 82
82 -
 83
83 -
 84
84 -
 85
85 -
 86
86 -
 87
87 -
 88
88 -
89
-
90
-
91
-
92
-
93
-
94
-
95
-
96
-
97
-
98
-
99
-
100
-
101
-
102
-
103
-
104
-
105
-
106
-
107
-
108
-
109
-
110
-
111
-
112
-
113
-
114
-
115
-
116
-
117
-
118
-
119
-
120
-
121
-
122
-
123
-
124
-
125
-
126
-
127
-
128
-
129
-
130
-
131
-
132
-
133
-
134
-
135
-
136
-
137
-
138
-
139
-
140
-
141
-
142
-
143
-
144
-
145
-
146
-
147
-
148
-
149
-
150
-
151
-
152
-
153
-
154
-
155
-
156
-
157
-
158
-
159
-
160
-
161
-
162
-
163
-
164
-
165
-
166
-
167
-
168
-
169
-
170
-
171
-
172
-
173
-
174
-
175
-
176
-
177
-
178
-
179
-
180
-
181
-
182
-
183
-
184
-
185
-
186
-
187
-
188
-
189
-
190
-
191
-
192
-
193
-
194
-
195
-
196
-
197
-
198
-
199
-
200
-
201
-
202
-
203
-
204
-
205
-
206
-
207
-
208
-
209
-
210
-
211
-
212
-
213
-
214
-
215
-
216
-
217
-
218
-
219
-
220
-
221
-
222
-
223
-
224
-
225
-
226
-
227
-
228
-
229
-
230
-
231
-
232
-
233
-
234
-
235
-
236
-
237
-
238
-
239
-
240
-
241
-
242
-
243
-
244
-
245
-
246
-
247
-
248
-
249
-
250
-
251
-
252
-
253
-
254
-
255
-
256
-
257
-
258
-
259
-
260
-
261
-
262
-
263
-
264
-
265
-
266
-
267
-
268
-
269
-
270
-
271
-
272
-
273
-
274
-
275
-
276
-
277
-
278
-
279
-
280
-
281
-
282
-
283
-
284
-
285
-
286
-
287
-
288
-
289
-
290
-
291
-
292
-
293
-
294
-
295
-
296
-
297
-
298
 |
 |