Pioneer PDP-6010FD Owner's Manual - Page 67
Reducing video noise, Selecting a game mode, Selecting a screen size manually
 |
View all Pioneer PDP-6010FD manuals
Add to My Manuals
Save this manual to your list of manuals |
Page 67 highlights
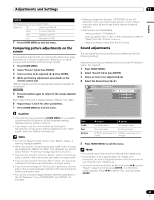
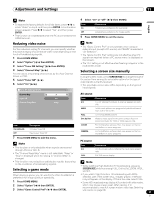
Adjustments and Settings 11 English Note • To restore the factory defaults for all the items, press / to select "Reset" in step 4, and then press ENTER. A confirmation screen appears. Press / to select "Yes", and then press ENTER. • This function is not selectable when the PC is connected to the HDMI terminal. 4 Select "On" or "Off" ( / then ENTER). Item On Off Description Establishes a preference for operability Establishes a preference for image quality 5 Press HOME MENU to exit the menu. Reducing video noise For the individual analog TV channels, you can specify whether the plasma display should reduce video noise depending on the levels of broadcasting signals. 1 Press HOME MENU. 2 Select "Option" ( / then ENTER). 3 Select "Tuner NR Setting" ( / then ENTER). 4 Select "Channel Map" ( / ). You can select only analog channels set by the Auto Channel Preset or POD. 5 Select "Tuner NR" ( / ). 6 Select "On" ( / ). HTuner NR Setting ANT.A Channel Map Tuner NR Channel Keep/Skip 7 On Keep Note • The "Game Control Pref" is only available when using an external input (except a PC source) and "GAME" is selected in "AV Selection". • The "Game Control Pref" options are not effective when PC signals are received (when a PC source menu is displayed on the screen). • The "On" setting is not effective when freezing images or in the multiscreen mode. Selecting a screen size manually In single-screen mode, press SCREEN SIZE to change the size of the screen from among the selectable options for the type of video signals currently received. • The selectable screen sizes differ depending on the types of input signals. AV source Item 4:3 Description For 4:3 "standard" pictures. A side bar appears on each side WIDE In this mode pictures are progressively stretched toward each side of the screen FULL For 16:9 squeezed pictures Dot by Dot Matches input signal to the same number of screen pixels (selectable for 1080i or 1080p signals only) Item On (default) Off Description Activates Tuner NR Deactivates Tuner NR ZOOM CINEMA For 16:9 letterbox pictures. Bars may appear on the top and bottom on some programs For 14:9 letterbox pictures. Bars may appear on the top and bottom on some programs 7 Press HOME MENU to exit the menu. Note • This function is only selectable when signals are received through ANT.A or ANT.B. • The "Channel Keep/Skip" menu is not selectable. "Keep" or "Skip" is displayed when the setting in "Channel Map" is changed. PC source Item 4:3 FULL Description Fills the screen without altering the input signal aspect ratio Full 16:9 screen display • This function may not achieve satisfactory results, depending on the conditions of broadcasting signals. Selecting a game mode Note • While watching High Definition TV broadcasting, pressing SCREEN SIZE switches among FULL, Dot by Dot, ZOOM, WIDE, and 4:3. When playing a game, you can use this function to establish a preference for image quality or operability. 1 Press HOME MENU. 2 Select "Option" ( / then ENTER). 3 Select "Game Control Pref" ( / then ENTER). • If you watch High Definition TV broadcasting with WIDE selected, part of the screen (e.g., images, graphic interface) may not appear on the display. If this is the case, select FULL. • Some HD broadcasts may display 4:3 content with side masks, which may cause uneven wear. After viewing, it is recommended to view full screen motion video (see Detecting side masks on page 68). 67 En
-
 1
1 -
2
-
3
-
4
-
5
-
6
-
7
-
8
-
9
-
10
-
11
-
12
-
13
-
14
-
15
-
16
-
17
-
18
-
19
-
20
-
21
-
22
-
23
-
24
-
25
-
26
-
27
-
28
-
29
-
30
-
31
-
32
-
33
-
34
-
35
-
36
-
37
-
38
-
39
-
40
-
41
-
42
-
43
-
44
-
45
-
46
-
47
-
48
-
49
-
50
-
51
-
52
-
53
-
54
-
55
-
56
-
57
-
58
-
59
-
60
-
61
-
 62
62 -
 63
63 -
 64
64 -
 65
65 -
 66
66 -
 67
67 -
 68
68 -
 69
69 -
 70
70 -
 71
71 -
 72
72 -
73
-
74
-
75
-
76
-
77
-
78
-
79
-
80
-
81
-
82
-
83
-
84
-
85
-
86
-
87
-
88
-
89
-
90
-
91
-
92
-
93
-
94
-
95
-
96
-
97
-
98
-
99
-
100
-
101
-
102
-
103
-
104
-
105
-
106
-
107
-
108
-
109
-
110
-
111
-
112
-
113
-
114
-
115
-
116
-
117
-
118
-
119
-
120
-
121
-
122
-
123
-
124
-
125
-
126
-
127
-
128
-
129
-
130
-
131
-
132
-
133
-
134
-
135
-
136
-
137
-
138
-
139
-
140
-
141
-
142
-
143
-
144
-
145
-
146
-
147
-
148
-
149
-
150
-
151
-
152
-
153
-
154
-
155
-
156
-
157
-
158
-
159
-
160
-
161
-
162
-
163
-
164
-
165
-
166
-
167
-
168
-
169
-
170
-
171
-
172
-
173
-
174
-
175
-
176
-
177
-
178
-
179
-
180
-
181
-
182
-
183
-
184
-
185
-
186
-
187
-
188
-
189
-
190
-
191
-
192
-
193
-
194
-
195
-
196
-
197
-
198
-
199
-
200
-
201
-
202
-
203
-
204
-
205
-
206
-
207
-
208
-
209
-
210
-
211
-
212
-
213
-
214
-
215
-
216
-
217
-
218
-
219
-
220
-
221
-
222
-
223
-
224
-
225
-
226
-
227
-
228
-
229
-
230
-
231
-
232
-
233
-
234
-
235
-
236
-
237
-
238
-
239
-
240
-
241
-
242
-
243
-
244
-
245
-
246
-
247
-
248
-
249
-
250
-
251
-
252
-
253
-
254
-
255
-
256
-
257
-
258
-
259
-
260
-
261
-
262
-
263
-
264
-
265
-
266
-
267
-
268
-
269
-
270
-
271
-
272
-
273
-
274
-
275
-
276
-
277
-
278
-
279
-
280
-
281
-
282
-
283
-
284
-
285
-
286
-
287
-
288
-
289
-
290
-
291
-
292
-
293
-
294
-
295
-
296
-
297
-
298
 |
 |