Pioneer PDP-6010FD Owner's Manual - Page 68
CINEMA, Dot
 |
View all Pioneer PDP-6010FD manuals
Add to My Manuals
Save this manual to your list of manuals |
Page 68 highlights
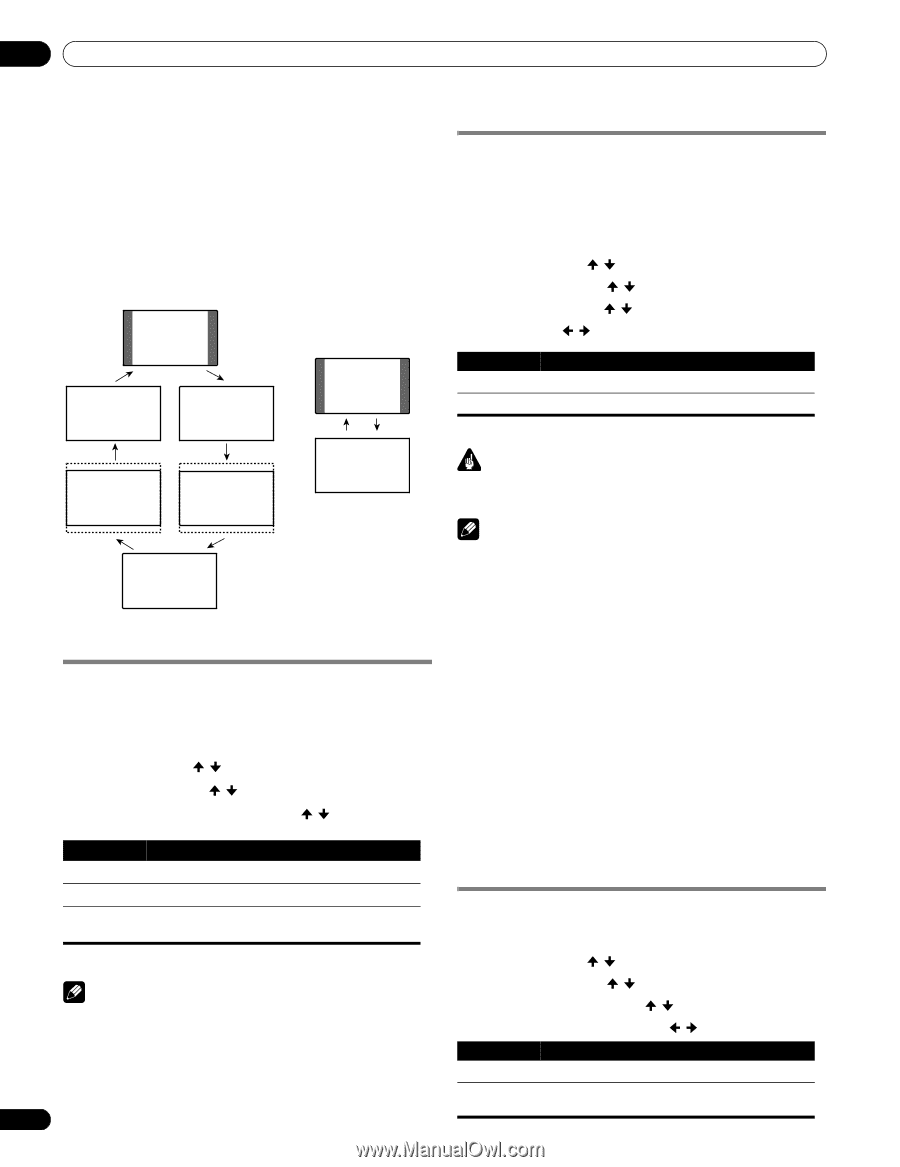
11 Adjustments and Settings • The selectable screen sizes may differ depending on the conditions. • You can freely change the screen size while watching HD broadcasts or enjoying other HD input sources. However, when you resume the HD programs after having quit them, "FULL" is automatically selected for the screen size. • It is not recommended to consistently display signals that do not completely fill the screen. This may cause temporary or permanent image retention depending on the frequency and duration. AV source PC source 4:3 4:3 CINEMA WIDE Detecting side masks Some HD broadcasts may display 4:3 content with side masks. The plasma display automatically detects these side masks to provide gray side masks when "Natural" has been selected for "Auto Size", or display the image full screen with the side masks removed when "Wide-Zoom" has been selected. This function does not operate when "Off" is selected for "Auto Size". 1 Press HOME MENU. 2 Select "Option" ( / then ENTER). 3 Select "Side Mask" ( / then ENTER). 4 Select "Detection" ( / ). 5 Select "On" ( / ). Item Description Off Deactivates the Side Mask detection On Activates the Side Mask detection 6 Press HOME MENU to exit the menu. ZOOM FULL FULL Important • The "On" setting prevents uneven wear on 4:3 content and side masks and can reduce the possibility of image retention. Dot by Dot Selecting a screen size automatically The plasma display automatically selects an appropriate screen size when video signals are received from a connected HDMI device (see page 71). To activate this function, use the following procedure. 1 Press HOME MENU. 2 Select "Option" ( / then ENTER). 3 Select "Auto Size" ( / then ENTER). 4 Select "Natural" or "Wide-Zoom" ( / then ENTER). Note • You cannot set the Side Mask detection to "On" or "Off" when "Off" is selected in "Auto Size". • Set the Side Mask detection function to "On". The High Definition 16:9 aspect ratio images containing side masks will be detected automatically and side masks will be added or the image displayed in full screen. • This Side Mask detection does not operate on 4:3 content displayed in SD (standard definition) broadcasts. • "Auto" will appear on the channel display when this function is on. • Detection errors may occur depending on the HD content. In case a detection error occurs, manually change the screen size to the desired size. • Side Mask detection may not operate properly for video signals that contain no aspect ratio information. If that is the case, check if "FULL" is selected for the screen size, switch to another input source, then switch back to the original input source again. Item Off Description Deactivates the Auto Size function Changing the brightness at both sides of the screen (Side Mask) Natural Naturally adjusts the image to the screen Wide-Zoom Enlarges and displays only the 4:3 aspect ratio portion in full and wide screen 5 Press HOME MENU to exit the menu. With the 4:3 screen size, you can change the brightness of the gray side masks that appear at both sides of the screen. 1 Press HOME MENU. 2 Select "Option" ( / then ENTER). Note • Manually select an appropriate screen size if an image does not automatically switch to a correct screen format. 3 Select "Side Mask" ( / then ENTER). 4 Select "Brightness Sync." ( / ). 5 Select the desired parameter ( / ). • When the video signal contains no aspect ratio information, the function will not work even with "Natural" or "Wide-Zoom" selected. 68 Item Description Fixed (default) Always sets the same brightness for the gray side masks Auto Adjusts the brightness of the gray side masks according to the brightness of images En
-
 1
1 -
2
-
3
-
4
-
5
-
6
-
7
-
8
-
9
-
10
-
11
-
12
-
13
-
14
-
15
-
16
-
17
-
18
-
19
-
20
-
21
-
22
-
23
-
24
-
25
-
26
-
27
-
28
-
29
-
30
-
31
-
32
-
33
-
34
-
35
-
36
-
37
-
38
-
39
-
40
-
41
-
42
-
43
-
44
-
45
-
46
-
47
-
48
-
49
-
50
-
51
-
52
-
53
-
54
-
55
-
56
-
57
-
58
-
59
-
60
-
61
-
62
-
 63
63 -
 64
64 -
 65
65 -
 66
66 -
 67
67 -
 68
68 -
 69
69 -
 70
70 -
 71
71 -
 72
72 -
 73
73 -
74
-
75
-
76
-
77
-
78
-
79
-
80
-
81
-
82
-
83
-
84
-
85
-
86
-
87
-
88
-
89
-
90
-
91
-
92
-
93
-
94
-
95
-
96
-
97
-
98
-
99
-
100
-
101
-
102
-
103
-
104
-
105
-
106
-
107
-
108
-
109
-
110
-
111
-
112
-
113
-
114
-
115
-
116
-
117
-
118
-
119
-
120
-
121
-
122
-
123
-
124
-
125
-
126
-
127
-
128
-
129
-
130
-
131
-
132
-
133
-
134
-
135
-
136
-
137
-
138
-
139
-
140
-
141
-
142
-
143
-
144
-
145
-
146
-
147
-
148
-
149
-
150
-
151
-
152
-
153
-
154
-
155
-
156
-
157
-
158
-
159
-
160
-
161
-
162
-
163
-
164
-
165
-
166
-
167
-
168
-
169
-
170
-
171
-
172
-
173
-
174
-
175
-
176
-
177
-
178
-
179
-
180
-
181
-
182
-
183
-
184
-
185
-
186
-
187
-
188
-
189
-
190
-
191
-
192
-
193
-
194
-
195
-
196
-
197
-
198
-
199
-
200
-
201
-
202
-
203
-
204
-
205
-
206
-
207
-
208
-
209
-
210
-
211
-
212
-
213
-
214
-
215
-
216
-
217
-
218
-
219
-
220
-
221
-
222
-
223
-
224
-
225
-
226
-
227
-
228
-
229
-
230
-
231
-
232
-
233
-
234
-
235
-
236
-
237
-
238
-
239
-
240
-
241
-
242
-
243
-
244
-
245
-
246
-
247
-
248
-
249
-
250
-
251
-
252
-
253
-
254
-
255
-
256
-
257
-
258
-
259
-
260
-
261
-
262
-
263
-
264
-
265
-
266
-
267
-
268
-
269
-
270
-
271
-
272
-
273
-
274
-
275
-
276
-
277
-
278
-
279
-
280
-
281
-
282
-
283
-
284
-
285
-
286
-
287
-
288
-
289
-
290
-
291
-
292
-
293
-
294
-
295
-
296
-
297
-
298
 |
 |