Pioneer PDP-6010FD Owner's Manual - Page 69
Room Light Sensor, Blue LED Dimmer, Orbiter, Video Pattern, Language setting
 |
View all Pioneer PDP-6010FD manuals
Add to My Manuals
Save this manual to your list of manuals |
Page 69 highlights
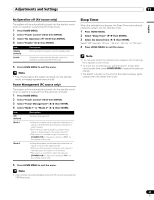
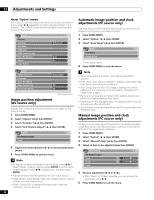
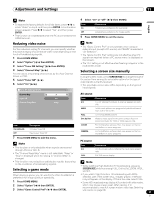
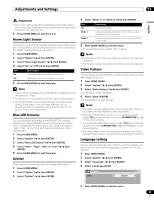
Adjustments and Settings 11 English Important • The "Auto" setting adjusts the brightness of the side masks according to the brightness of the screen and can reduce the possibility of image retention. 6 Press HOME MENU to exit the menu. Room Light Sensor This function automatically adjusts the brightness of the display panel in accordance with the brightness level of the viewing area. For details, use the following procedure. 1 Press HOME MENU. 2 Select "Option" ( / then ENTER). 3 Select "Room Light Sensor" ( / then ENTER). 4 Select "On" or "Off" ( / then ENTER). Item On Off Description Activates the Room Light Sensor function Deactivates the Room Light Sensor function 5 Press HOME MENU to exit the menu. Note • This function is disabled when "OPTIMUM" is selected on the "AV Selection" menu. • This function is not available when PC signals are received. • As the OPTIMUM function automatically optimizes image quality, the process in which image settings such as brightness and tint gradually change may be seen on the screen. This is not a malfunction. Blue LED Dimmer You can adjust the brightness of the POWER ON indicator depending on the brightness level of the viewing area. When "Auto" is selected, the brightness of the indicator changes to "High", "Mid" or "Low" to match the brightness level of the viewing area. 1 Press HOME MENU. 2 Select "Option" ( / then ENTER). 3 Select "Blue LED Dimmer" ( / then ENTER). 4 Select "Auto", "High", "Mid" or "Low" ( / then ENTER). 5 Press HOME MENU to exit the menu. Orbiter This function automatically shifts the image little by little. 1 Press HOME MENU. 2 Select "Option" ( / then ENTER). 3 Select "Orbiter" ( / then ENTER). 4 Select "Mode 1" or "Mode 2" ( / then ENTER). Item Off Mode 1 Mode 2 Description Disables the Orbiter Enables the display protection function for any screen mode other than "Dot by Dot" Enables the display protection function for all available screen modes 5 Press HOME MENU to exit the menu. • To cancel this function, select "Off" in step 4. Note • For the Dot by Dot mode, see Selecting a screen size manually on page 67. • This function does not operate when PC signals are received. Video Pattern You can display the Video Pattern screen that also helps alleviate after-image if it occurs. 1 Press HOME MENU. 2 Select "Option" ( / then ENTER). 3 Select "Video Pattern" ( / then ENTER). A confirmation screen appears. 4 Select "Start" (ENTER). The Video Pattern screen displays. Note • The system is automatically placed into the standby mode one hour after the Video Pattern screen has started. • While the Video Pattern screen is on, no buttons operate except TVa on the remote control unit, STANDBY/ON and a on the plasma display. • To cancel the Video Pattern screen, press TVa on the remote control unit, press STANDBY/ON or a (or slide a up) on the plasma display. • The Video Pattern timer has priority over the sleep timer. When the Video Pattern timer is on, the sleep timer becomes ineffective. Language setting You can select a language to be used for on-screen display such as menus from among three languages: English, French, and Spanish. 1 Press HOME MENU. 2 Select "Option" ( / then ENTER). 3 Select "Language" ( / then ENTER). 4 Select a language ( / ). Language Menu English 5 Press HOME MENU to exit the menu. 69 En
-
 1
1 -
2
-
3
-
4
-
5
-
6
-
7
-
8
-
9
-
10
-
11
-
12
-
13
-
14
-
15
-
16
-
17
-
18
-
19
-
20
-
21
-
22
-
23
-
24
-
25
-
26
-
27
-
28
-
29
-
30
-
31
-
32
-
33
-
34
-
35
-
36
-
37
-
38
-
39
-
40
-
41
-
42
-
43
-
44
-
45
-
46
-
47
-
48
-
49
-
50
-
51
-
52
-
53
-
54
-
55
-
56
-
57
-
58
-
59
-
60
-
61
-
62
-
63
-
 64
64 -
 65
65 -
 66
66 -
 67
67 -
 68
68 -
 69
69 -
 70
70 -
 71
71 -
 72
72 -
 73
73 -
 74
74 -
75
-
76
-
77
-
78
-
79
-
80
-
81
-
82
-
83
-
84
-
85
-
86
-
87
-
88
-
89
-
90
-
91
-
92
-
93
-
94
-
95
-
96
-
97
-
98
-
99
-
100
-
101
-
102
-
103
-
104
-
105
-
106
-
107
-
108
-
109
-
110
-
111
-
112
-
113
-
114
-
115
-
116
-
117
-
118
-
119
-
120
-
121
-
122
-
123
-
124
-
125
-
126
-
127
-
128
-
129
-
130
-
131
-
132
-
133
-
134
-
135
-
136
-
137
-
138
-
139
-
140
-
141
-
142
-
143
-
144
-
145
-
146
-
147
-
148
-
149
-
150
-
151
-
152
-
153
-
154
-
155
-
156
-
157
-
158
-
159
-
160
-
161
-
162
-
163
-
164
-
165
-
166
-
167
-
168
-
169
-
170
-
171
-
172
-
173
-
174
-
175
-
176
-
177
-
178
-
179
-
180
-
181
-
182
-
183
-
184
-
185
-
186
-
187
-
188
-
189
-
190
-
191
-
192
-
193
-
194
-
195
-
196
-
197
-
198
-
199
-
200
-
201
-
202
-
203
-
204
-
205
-
206
-
207
-
208
-
209
-
210
-
211
-
212
-
213
-
214
-
215
-
216
-
217
-
218
-
219
-
220
-
221
-
222
-
223
-
224
-
225
-
226
-
227
-
228
-
229
-
230
-
231
-
232
-
233
-
234
-
235
-
236
-
237
-
238
-
239
-
240
-
241
-
242
-
243
-
244
-
245
-
246
-
247
-
248
-
249
-
250
-
251
-
252
-
253
-
254
-
255
-
256
-
257
-
258
-
259
-
260
-
261
-
262
-
263
-
264
-
265
-
266
-
267
-
268
-
269
-
270
-
271
-
272
-
273
-
274
-
275
-
276
-
277
-
278
-
279
-
280
-
281
-
282
-
283
-
284
-
285
-
286
-
287
-
288
-
289
-
290
-
291
-
292
-
293
-
294
-
295
-
296
-
297
-
298
 |
 |