Samsung GX10 User Manual (ENGLISH) - Page 80
No image is recorded when the shutter release button is pressed to adjust the white balance.
 |
UPC - 044701007098
View all Samsung GX10 manuals
Add to My Manuals
Save this manual to your list of manuals |
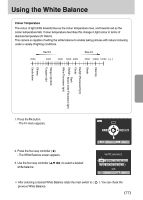
Page 80 highlights
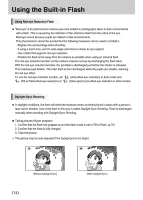
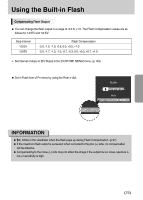
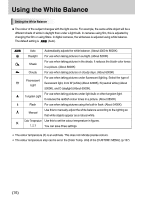
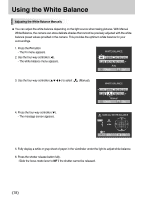
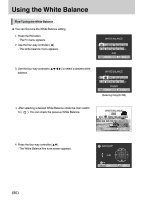
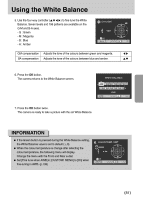
Using the White Balance 7. The menu as shown will display. : Set ſ The position of Custom white balance can be changed by the real e-dial. You can select a desired white balance by using the four way controller (ƊƌȜȞ). : Set 8. Press the OK button and the White Balance adjustment menu will display. Press the OK button again to save the setting. INFORMATION ƃ No image is recorded when the shutter release button is pressed to adjust the white balance. ƃ Press the Fn button when adjustment is unsuccessful to set again. ƃ If picture is extremely overexposed or underexposed, white balance may not be adjusted. In this case, set an appropriate exposure and re-adjust the white balance. ŝ79Ş
-
 1
1 -
2
-
3
-
4
-
5
-
6
-
7
-
8
-
9
-
10
-
11
-
12
-
13
-
14
-
15
-
16
-
17
-
18
-
19
-
20
-
21
-
22
-
23
-
24
-
25
-
26
-
27
-
28
-
29
-
30
-
31
-
32
-
33
-
34
-
35
-
36
-
37
-
38
-
39
-
40
-
41
-
42
-
43
-
44
-
45
-
46
-
47
-
48
-
49
-
50
-
51
-
52
-
53
-
54
-
55
-
56
-
57
-
58
-
59
-
60
-
61
-
62
-
63
-
64
-
65
-
66
-
67
-
68
-
69
-
70
-
71
-
72
-
73
-
74
-
 75
75 -
 76
76 -
 77
77 -
 78
78 -
 79
79 -
 80
80 -
 81
81 -
 82
82 -
 83
83 -
 84
84 -
 85
85 -
86
-
87
-
88
-
89
-
90
-
91
-
92
-
93
-
94
-
95
-
96
-
97
-
98
-
99
-
100
-
101
-
102
-
103
-
104
-
105
-
106
-
107
-
108
-
109
-
110
-
111
-
112
-
113
-
114
-
115
-
116
-
117
-
118
-
119
-
120
-
121
-
122
-
123
-
124
-
125
-
126
-
127
-
128
-
129
-
130
-
131
-
132
-
133
-
134
-
135
-
136
-
137
-
138
-
139
-
140
-
141
-
142
-
143
-
144
-
145
-
146
-
147
-
148
-
149
-
150
-
151
-
152
-
153
-
154
-
155
-
156
-
157
-
158
-
159
-
160
-
161
-
162
-
163
-
164
-
165
-
166
-
167
-
168
-
169
-
170
-
171
-
172
-
173
-
174
-
175
-
176
-
177
-
178
-
179
-
180
-
181
-
182
-
183
-
184
-
185
-
186
-
187
-
188
-
189
-
190
-
191
-
192
-
193
-
194
-
195
-
196
-
197
-
198
-
199
-
200
-
201
-
202
-
203
-
204
-
205
-
206
-
207
-
208
-
209
-
210
-
211
-
212
-
213
-
214
-
215
-
216
-
217
-
218
-
219
-
220
-
221
-
222
-
223
-
224
-
225
-
226
-
227
-
228
-
229
-
230
-
231
-
232
-
233
-
234
-
235
-
236
-
237
-
238
-
239
-
240
-
241
-
242
-
243
-
244
-
245
-
246
-
247
-
248
-
249
-
250
-
251
-
252
-
253
-
254
-
255
-
256
-
257
-
258
-
259
-
260
-
261
-
262
 |
 |
79
Using the White Balance
7. The menu as shown will display.
8. Press the
OK
button and the White Balance adjustment menu will display. Press the
OK
button
again to save the setting.
The position of Custom white balance can be changed by the
real e-dial. You can select a desired white balance by using the
four way controller (
).
No image is recorded when the shutter release button is pressed to adjust the white balance.
Press the
Fn
button when adjustment is unsuccessful to set again.
If picture is extremely overexposed or underexposed, white balance may not be adjusted. In this
case, set an appropriate exposure and re-adjust the white balance.
INFORMATION
: Set
: Set