Samsung SPH-M340 User Manual (user Manual) (ver.f4) (English) - Page 36
Contacts, Saving a Phone Number, Contacts, Add new
 |
View all Samsung SPH-M340 manuals
Add to My Manuals
Save this manual to your list of manuals |
Page 36 highlights
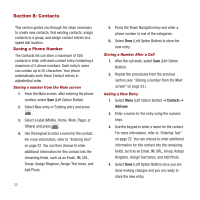
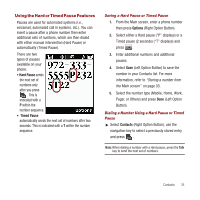
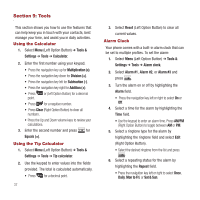
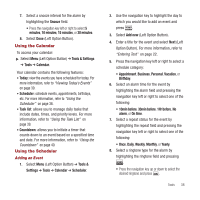
Section 8: Contacts This section guides you through the steps necessary to create new contacts, find existing contacts, assign contacts to a group, and assign contact entries to a speed dial location. Saving a Phone Number The Contacts list can store a maximum of 500 contacts in total, with each contact entry containing a maximum of 5 phone numbers. Each entry's name can contain up to 20 characters. Your phone automatically sorts these Contact entries in alphabetical order. Storing a number from the Main screen 1. From the Main screen, after entering the phone number, select Save (Left Option Button). 2. Select New entry or Existing entry and press . 3. Select a label (Mobile, Home, Work, Pager, or Others) and press . 4. Use the keypad to enter a name for the contact. For more information, refer to "Entering Text" on page 22. You can then choose to enter additional information for this contact into the remaining fields, such as an Email, IM, URL, Group, Assign Ringtone, Assign Text tones, and Add Photo. 33 5. Press the Down Navigation key and enter a phone number in one of the categories. 6. Select Done (Left Option Button) to store the new entry. Storing a Number After a Call 1. After the call ends, select Save (Left Option Button). 2. Repeat the procedures from the previous section (see "Storing a number from the Main screen" on page 33.) Adding a New Entry 1. Select Menu (Left Option Button) ➔ Contacts ➔ Add new. 2. Enter a name for the entry using the numeric keys. 3. Use the keypad to enter a name for the contact. For more information, refer to "Entering Text" on page 22. You can choose to enter additional information for this contact into the remaining fields, such as an Email, IM, URL, Group, Assign Ringtone, Assign Text tones, and Add Photo. 4. Select Done (Left Option Button) once you are done making changes and you are ready to store the new entry.
-
 1
1 -
2
-
3
-
4
-
5
-
6
-
7
-
8
-
9
-
10
-
11
-
12
-
13
-
14
-
15
-
16
-
17
-
18
-
19
-
20
-
21
-
22
-
23
-
24
-
25
-
26
-
27
-
28
-
29
-
30
-
 31
31 -
 32
32 -
 33
33 -
 34
34 -
 35
35 -
 36
36 -
 37
37 -
 38
38 -
 39
39 -
 40
40 -
 41
41 -
42
-
43
-
44
-
45
-
46
-
47
-
48
-
49
-
50
-
51
-
52
-
53
-
54
-
55
-
56
-
57
-
58
-
59
-
60
-
61
-
62
-
63
-
64
-
65
-
66
-
67
-
68
-
69
-
70
-
71
-
72
-
73
-
74
-
75
-
76
-
77
-
78
-
79
-
80
-
81
-
82
-
83
-
84
-
85
-
86
-
87
-
88
-
89
-
90
-
91
-
92
-
93
-
94
-
95
-
96
-
97
-
98
-
99
-
100
 |
 |