Samsung SPH-M910 User Manual (user Manual) (ver.f3) (English) - Page 103
Create, Event, From/To, All day, Google/Gmail
 |
View all Samsung SPH-M910 manuals
Add to My Manuals
Save this manual to your list of manuals |
Page 103 highlights
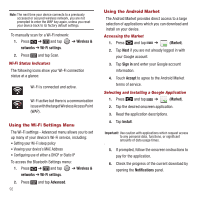
• Hide declined events hides (checked) or displays (unchecked) those events that have been declined via the calendar application. Adding an Event to the Calendar Your Calendar helps organize your time and reminds you of important events. 1. Press and tap ➔ . Note: To synchronize calendar events among your Google and Corporate accounts, make sure they are being managed by your device (page 46). The default view for the Calendar is the Month view. To change the view, tap the available tabs along the top of the Calendar screen (left of the screen in Landscape mode). Choose from Month, Week, Day, and List. 2. Tap a day to which you would like to add an event and press and tap Create. • Press to hide the menu options. 3. Tap the Event field and enter a title for the event. 96 4. Select a From/To date for the event by tapping the corresponding fields, and adjusting the month, day, and year by tapping or . 5. Tap Set when finished. 6. Select a time for the event by tapping the time field and then adjusting the hour and minute by tapping or . 7. Tap the AM or PM button to change the value. 8. Tap Set when finished. 9. Tap the All day field to assign this as an all day event. If assigned as an all day event, the time fields are removed as options. 10. Assign the new calendar event to a current account by tapping the Calendar field and then selecting an account. For this example we are choosing a Google. • My calendar entries are stored locally on the device and not part of an email account. • Google/Gmail calendar entries are synchronized between your device and your online Google account. • Corporate calendar entries are synchronized between your device and either an Exchange Server or available from within Microsoft® Exchange. • default calendar entries are synchronized between your device and your default email account. 11. Tap OK when finished.
-
 1
1 -
2
-
3
-
4
-
5
-
6
-
7
-
8
-
9
-
10
-
11
-
12
-
13
-
14
-
15
-
16
-
17
-
18
-
19
-
20
-
21
-
22
-
23
-
24
-
25
-
26
-
27
-
28
-
29
-
30
-
31
-
32
-
33
-
34
-
35
-
36
-
37
-
38
-
39
-
40
-
41
-
42
-
43
-
44
-
45
-
46
-
47
-
48
-
49
-
50
-
51
-
52
-
53
-
54
-
55
-
56
-
57
-
58
-
59
-
60
-
61
-
62
-
63
-
64
-
65
-
66
-
67
-
68
-
69
-
70
-
71
-
72
-
73
-
74
-
75
-
76
-
77
-
78
-
79
-
80
-
81
-
82
-
83
-
84
-
85
-
86
-
87
-
88
-
89
-
90
-
91
-
92
-
93
-
94
-
95
-
96
-
97
-
 98
98 -
 99
99 -
 100
100 -
 101
101 -
 102
102 -
 103
103 -
 104
104 -
 105
105 -
 106
106 -
 107
107 -
 108
108 -
109
-
110
-
111
-
112
-
113
-
114
-
115
-
116
-
117
-
118
-
119
-
120
-
121
-
122
-
123
-
124
-
125
-
126
-
127
-
128
-
129
-
130
-
131
-
132
-
133
-
134
-
135
-
136
-
137
-
138
-
139
-
140
-
141
-
142
-
143
-
144
-
145
-
146
-
147
-
148
-
149
-
150
-
151
-
152
-
153
-
154
-
155
-
156
 |
 |
