Samsung SPH-M910 User Manual (user Manual) (ver.f3) (English) - Page 56
Adding a Number to a Contacts Entry, Editing a Contacts Entry’s Number
 |
View all Samsung SPH-M910 manuals
Add to My Manuals
Save this manual to your list of manuals |
Page 56 highlights
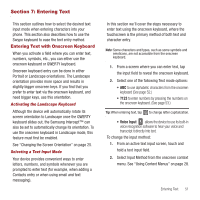
2. Tap Save to store your updates. Adding a Number to a Contacts Entry 1. From the Contact's overview screen, press and tap Edit. 2. From the phone numbers area, tap Add phone number to create a new empty Phone number field within the selected phone number category. 3. Tap the label button (to the left of the Phone number field) to select from an onscreen category such as: Mobile, Home, Work, Work Fax, Pager, Assistant, Other, or tap Custom. 4. Tap the Phone number field and use the onscreen dialpad to enter the new number. 5. Tap Save to update the new number to the existing Contacts entry. Editing a Contacts Entry's Number 1. From the Contact's overview screen, press and tap Edit. 2. Tap an existing phone number field. Note: Touch and hold the Phone number field to activate the Edit text menu. You can select editing options such as: Copy all. 3. Tap DEL to clear one digit at a time. 4. Re-enter or edit the number using the onscreen dialpad. Note: To hide an onscreen keypad, dialpad or keyboard, press . 5. Tap Save to update the number to the existing Contacts entry. Selecting a Ringtone Type for an Entry Assign a ringtone type to a Contacts entry so you can identify the caller by the ringtone type. (See "Ringtone Types" on page 102.) 1. From the Contact's overview screen, press and tap Edit. 2. Use either your finger or the Optical Joystick to scroll down the page and select within the Ringtone field to display the Ringtones menu. 3. Tap either Default Ringtone, Sounds, or Phone ringtone. • Sound allows you to access your microSD card and select a compatible music/sound file and use it as a ringtone. • Phone ringtone allows to select from an available list of device-specific ringtones. 4. Scroll through available ringtones. (To hear a sample ringtone, highlight or tap a ringtone entry.) 5. Tap OK to save the new ringtone type. Contacts 49
-
 1
1 -
2
-
3
-
4
-
5
-
6
-
7
-
8
-
9
-
10
-
11
-
12
-
13
-
14
-
15
-
16
-
17
-
18
-
19
-
20
-
21
-
22
-
23
-
24
-
25
-
26
-
27
-
28
-
29
-
30
-
31
-
32
-
33
-
34
-
35
-
36
-
37
-
38
-
39
-
40
-
41
-
42
-
43
-
44
-
45
-
46
-
47
-
48
-
49
-
50
-
 51
51 -
 52
52 -
 53
53 -
 54
54 -
 55
55 -
 56
56 -
 57
57 -
 58
58 -
 59
59 -
 60
60 -
 61
61 -
62
-
63
-
64
-
65
-
66
-
67
-
68
-
69
-
70
-
71
-
72
-
73
-
74
-
75
-
76
-
77
-
78
-
79
-
80
-
81
-
82
-
83
-
84
-
85
-
86
-
87
-
88
-
89
-
90
-
91
-
92
-
93
-
94
-
95
-
96
-
97
-
98
-
99
-
100
-
101
-
102
-
103
-
104
-
105
-
106
-
107
-
108
-
109
-
110
-
111
-
112
-
113
-
114
-
115
-
116
-
117
-
118
-
119
-
120
-
121
-
122
-
123
-
124
-
125
-
126
-
127
-
128
-
129
-
130
-
131
-
132
-
133
-
134
-
135
-
136
-
137
-
138
-
139
-
140
-
141
-
142
-
143
-
144
-
145
-
146
-
147
-
148
-
149
-
150
-
151
-
152
-
153
-
154
-
155
-
156
 |
 |
