Samsung SPH-M910 User Manual (user Manual) (ver.f3) (English) - Page 54
Groups, Contacts Menu Options, Create, name of, Add member, Select all, message
 |
View all Samsung SPH-M910 manuals
Add to My Manuals
Save this manual to your list of manuals |
Page 54 highlights
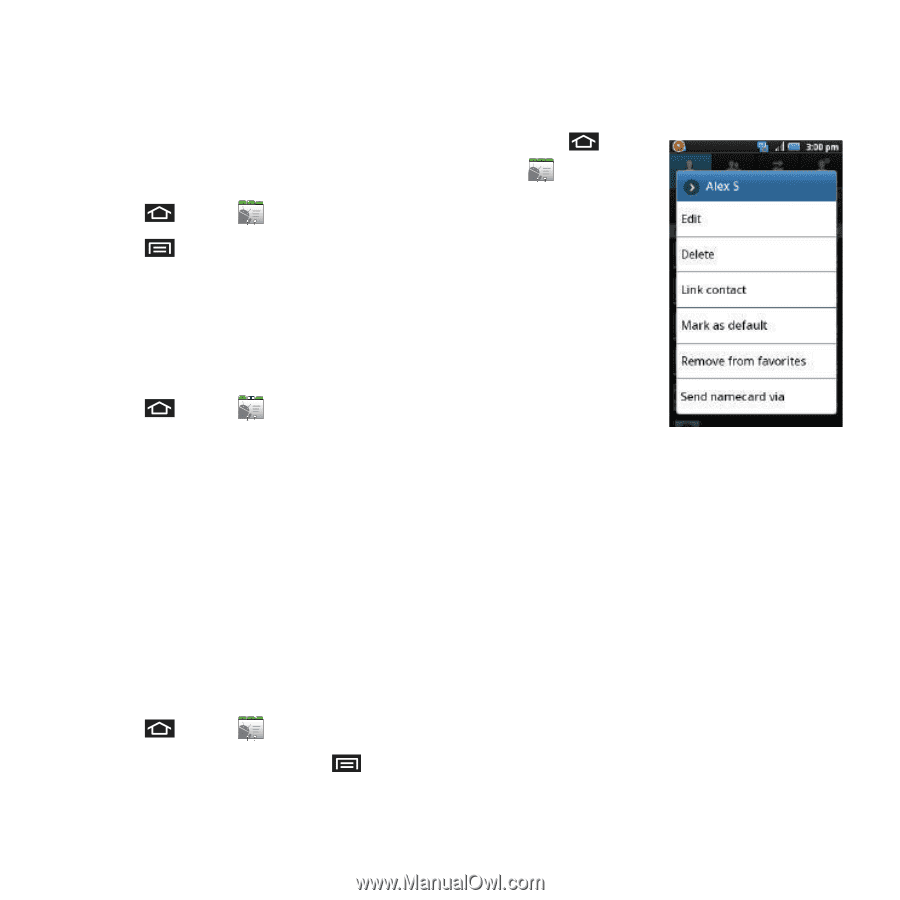
Groups This feature allows you to add a new or existing contact to a call group. This group can be one of the already present groups (Family, Friends, or Work) or a user-created group. To create a new group: 1. Press and tap ➔ Groups. 2. Press and tap Create. 3. Tap the Group field, and enter a group name and defining ringtone. 4. Tap Save to store the newly created group. To add an existing contact to a current group: 1. Press and tap ➔ Group ➔ [name of group]. 2. Tap Add member. 3. Locate an entry from the Contacts list. 4. From the list of contacts, tap the contact you want to add or tap Select all. (A green checkmark appears next to the entry.) 5. Tap Add to add the contact to your group. 6. Touch an existing group. To send a message to a group: 1. Press and tap ➔ Groups. 2. Tap an existing group, and press message. ➔ Send 3. Use the QWERTY keyboard to type your message, and tap Send. Contacts Menu Options 1. Press and tap . 2. Touch and hold an entry and select from the available contact menu options: • Edit to edit the currently selected Contacts entry. See "Editing a Contacts Entry" on page 48. • Delete to erase the currently selected Contacts entry. See "Deleting Entries" on page 50. • Link contact to link the current contact to another current contact. Similar to a "see also" feature. If you can't remember a contact's information, linking entries can help you find the person you are looking for. • Mark as default to assign one the entry's available numbers as the default (main) contact number. • Add to favorites to copy the current Contacts entry to the list within the Favorites tab (page 50). • Remove from favorites to remove the current Contacts entry fromthe list within the Favorites tab. Contacts 47
-
 1
1 -
2
-
3
-
4
-
5
-
6
-
7
-
8
-
9
-
10
-
11
-
12
-
13
-
14
-
15
-
16
-
17
-
18
-
19
-
20
-
21
-
22
-
23
-
24
-
25
-
26
-
27
-
28
-
29
-
30
-
31
-
32
-
33
-
34
-
35
-
36
-
37
-
38
-
39
-
40
-
41
-
42
-
43
-
44
-
45
-
46
-
47
-
48
-
 49
49 -
 50
50 -
 51
51 -
 52
52 -
 53
53 -
 54
54 -
 55
55 -
 56
56 -
 57
57 -
 58
58 -
 59
59 -
60
-
61
-
62
-
63
-
64
-
65
-
66
-
67
-
68
-
69
-
70
-
71
-
72
-
73
-
74
-
75
-
76
-
77
-
78
-
79
-
80
-
81
-
82
-
83
-
84
-
85
-
86
-
87
-
88
-
89
-
90
-
91
-
92
-
93
-
94
-
95
-
96
-
97
-
98
-
99
-
100
-
101
-
102
-
103
-
104
-
105
-
106
-
107
-
108
-
109
-
110
-
111
-
112
-
113
-
114
-
115
-
116
-
117
-
118
-
119
-
120
-
121
-
122
-
123
-
124
-
125
-
126
-
127
-
128
-
129
-
130
-
131
-
132
-
133
-
134
-
135
-
136
-
137
-
138
-
139
-
140
-
141
-
142
-
143
-
144
-
145
-
146
-
147
-
148
-
149
-
150
-
151
-
152
-
153
-
154
-
155
-
156
 |
 |