Singer One Instruction Manual 14 - Page 37
Straight, Stitching, Piqfire, point, droit, Punto, Recto
 |
View all Singer One manuals
Add to My Manuals
Save this manual to your list of manuals |
Page 37 highlights
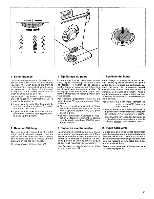
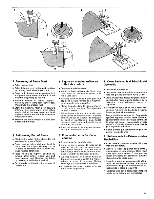
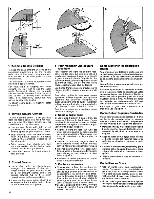
4. Straight Stitching 4. Piqfire au point droit 4. Punto Recto a b , \ . , N 5676 . • 1 2A BC c I I I 543 3456 ... t.'') t`17 Ile/ . , preparation Select straight stitoh. • Stitch length: to suit application or fabric • Straight stitch needle plate • Straight stitch foot Straight stitch needle plate and foot are best for all straight stitching. The straight stitch foot allows you to control the fabric easily when stitching around a curve or close to the fabric edge. The design of the foot helps prevent skipped stitches. The straight stitch foot should be used only with the straight stitch needle plate. Always change back to the appropriate needle plate and presser foot when doing sewing other than straight stitching. Upper Thread Tension Having selected the correct needle and thread combination for the fabric being used, it may be necessary to adjust the tension of the sewing machine to ensure a well balanced stitch. A well balanced stitch is produced when the upper and lower threads appear the same on the fabric, illustration a. YOur machine has an adjustable upper tension control system. This control exerts tension on the upper and lower threads as they pass through the machine to form a stitch. • Too much tension will produce a tight stitch which will cause puckered seams, illustration b. To decrease tension, turn dial to a lower number. • Too little tension will produce a loose stitch, illustration c. To increase tension, turn dial to a higher number. When an even amount of tension is exerted on both threads, a smooth even stitch known as a balanced stitch, is produced. 36 Preparation Selectionnez le point droit. • Longueur de point: en fonction de l'ouvrage et du tissu • Plaque a aiguille point droit • Pied point droit Le pied et la plaque a aiguille point droit sont indiques pour toutes les piciOres au point droit. Le pied point droit vous permet de contreler aisement le tissu lorsque vous piquez le long d'une courbe ou pres du bord du tissu. La conception du pied evite les sautes de points. Le pied point droit doit etre utilise uniqt,Jement avec la plaque a aiguille point droit. Changez toujours la plaque a aiguille et le pied presseur lorsque vous ne piquez pas au point droit. Tension du fil d'aiguille Apres avoir choisi l'aiguille et le fil conve- nant au tissu, vous aurez peut-etre a ajuster la tension pour obtenir un point bien equilibre, c'est a dire une similitude des points sur l'endroit et l'envers de l'ouvrage (illustration a). Le selecteur de tension permet de regler la tension des fils d'aiguill,e et de canette au moment de la formation des points. • Une tension trop forte provoque une couture trop serree qui fera grigner le tissu (illustration b). Pour reduire la tension, tournez le selecteur vers un chiffre inferieur. • Une tensibn trop faible produira des coutures laches, qui ne resisteraient pas a l'usage (illustration.c). Pour augmenter la tension, tournez le selecteur vers un chiffre superieur. Lorsque la tension est bien reglee, les points sont noues bien a plat, dans l'epaisseur du tissu. Ils sont alors equilibres. preparaci6n Elija el punto recto. • Longutud del punto: de acuerdo con la aplicaciOn o la tela • Plancha de aguja de punto recto • Prensatelas de punto recto La plancha de aguja y el prensatelas para el punto recto son lo mejor que se puede usar para toda clase de puntos rectos. El prensatelas para punto recto le permite a Usted controlar el material con mucha facilidad cuando cose alrededor de una curva o cerca del borde material. El disetio del prensatelas le ayuda a evitar que se salten los puntos. El prensatelas para el punto recto se ha de usar solamente con la plancha de aguja para punto recto. Siempre vuelva a la plancha de aguja y el prensatelas adecuados cuando cosa con otro punto que no sea el punto recto. Tension del Hilo Superior Despues de que haya elegido la correcta combinacion de aguja e hilo para el material que va a usar, es posible que sea necesario hacer un ajuste en la tensiOn de la maquina de coser para asegurarse de que ha de conseguir un punto bien equilibrado. Un punto bien equilibrado se produce cuando el hilo superior y el hilo inferior aparecen iguales en el material. Ilustracion A. Su maquina tiene un sistema de control de la tensiOn superior ajustable. Este control ejerce tension en el hilo superior y el hilo inferior al mismo tiempo que los hilos pasan a traves de la maquina para formar el punto. Demasiada tension le poducira un punto muy apretado que sera la causa de costuras arrugadas, ilustraciOn B. Para disminuir la tension, gire el disco a un raimero mas bajo. Muy poca tension le producird un punto suelto, ilustraciOp C. Para aumentar la tension, gire el disco a un numero mas alto. Cuando una tensiOn equilibrada se ejerce en ambos hilos, se produce un punto uniforme y nivelado que se conoce con el nombre de punto equilibrado.
-
 1
1 -
2
-
3
-
4
-
5
-
6
-
7
-
8
-
9
-
10
-
11
-
12
-
13
-
14
-
15
-
16
-
17
-
18
-
19
-
20
-
21
-
22
-
23
-
24
-
25
-
26
-
27
-
28
-
29
-
30
-
31
-
 32
32 -
 33
33 -
 34
34 -
 35
35 -
 36
36 -
 37
37 -
 38
38 -
 39
39 -
 40
40 -
 41
41 -
 42
42 -
43
-
44
-
45
-
46
-
47
-
48
-
49
-
50
-
51
-
52
-
53
-
54
-
55
-
56
-
57
-
58
-
59
-
60
-
61
-
62
-
63
-
64
-
65
-
66
-
67
-
68
-
69
-
70
-
71
-
72
-
73
-
74
-
75
-
76
-
77
-
78
-
79
-
80
-
81
-
82
-
83
-
84
-
85
-
86
-
87
-
88
-
89
-
90
 |
 |
