Singer One Instruction Manual 14 - Page 40
Reinforcing
 |
View all Singer One manuals
Add to My Manuals
Save this manual to your list of manuals |
Page 40 highlights
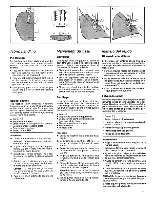
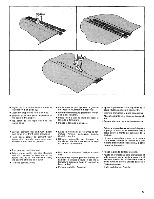
2 Ill l 56 0 a III II I 6 O V C, //r1I 4' X O N 0" 1 Reversing at Seam Start • Raise presser foot. • Raise take-up lever to highest position by turning hand wheel toward you. • Draw both threads under presser foot and place them toward the back of the machine diagonally to the left. a Position needle in fabric approximately 1/2 cm (1/4 inch) from fabric edge. Then lower the presser foot. b Start the machine. After a few forward stitches have been sewn, press stitch length dial all the way down and hold in place. Sew a few stitches in reverse to lock the seam. • Release the stitch length dial and sew in forward direction. 2 Reinforcing End of Seam • Stitch to the edge of the fabric. (Do not sew beyond edge of fabric) • Press reverse stitch dial and hold in place. Backstitch approximately 1.5 cm (1/2 inch) to reinforce end of seam. Release reverse stitch dial. • Raise needle to highest position by turning hand wheel toward you and raise presser foot. Remove the fabric by drawing it to the back and left. • Cut threads on thread cutter at rear of presser bar. 1 Piqure en marche arriere en debut de couture 1. Coser hacia atras al Principio del Dobladillo • Soulevez le pied presseur. • Mettez le levier releveur de fil en position haute en tournant le volant, a la main, vers vous. • Tirez les deux fits sous le pied presseur et placez-les vers ('arriere de la machine, en diagonale vers la gauche. a Placez I'aiguille dans le tissu a environ V2 cm du bord du tissu. Puis abaissez le pied presseur. b Faites demarrer la machine. Apres quelques points en marche avant, appuyez fermement sur le cadran de longueur de point et maintenez-le ainsi. Faites quelques points en marche arriere pour renforcer la couture. • Relachez le cadran de longueur de point et piquez en marche avant. 2 Pour renforcer la fin d'une couture • Piquez jusqu'au bord du tissu. • Appuyez sur le cadran de longueur de point et, sans le relacher, piquez quelques points (environ 1 cm) en marche arriere pour arreter votre couture. Relachez le cadran de longueur de point. • Amenez l'taiguille en position haute en tournant vers vous le volant a la main et relevez le levier du presseur. Retirez I'ouvrage par l'arriere de la machine. • Coupez les fits sur le coupe-fil a ('arriere de la barre du presseur. • Levante el prensatelas. • Levante la palanca tira-hilo a su posiciOn mas alta girando el volante hacia Usted. • Lleve ambos hilos debajo del prensatelas y posiciOnelos hacia la parte posterior de la maquina, diagonalmente hacia la izquierda. a. Posicione la aguja en la tela a aproximadamente 1/2 cms. del borde de la misma. Entonces, baje el prensatelas. b. Ponga la maquina en marcha. Despues de ejecutar algunos puntos hacia adelante, apriete totalmente el disco que controla la longitud del punto y mantengalo en esta posiciOn. Cosa algunos puntos hacia atras para sujetar el dobladillo. • Suelte el disco que controla la longitud del punto y cosa adelante. 2. Reforzado de los Extremos de los Dobladillos • Cosa hasta el borde del material. (No cosa mas alla del borde). • Apriete el disco de punto hacia atras y mantengalo en esta posiciOn. Cosa hacia atras aproximadamente 1,5 cms. para reforzar el extremo del dobladillo. Suelte el disco de punto hacia atras. • Levante la aguja a su posicion mas alta girando el volante hacia Usted y levante el prensatelas. Saque el material Ilevandolo hacia atras y hacia la izquierda. • Corte los hilos con el corta-hilos en la parte posterior de la barra del prensatelas. 39
-
 1
1 -
2
-
3
-
4
-
5
-
6
-
7
-
8
-
9
-
10
-
11
-
12
-
13
-
14
-
15
-
16
-
17
-
18
-
19
-
20
-
21
-
22
-
23
-
24
-
25
-
26
-
27
-
28
-
29
-
30
-
31
-
32
-
33
-
34
-
 35
35 -
 36
36 -
 37
37 -
 38
38 -
 39
39 -
 40
40 -
 41
41 -
 42
42 -
 43
43 -
 44
44 -
 45
45 -
46
-
47
-
48
-
49
-
50
-
51
-
52
-
53
-
54
-
55
-
56
-
57
-
58
-
59
-
60
-
61
-
62
-
63
-
64
-
65
-
66
-
67
-
68
-
69
-
70
-
71
-
72
-
73
-
74
-
75
-
76
-
77
-
78
-
79
-
80
-
81
-
82
-
83
-
84
-
85
-
86
-
87
-
88
-
89
-
90
 |
 |
