Sony RM-AX4000 AX Remote Editor Ver.1.0 Help - Page 109
Adding a Learn action Learn dialog box, Checking the action of the Action list
 |
UPC - 027242677036
View all Sony RM-AX4000 manuals
Add to My Manuals
Save this manual to your list of manuals |
Page 109 highlights
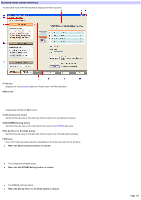
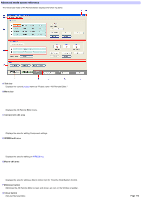
Note If the XPRESS function is set as an Alias action, Exit Macro w ill not w ork. [Add] Adds the Alias action programmed for the selected item is added to the Action list. [OK] Saves the setting of the Action list, and the "Edit actions" dialog box closes. [Cancel] Cancels the setting for the Action list, and the "Edit actions" dialog box closes. [Test] Opens the "Test" dialog box for you to check if the Action list w orks properly. For further details, see "Checking the action of the Action list" below . Adding a Learn action ("Learn" dialog box) The "Adding a Learn action" dialog box allow s you to teach the remote control signal of an AV component to a key/button for a component/XPRESS key. This operation adds the Learn action (or the Learn+ action) to the Action list of the key/button. After the "Learn" dialog box appears, perform the follow ing steps. 1. Conne ct the Re m ote Com m ande r (RM -AX4000) to your PC w ith the USB m ini cable . Note s Do not disconnect the USB mini cable from your PC w hile teaching the remote control signals, otherw ise a malfunction may occur. Only connect one Remote Commander to your PC at a time. Otherw ise, teaching may not be successful. 2. Follow ing the on-s cre e n ins tructions, place the Re m ote Com m ande r (RM -AX4000) he ad to head w ith the AV com pone nt's re m ote control w hose signal you w ant to teach. 3. Click "Learn." The Remote Commander (RM-NX4000) goes to standby mode. Hint If you check the "Save remote control signal as raw data" box, the remote control signal of the AV component is programmed as the raw -data onto the Remote Commander. If the AV component does not w ork properly w hen a learned key is pressed, check this box to try the learning. In this case, the learned data is larger than normal learning. 4. Press and hold dow n the button on the rem ote control until "Learning com pleted" appears. If "Learning is complete." appear, learning w as successful. Hints If "A time out error: 60 seconds has passed" appears, click [OK] and redo from step 3. If "The Remote Commander is not connected or not responding." appears, the Remote Commander (RM-AX4000) may not be connected to your PC properly. After checking the connection, click "Retry" to repeat the operation. 5. Click "OK" in the m essage box. The message box closes, and the follow ing action is added to the Action list. If a Preset action is in the Action list The Learn+ action replaces the Preset action. If a Preset action is not in the Action list The Learn action is added. Checking the action of the Action list The "Edit actions" dialog box allow s you to check if the Action list w orks properly. For the checking, perform the follow ing steps. 1. Conne ct the Re m ote Com m ande r (RM -AX4000) to your PC w ith the USB m ini cable . Note s Do not disconnect the USB mini cable from your PC w hile the checking, otherw ise a malfunction may occur. Only connect one Remote Commander to your PC at a time. Otherw ise, you w on't be able to check the action correctly. 2. Aim the Re m ote Com m ande r at the AV com pone nt you w ant to ope rate , the n click "Te s t." A message box appears. 3. Follow ing the on-s cre e n ins tructions, pre pare the AV com pone nt you w ant to ope rate and click "OK." The "Test" dialog box appears. 4. Click "Se nd." The signal programmed for the Remote Commander as an Action list is sent to the AV component. Check if the AV component w orks properly. 5. After checking, click "Cance l." The "Test" dialog box closes, and the screen returns to the "Edit Actions" dialog box. Page 109
-
 1
1 -
2
-
3
-
4
-
5
-
6
-
7
-
8
-
9
-
10
-
11
-
12
-
13
-
14
-
15
-
16
-
17
-
18
-
19
-
20
-
21
-
22
-
23
-
24
-
25
-
26
-
27
-
28
-
29
-
30
-
31
-
32
-
33
-
34
-
35
-
36
-
37
-
38
-
39
-
40
-
41
-
42
-
43
-
44
-
45
-
46
-
47
-
48
-
49
-
50
-
51
-
52
-
53
-
54
-
55
-
56
-
57
-
58
-
59
-
60
-
61
-
62
-
63
-
64
-
65
-
66
-
67
-
68
-
69
-
70
-
71
-
72
-
73
-
74
-
75
-
76
-
77
-
78
-
79
-
80
-
81
-
82
-
83
-
84
-
85
-
86
-
87
-
88
-
89
-
90
-
91
-
92
-
93
-
94
-
95
-
96
-
97
-
98
-
99
-
100
-
101
-
102
-
103
-
 104
104 -
 105
105 -
 106
106 -
 107
107 -
 108
108 -
 109
109 -
 110
110 -
 111
111 -
 112
112 -
 113
113 -
 114
114 -
115
-
116
-
117
-
118
 |
 |