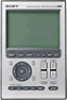
Sony RM-AX4000 AX Remote Editor Ver.1.0 Help - Page 16
Option1: Start Macro - remote commander
 |
UPC - 027242677036
View all Sony RM-AX4000 manuals
Add to My Manuals
Save this manual to your list of manuals |
Page 16 highlights
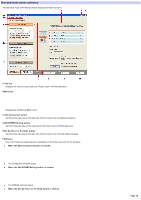
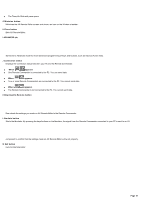
12. Ente r the follow ing inform ation re garding the input s e le ction of the vide o com pone nt, the n click "Ne xt". o What is the total num ber of inputs you can select from the on screen m enu? o Click and select the number. o Which input do you select w hen you use "Source com ponent nam e"? o Enter the input name in the text box. o In w hat order does your selection (in [2]) appear on the list (1st, 2nd, 3rd, etc.)? o Select the order number by clicking . 13. Se le ct w hich input is highlighte d w he n you pre s s the input s e le ct button on the re m ote control, then click "Ne xt." After this selection, go to step 15. 14. Ente r the follow ing inform ation re garding the input s e le ction of the vide o com pone nt, the n click "Ne xt". o What is the total num ber of inputs you can change by pressing the Input Select button? o Click and select the number. o Which input do you select w hen you use "Source com ponent nam e"? o Enter the input name in the text box. o Where does the input (in [2]) stand from the initial input? o Select the order number by clicking . 15. Follow ing the on-s cre e n ins tructions, place the Re m ote Com m ande r (RM -AX4000) he ad to head w ith the AV com pone nt's re m ote control w hose preset code you w ant to program . Note Make sure that the Remote Commander (RM-AX4000) is connected to your PC. 16. Click "Learn." The "Learn" dialog box appears, and the Remote Commander (RM-AX4000) goes to standby mode. 17. Operate the rem ote control according to the on-screen instructions. "Learning is complete" appears w hen learning is successful. Keep follow ing the on-screen instructions. The "Learning is complete" message box show s "OK" w hen learning is complete. Hints o If "A time out error: 60 seconds has passed" appears, click [OK] and redo from step 16. o If "The Remote Commander is not connected or not responding." appears, the Remote Commander (RM-AX4000) may not be connected to your PC properly. After checking the connection, click "Retry" to repeat the operation. 18. Click "OK." The message box closes and the screen returns to "XPRESS Settings - Learn." 19. Click "Ne xt." The "XPRESS Settings - Pow er Button on your Remote Control of the Audio Component" screen appears. 20. Se t the inform ation re garding the audio com pone nt's re m ote control in the s am e w ay as for the vide o com pone nt (s how n in ste ps 9 to18). 21. Whe n finis he d, the n click "Ne xt." The "XPRESS Settings - Pow er Button on your Remote Control of the Source Component" screen appears. 22. Se le ct the type of pow e r button on the s ource com pone nt's re m ote control, then click "Ne xt." The "XPRESS Settings - Learn" screen appears. 23. M ak e the Re m ote Com m ande r le arn the s ource com pone nt's re m ote control s ignal in the s am e w ay as for the vide o com pone nt (show n in steps 15 to18). 24. Whe n le arning is com ple te , click "Ne xt." The "XPRESS Settings - Options" screen appears. 25. Se t the follow ing options : o Option1: Start Macro o Select this to set additional actions (Start macro) to w ork w hen operating an XPRESS key. If an action is not necessary, uncheck the box. o Option2: Exit M acro o Select this to set additional actions (Exit macro) to w ork w henever you sw itch to another XPRESS display. If an action is not necessary, uncheck the box. 26. Click "Ne xt." The "XPRESS Settings - Checking the Operations" screen appears. This screen allow s you to check if the Start macro added in step 25 w orks properly. Note Before checking, make sure that the Remote Commander (RM-AX4000) is connected to your PC. 27. Aim the Re m ote Com m ande r at the AV com pone nt you w ant to ope rate , the n click "Te s t." A message box appears. 28. Follow ing the on-s cre e n ins tructions, pre pare the AV com pone nt you w ant to ope rate and click "OK." The "Test" dialog box appears. Page 16
-
 1
1 -
2
-
3
-
4
-
5
-
6
-
7
-
8
-
9
-
10
-
 11
11 -
 12
12 -
 13
13 -
 14
14 -
 15
15 -
 16
16 -
 17
17 -
 18
18 -
 19
19 -
 20
20 -
 21
21 -
22
-
23
-
24
-
25
-
26
-
27
-
28
-
29
-
30
-
31
-
32
-
33
-
34
-
35
-
36
-
37
-
38
-
39
-
40
-
41
-
42
-
43
-
44
-
45
-
46
-
47
-
48
-
49
-
50
-
51
-
52
-
53
-
54
-
55
-
56
-
57
-
58
-
59
-
60
-
61
-
62
-
63
-
64
-
65
-
66
-
67
-
68
-
69
-
70
-
71
-
72
-
73
-
74
-
75
-
76
-
77
-
78
-
79
-
80
-
81
-
82
-
83
-
84
-
85
-
86
-
87
-
88
-
89
-
90
-
91
-
92
-
93
-
94
-
95
-
96
-
97
-
98
-
99
-
100
-
101
-
102
-
103
-
104
-
105
-
106
-
107
-
108
-
109
-
110
-
111
-
112
-
113
-
114
-
115
-
116
-
117
-
118
 |
 |