Sony RM-AX4000 AX Remote Editor Ver.1.0 Help - Page 95
Creating a project in Advanced mode, Select the folder in w hich you w ant to create the project
 |
UPC - 027242677036
View all Sony RM-AX4000 manuals
Add to My Manuals
Save this manual to your list of manuals |
Page 95 highlights
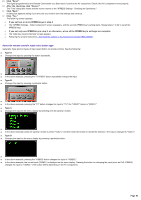
Creating a project in Advanced mode You can create a project in Advanced mode. 1. Click "File " on the m e nu bar, the n s e le ct "Ne w ." The "New Project" dialog box appears. Hint If the project you are editing is not saved, a message box appears asking you to confirm saving before the "New Project" dialog box appears. To save the project, click "Yes," otherw ise, click "No." 2. Click "Advance d," the n click "OK." The "New Project" w izard appears. 3. Ente r a proje ct nam e unde r "Input a proje ct folde r nam e ," ne xt to . 4. Click under "Save the project folder in." A dialog box appears for you to select a folder. Hint The "Save the project folder in" field show s the folder (location) in w hich you created a project or saved the project under a different name last time. The first time you start AX Remote Editor, the field show s the Window s desktop. 5. Se le ct the folde r in w hich you w ant to cre ate the project, the n click "OK." The dialog box closes, and the selected folder is displayed to the left side of . 6. Click "OK." The "New " dialog box closes, and the new project named in step 3 is created. The project is displayed in Advanced mode on the AX Remote Editor screen. Page 95
-
 1
1 -
2
-
3
-
4
-
5
-
6
-
7
-
8
-
9
-
10
-
11
-
12
-
13
-
14
-
15
-
16
-
17
-
18
-
19
-
20
-
21
-
22
-
23
-
24
-
25
-
26
-
27
-
28
-
29
-
30
-
31
-
32
-
33
-
34
-
35
-
36
-
37
-
38
-
39
-
40
-
41
-
42
-
43
-
44
-
45
-
46
-
47
-
48
-
49
-
50
-
51
-
52
-
53
-
54
-
55
-
56
-
57
-
58
-
59
-
60
-
61
-
62
-
63
-
64
-
65
-
66
-
67
-
68
-
69
-
70
-
71
-
72
-
73
-
74
-
75
-
76
-
77
-
78
-
79
-
80
-
81
-
82
-
83
-
84
-
85
-
86
-
87
-
88
-
89
-
 90
90 -
 91
91 -
 92
92 -
 93
93 -
 94
94 -
 95
95 -
 96
96 -
 97
97 -
 98
98 -
 99
99 -
 100
100 -
101
-
102
-
103
-
104
-
105
-
106
-
107
-
108
-
109
-
110
-
111
-
112
-
113
-
114
-
115
-
116
-
117
-
118
 |
 |