Sony RM-AX4000 AX Remote Editor Ver.1.0 Help - Page 83
Changing the Timer function
 |
UPC - 027242677036
View all Sony RM-AX4000 manuals
Add to My Manuals
Save this manual to your list of manuals |
Page 83 highlights
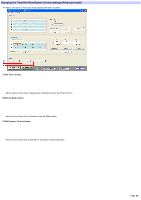
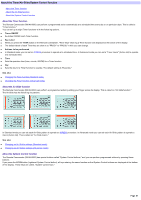
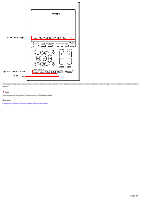
Changing the Timer function (Advanced mode) The Timer function allow s you to set the Remote Commander to operate a series of actions, called a macro (Action list), at a scheduled time. (Timer macro) You can set up to eight Timer macros. 1. Click the "Advanced" tab in the low er left of the screen to sw itch to Advanced m ode. 2. Click "Edit Tim e r" in the low e r le ft of the s cre e n. The 'Edit Timer" dialog box appears. This dialog box allow s you to set the follow ing: o ON/OFF o Sw itches ON/OFF each Timer program. o : The Timer program is on. Click to deactivate the Timer program. o : The Timer program is off. Click to activate the Timer program. o Key Label o Makes a label for a Timer key. The default labels are show n as "PROG1" to "PROG8." o By clicking the button, the "Edit Label" dialog box appears. Enter a label and click "OK" to update the information. Hint You can enter up to eight characters. How ever, the label cannot be left blank. Be sure to enter at least one character. By clicking "Symbol," the "Symbol select" dialog box appears. This dialog box allow s you to enter symbols such as . The "Label" text box allow s you to copy and paste characters by using the shortcut menu (right-click menu) or the shortcut keys. o Tim er Macro o By clicking "Edit Actions," the "Edit Actions" dialog box appears. This dialog box allow s you to add/change/delete the action of a Timer macro or change the action order. o Tim e o Sets the operation time (hour, minute, AM/PM) for a Timer macro. o For the hour/minute setting, enter the digit or click . For the AM/PM setting, click and select from the drop-dow n list. o Day o Set the day for the Timer macro to operate. The default setting is "Everyday." o Click the day setting button to display the "Edit Day" dialog box, w hich show s the follow ing options: Everyday Operates everyday. Weekday Operates w eekdays. Weekend Operates at the scheduled time on w eekends. Sunday - Saturday Operates at the scheduled time and day. Check only the box of the day w hen you w ant to operate the Timer macro. o [Clear] o Returns to the initial setting. 3. Click "OK." The Timer program is changed and the "Edit Timer" dialog box closes. Page 83
-
 1
1 -
2
-
3
-
4
-
5
-
6
-
7
-
8
-
9
-
10
-
11
-
12
-
13
-
14
-
15
-
16
-
17
-
18
-
19
-
20
-
21
-
22
-
23
-
24
-
25
-
26
-
27
-
28
-
29
-
30
-
31
-
32
-
33
-
34
-
35
-
36
-
37
-
38
-
39
-
40
-
41
-
42
-
43
-
44
-
45
-
46
-
47
-
48
-
49
-
50
-
51
-
52
-
53
-
54
-
55
-
56
-
57
-
58
-
59
-
60
-
61
-
62
-
63
-
64
-
65
-
66
-
67
-
68
-
69
-
70
-
71
-
72
-
73
-
74
-
75
-
76
-
77
-
 78
78 -
 79
79 -
 80
80 -
 81
81 -
 82
82 -
 83
83 -
 84
84 -
 85
85 -
 86
86 -
 87
87 -
 88
88 -
89
-
90
-
91
-
92
-
93
-
94
-
95
-
96
-
97
-
98
-
99
-
100
-
101
-
102
-
103
-
104
-
105
-
106
-
107
-
108
-
109
-
110
-
111
-
112
-
113
-
114
-
115
-
116
-
117
-
118
 |
 |