Toshiba 50L3400U User's Guide for 40L3400U and 50L3400U Series TV's - Page 28
Connecting a Blu-ray, DVD player, satellite receiver with, ColorStream, or VCR
 |
View all Toshiba 50L3400U manuals
Add to My Manuals
Save this manual to your list of manuals |
Page 28 highlights
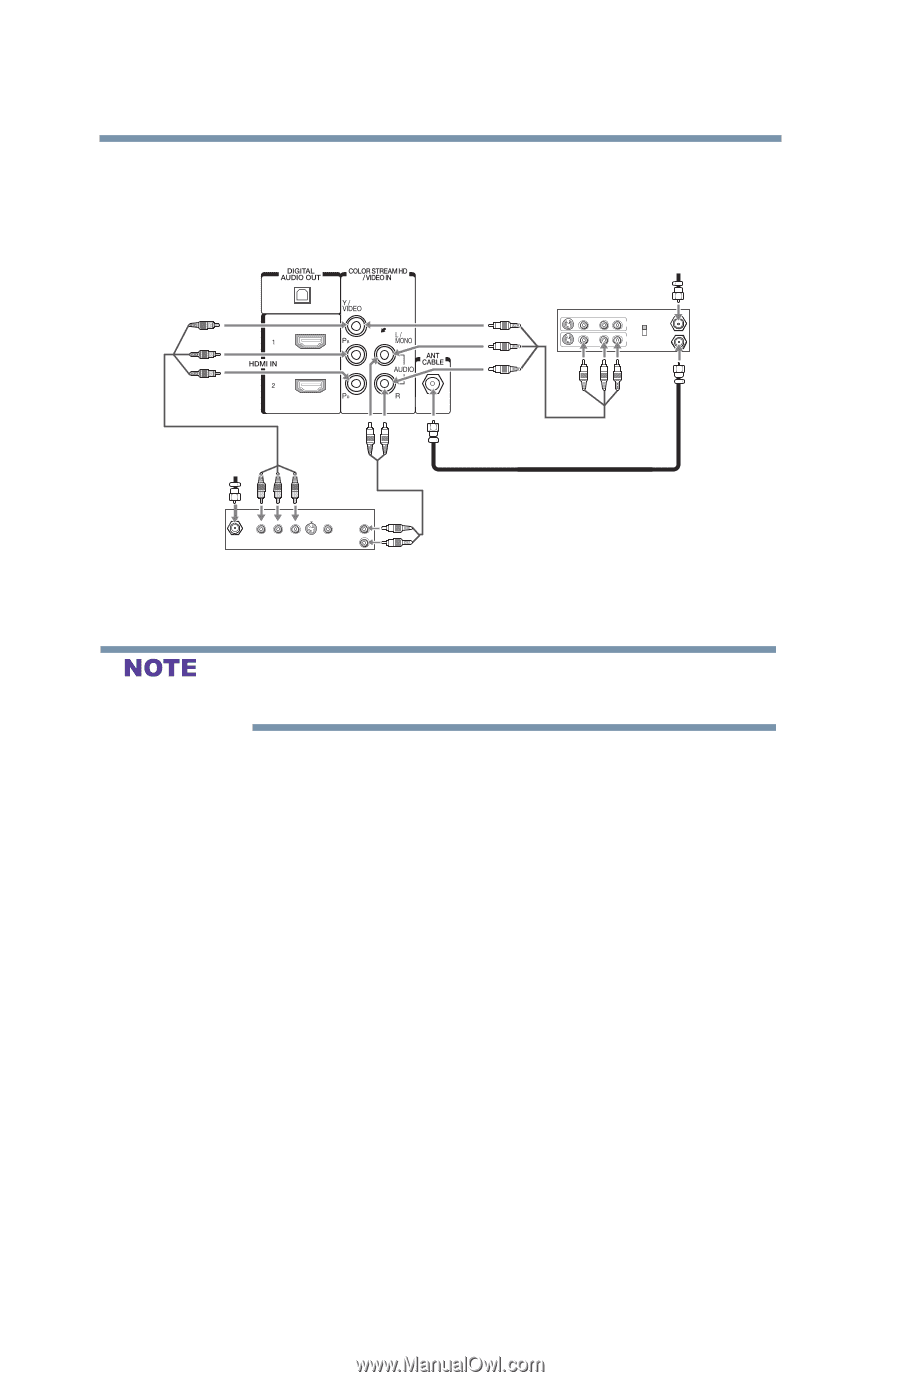
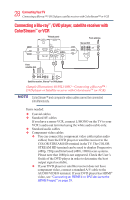
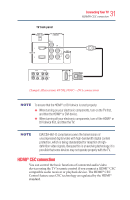
28 ConnectingYourTV Connecting a Blu-ray™ / DVD player, satellite receiver with ColorStream™ or VCR Connecting a Blu-ray™ / DVD player, satellite receiver with ColorStream™ or VCR TV back panel From antenna Stereo VCR VIDEO AUDIO L R IN CH 3 CH 4 OUT L R IN from ANT OUT to TV From satellite dish Y PB PR Satellite IN COMPONENT VIDEO S-VIDEO VIDEO OUT OUT AUDIO OUT L R Satellite receiver, Blu-rayTM or DVD player (Sample Illustration) 40/50L3400U-Connecting a Blu-ray™ / DVD player or Satellite receiver with ColorstreamTM (or VCR). ColorStreamTM and composite video cables cannot be connected simultaneously. Items needed: v Coaxial cables v Standard AV cables If you have a mono VCR, connect L/MONO on the TV to your VCR's audio out terminal using the white audio cable only. v Standard audio cables v Component video cables v You can connect the component video cables (plus audio cables) from the DVD player or satellite receiver to the COLOR STREAM HD terminal in the TV. The COLOR STREAM HD terminal can be used to display Progressive (480p, 720p) and Interlaced (480i, 1080i) scan systems. Please note that 1080p is not supported. Check the User's Guide of the DVD player in order to determine the best output signal available. v If your DVD player or satellite receiver does not have component video, connect a standard A/V cable to the AUDIO/VIDEO terminal. If your DVD player has HDMI® video, see "Connecting an HDMI® or DVI device to the HDMI® input" on page 29.
-
 1
1 -
2
-
3
-
4
-
5
-
6
-
7
-
8
-
9
-
10
-
11
-
12
-
13
-
14
-
15
-
16
-
17
-
18
-
19
-
20
-
21
-
22
-
 23
23 -
 24
24 -
 25
25 -
 26
26 -
 27
27 -
 28
28 -
 29
29 -
 30
30 -
 31
31 -
 32
32 -
 33
33 -
34
-
35
-
36
-
37
-
38
-
39
-
40
-
41
-
42
-
43
-
44
-
45
-
46
-
47
-
48
-
49
-
50
-
51
-
52
-
53
-
54
-
55
-
56
-
57
-
58
-
59
-
60
-
61
-
62
-
63
-
64
-
65
-
66
-
67
-
68
-
69
-
70
-
71
-
72
-
73
-
74
-
75
-
76
-
77
-
78
-
79
-
80
-
81
-
82
-
83
-
84
-
85
-
86
-
87
-
88
-
89
-
90
-
91
-
92
-
93
-
94
-
95
-
96
-
97
-
98
-
99
-
100
-
101
-
102
-
103
-
104
-
105
-
106
-
107
-
108
-
109
-
110
-
111
-
112
-
113
-
114
-
115
-
116
-
117
-
118
-
119
-
120
-
121
-
122
-
123
-
124
-
125
-
126
-
127
-
128
-
129
-
130
-
131
-
132
-
133
-
134
-
135
-
136
-
137
-
138
-
139
-
140
-
141
-
142
 |
 |