Toshiba 50L3400U User's Guide for 40L3400U and 50L3400U Series TV's - Page 65
Using the Auto Aspect feature, Using the 4:3 Stretch
 |
View all Toshiba 50L3400U manuals
Add to My Manuals
Save this manual to your list of manuals |
Page 65 highlights
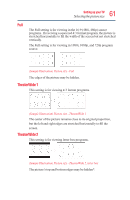
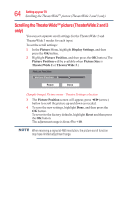
65 Setting up your TV Using theUAsiuntgotAhsep4e:c3tSfetraettucrhe Using the Auto Aspect feature When this feature is set to On, the TV will automatically select the picture size when one of the following input sources is received: v A 480i, 480p, 720p, 1080i digital signal from the ANT/CABLE input. v 480i, 480p, 720p, 1080i, 1080p, or VGA (60Hz) signal from the HDMI® inputs. Aspect Ratio of Signal Automatic Aspect Size (automatically selected when Auto Source Aspect is On) 4:3 Normal 4:3 4:3 Letter Box TheaterWide 2 16:9 Full Full Not defined (no ID-1 data or HDMI® aspect data) The current picture size you selected, see "Selecting the picture size" on page 60. To turn on the auto aspect ratio feature: 1 Press the MENU button and open the Picture menu. 2 Highlight Display Settings, and then press the OK button. 3 In the Auto Aspect field, press the OK button, and then select On. To turn off the Auto Aspect ratio feature, Select Off in step 3 above. Using the 4:3 Stretch When 4:3 Stretch is activated, the TV displays 4:3 programs as a full-screen picture. 1 From the Picture menu, highlight Display Settings, and then press the OK button. 2 Press the ▲/▼(arrow) buttons to select 4:3 Stretch, and then press the OK button. 3 Press the ▲/▼(arrow) buttons to select On or Off, and then press the OK button This feature is available when Auto Aspect is set to On.
-
 1
1 -
2
-
3
-
4
-
5
-
6
-
7
-
8
-
9
-
10
-
11
-
12
-
13
-
14
-
15
-
16
-
17
-
18
-
19
-
20
-
21
-
22
-
23
-
24
-
25
-
26
-
27
-
28
-
29
-
30
-
31
-
32
-
33
-
34
-
35
-
36
-
37
-
38
-
39
-
40
-
41
-
42
-
43
-
44
-
45
-
46
-
47
-
48
-
49
-
50
-
51
-
52
-
53
-
54
-
55
-
56
-
57
-
58
-
59
-
 60
60 -
 61
61 -
 62
62 -
 63
63 -
 64
64 -
 65
65 -
 66
66 -
 67
67 -
 68
68 -
 69
69 -
 70
70 -
71
-
72
-
73
-
74
-
75
-
76
-
77
-
78
-
79
-
80
-
81
-
82
-
83
-
84
-
85
-
86
-
87
-
88
-
89
-
90
-
91
-
92
-
93
-
94
-
95
-
96
-
97
-
98
-
99
-
100
-
101
-
102
-
103
-
104
-
105
-
106
-
107
-
108
-
109
-
110
-
111
-
112
-
113
-
114
-
115
-
116
-
117
-
118
-
119
-
120
-
121
-
122
-
123
-
124
-
125
-
126
-
127
-
128
-
129
-
130
-
131
-
132
-
133
-
134
-
135
-
136
-
137
-
138
-
139
-
140
-
141
-
142
 |
 |
