Toshiba Tecra M2V-S310 User Guide - Page 162
Accessing TOSHIBA HW Setup, press the TOSHIBA
 |
View all Toshiba Tecra M2V-S310 manuals
Add to My Manuals
Save this manual to your list of manuals |
Page 162 highlights
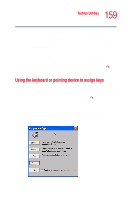
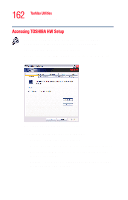
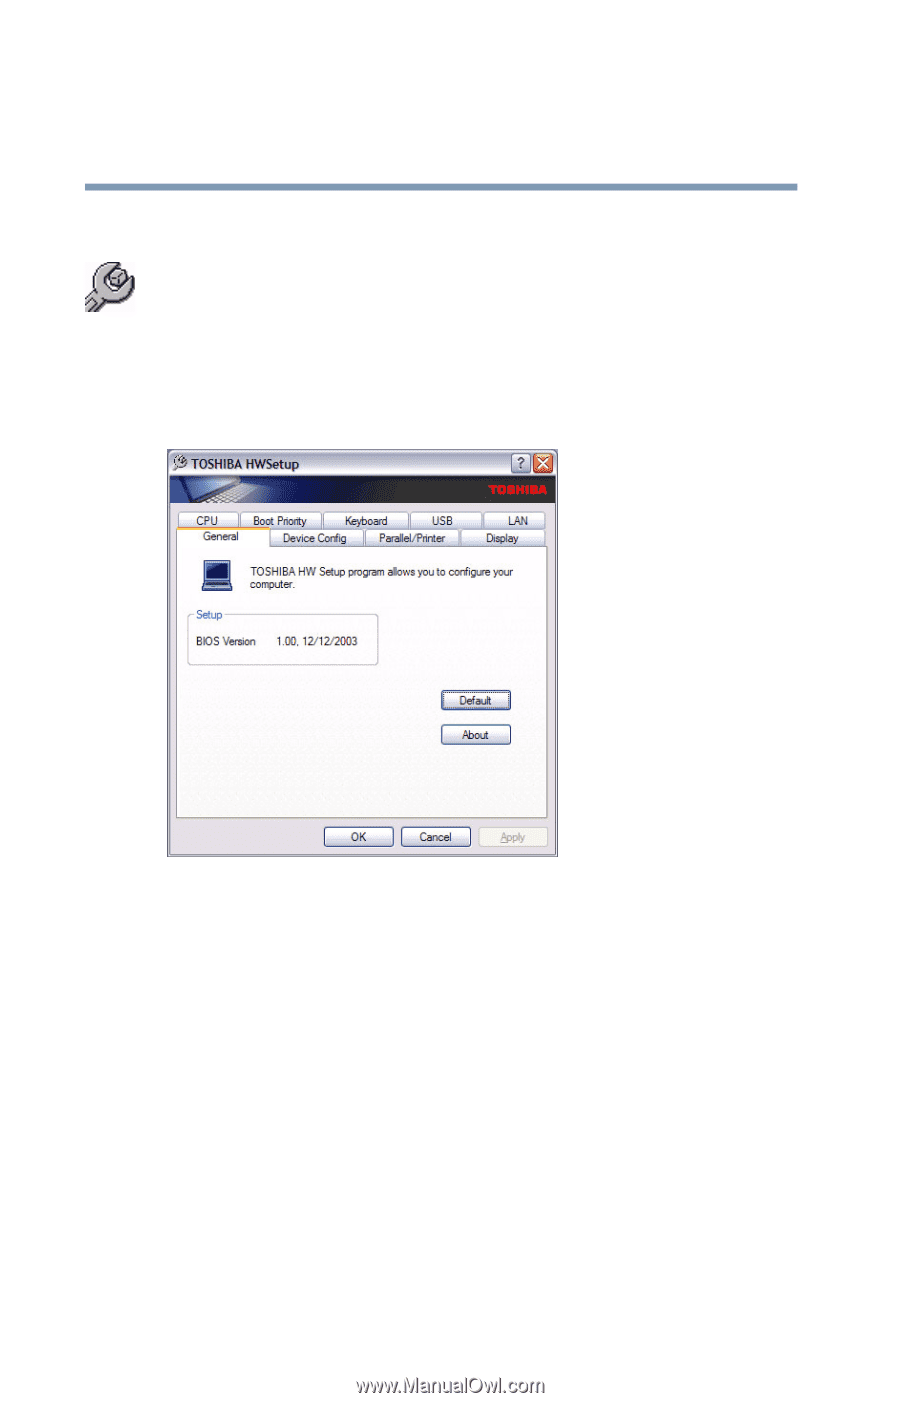
162 Toshiba Utilities TOSHIBA HW Setup Accessing TOSHIBA HW Setup To access TOSHIBA HW Setup, press the TOSHIBA Console button above the left side of the keyboard. The TOSHIBA Console screen appears. Double-click on the HW Setup icon to open the HW Setup dialog box. Sample TOSHIBA HW Setup tab options Toshiba HW Setup has the following tabs: ❖ General-Shows the BIOS version ❖ Device Config-Shows the Device configuration options ❖ Parallel/Printer-Allows you to configure the parallel port default settings ❖ Display-Allows you to change various default settings for the built-in LCD display
-
 1
1 -
2
-
3
-
4
-
5
-
6
-
7
-
8
-
9
-
10
-
11
-
12
-
13
-
14
-
15
-
16
-
17
-
18
-
19
-
20
-
21
-
22
-
23
-
24
-
25
-
26
-
27
-
28
-
29
-
30
-
31
-
32
-
33
-
34
-
35
-
36
-
37
-
38
-
39
-
40
-
41
-
42
-
43
-
44
-
45
-
46
-
47
-
48
-
49
-
50
-
51
-
52
-
53
-
54
-
55
-
56
-
57
-
58
-
59
-
60
-
61
-
62
-
63
-
64
-
65
-
66
-
67
-
68
-
69
-
70
-
71
-
72
-
73
-
74
-
75
-
76
-
77
-
78
-
79
-
80
-
81
-
82
-
83
-
84
-
85
-
86
-
87
-
88
-
89
-
90
-
91
-
92
-
93
-
94
-
95
-
96
-
97
-
98
-
99
-
100
-
101
-
102
-
103
-
104
-
105
-
106
-
107
-
108
-
109
-
110
-
111
-
112
-
113
-
114
-
115
-
116
-
117
-
118
-
119
-
120
-
121
-
122
-
123
-
124
-
125
-
126
-
127
-
128
-
129
-
130
-
131
-
132
-
133
-
134
-
135
-
136
-
137
-
138
-
139
-
140
-
141
-
142
-
143
-
144
-
145
-
146
-
147
-
148
-
149
-
150
-
151
-
152
-
153
-
154
-
155
-
156
-
 157
157 -
 158
158 -
 159
159 -
 160
160 -
 161
161 -
 162
162 -
 163
163 -
 164
164 -
 165
165 -
 166
166 -
 167
167 -
168
-
169
-
170
-
171
-
172
-
173
-
174
-
175
-
176
-
177
-
178
-
179
-
180
-
181
-
182
-
183
-
184
-
185
-
186
-
187
-
188
-
189
-
190
-
191
-
192
-
193
-
194
-
195
-
196
-
197
-
198
-
199
-
200
-
201
-
202
-
203
-
204
-
205
-
206
-
207
-
208
-
209
-
210
-
211
-
212
-
213
-
214
-
215
-
216
-
217
-
218
-
219
-
220
-
221
-
222
-
223
-
224
-
225
-
226
-
227
-
228
-
229
-
230
-
231
-
232
-
233
-
234
-
235
-
236
-
237
-
238
-
239
-
240
-
241
-
242
-
243
-
244
-
245
-
246
-
247
-
248
-
249
-
250
-
251
-
252
-
253
-
254
-
255
-
256
-
257
-
258
-
259
-
260
-
261
-
262
-
263
 |
 |
162
Toshiba Utilities
TOSHIBA HW Setup
Accessing TOSHIBA HW Setup
To access TOSHIBA HW Setup, press the TOSHIBA
Console button above the left side of the keyboard.
The TOSHIBA Console screen appears.
Double-click on the
HW Setup
icon to open the HW Setup
dialog box.
Sample TOSHIBA HW Setup tab options
Toshiba HW Setup has the following tabs:
General—Shows the BIOS version
Device Config—Shows the Device configuration options
Parallel/Printer—Allows you to configure the parallel
port default settings
Display—Allows you to change various default settings
for the built-in LCD display