Yamaha CLP-480 Owner's Manual - Page 37
Other recording techniques
 |
View all Yamaha CLP-480 manuals
Add to My Manuals
Save this manual to your list of manuals |
Page 37 highlights
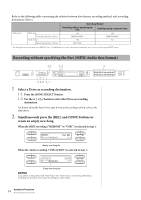
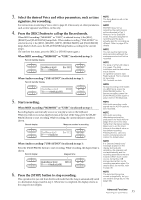
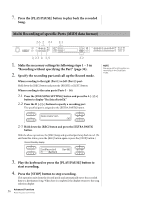
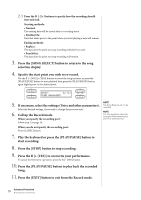
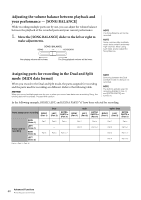
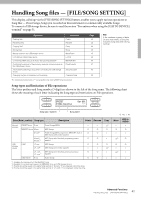
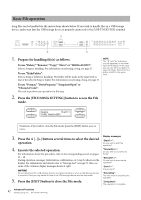
5. Press the [PLAY/PAUSE] button to play back the recorded Song. After recording is completed, specify a different recording part in Step 2, then record and overdub onto your performance as desired, part by part. NOTE The recorded Songs are named automatically, but you can rename Songs as you like (page 43). Other recording techniques Replacing the part of an existing Song (MIDI data format) For example, you can record your performance to the Right part along with the Left part playback of the existing Song. 1. Select the desired existing Song. For information on selecting a Song, see page 27. 2. If necessary, select the settings (Voice and other parameters). Select the desired settings, if you wish to change the previous ones. 3. Select a Part, start recording then stop recording by executing steps 2 - 4 of "Multi Recording of specific Parts" on page 36. When you select a Preset Song in step 1, the recorded Song will be automatically saved as a new Song to the MEMORY drive. When you select a Song in the MEMORY drive/USB storage device in step 1, the recorded Song will be overwritten. 4. Press the [PLAY/PAUSE] button to play back the recorded Song. NOTE The Song Balance will not be recorded. Re-recording a Song partially (MIDI data format) You can re-record a specific range of the MIDI Song. 1. Select the desired MIDI Song. For instructions, refer to page 27. 2. Select a recording method. 2-1 Press the [FILE/SONG SETTING] button. 2-2 Press the A [-][+] buttons to display "RecStart" or "RecEnd." RecStart Normal 37 Advanced Functions Recording your performance
-
 1
1 -
2
-
3
-
4
-
5
-
6
-
7
-
8
-
9
-
10
-
11
-
12
-
13
-
14
-
15
-
16
-
17
-
18
-
19
-
20
-
21
-
22
-
23
-
24
-
25
-
26
-
27
-
28
-
29
-
30
-
31
-
 32
32 -
 33
33 -
 34
34 -
 35
35 -
 36
36 -
 37
37 -
 38
38 -
 39
39 -
 40
40 -
 41
41 -
 42
42 -
43
-
44
-
45
-
46
-
47
-
48
-
49
-
50
-
51
-
52
-
53
-
54
-
55
-
56
-
57
-
58
-
59
-
60
-
61
-
62
-
63
-
64
-
65
-
66
-
67
-
68
-
69
-
70
-
71
-
72
-
73
-
74
-
75
-
76
-
77
-
78
-
79
-
80
-
81
-
82
-
83
-
84
-
85
-
86
-
87
-
88
-
89
-
90
-
91
-
92
-
93
-
94
-
95
-
96
 |
 |