Yamaha CLP-480 Owner's Manual - Page 84
Attach A., Connect the speaker cord., Connect the pedal cord
 |
View all Yamaha CLP-480 manuals
Add to My Manuals
Save this manual to your list of manuals |
Page 84 highlights
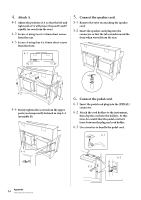
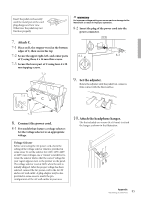
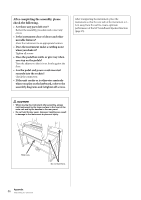
4. Attach A. 4-1 Adjust the position of A so that the left and right ends of A will project beyond E and F equally (as seen from the rear). 4-2 Secure A using two 6 x 16mm short screws from the rear. 4-3 Secure A using four 6 x 16mm short screws from the front. 4-1 5. Connect the speaker cord. 5-1 Remove the twist tie attaching the speaker cord. 5-2 Insert the speaker cord plug into the connector so that the tab extends toward the front when viewed from the rear. A 4-2 4-3 4-4 Firmly tighten the screws from the upper parts you temporarily fastened in step 2-4 (assembly B). B 6. Connect the pedal cord. 6-1 Insert the pedal cord plug into the [PEDAL] connector. 6-2 Attach the cord holders to the instrument, then clip the cord into the holders. At this time, be careful that the pedal cord isn't loose between the plug and cord holder. 6-3 Use a twist tie to bundle the pedal cord. 6-1 4-4 6-2 6-3 E 84 Appendix Assembling the Clavinova
-
 1
1 -
2
-
3
-
4
-
5
-
6
-
7
-
8
-
9
-
10
-
11
-
12
-
13
-
14
-
15
-
16
-
17
-
18
-
19
-
20
-
21
-
22
-
23
-
24
-
25
-
26
-
27
-
28
-
29
-
30
-
31
-
32
-
33
-
34
-
35
-
36
-
37
-
38
-
39
-
40
-
41
-
42
-
43
-
44
-
45
-
46
-
47
-
48
-
49
-
50
-
51
-
52
-
53
-
54
-
55
-
56
-
57
-
58
-
59
-
60
-
61
-
62
-
63
-
64
-
65
-
66
-
67
-
68
-
69
-
70
-
71
-
72
-
73
-
74
-
75
-
76
-
77
-
78
-
 79
79 -
 80
80 -
 81
81 -
 82
82 -
 83
83 -
 84
84 -
 85
85 -
 86
86 -
 87
87 -
 88
88 -
 89
89 -
90
-
91
-
92
-
93
-
94
-
95
-
96
 |
 |
