Yamaha CLP-480 Owner's Manual - Page 82
Assembling the Clavinova
 |
View all Yamaha CLP-480 manuals
Add to My Manuals
Save this manual to your list of manuals |
Page 82 highlights
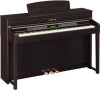
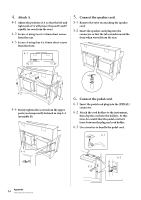
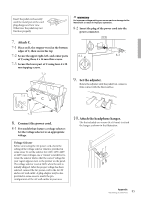
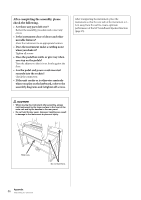
Assembling the Clavinova CAUTION • Be careful not to confuse parts, and be sure to install all parts in the correct direction. Please assemble in accordance with the sequence given below. • Assembly should be carried out by at least two persons. • Be sure to use the correct screw size, as indicated below. Use of incorrect screws can cause damage. • Assemble the unit on a hard and flat floor with ample space. • Be sure to tighten up all screws upon completing assembly of each unit. • To disassemble, reverse the assembly sequence given below. Have a Philips-head (+) screwdriver of the appropriate size ready. Remove all parts from the package and make sure you have all of the items. Connector panel A AC IN Foamed styrol pads Take out the styrofoam pads, and place A on top of the pads. Position the styrofoam pads so that they do not interfere with B the connector panel at the bottom of A, AC IN, or the fittings on the center of the rear panel. C Pedal cord D The pedals are covered with vinyl covers when shipped from the factory. For optimum use of the GP Responsive Damper Pedal, we recommend that you remove the cover from the damper pedal. E F 6 x 20 mm long screws x 4 4 x 20 mm tapping screws x 4 6 x 16 mm short screws x 6 Cord holders x 2 4 x 14 mm thin screws x 9 Power cord 4 x 10 mm thin screws x 2 Headphone hanger 82 Appendix Assembling the Clavinova
-
 1
1 -
2
-
3
-
4
-
5
-
6
-
7
-
8
-
9
-
10
-
11
-
12
-
13
-
14
-
15
-
16
-
17
-
18
-
19
-
20
-
21
-
22
-
23
-
24
-
25
-
26
-
27
-
28
-
29
-
30
-
31
-
32
-
33
-
34
-
35
-
36
-
37
-
38
-
39
-
40
-
41
-
42
-
43
-
44
-
45
-
46
-
47
-
48
-
49
-
50
-
51
-
52
-
53
-
54
-
55
-
56
-
57
-
58
-
59
-
60
-
61
-
62
-
63
-
64
-
65
-
66
-
67
-
68
-
69
-
70
-
71
-
72
-
73
-
74
-
75
-
76
-
 77
77 -
 78
78 -
 79
79 -
 80
80 -
 81
81 -
 82
82 -
 83
83 -
 84
84 -
 85
85 -
 86
86 -
 87
87 -
88
-
89
-
90
-
91
-
92
-
93
-
94
-
95
-
96
 |
 |
