Yamaha CLP-480 Owner's Manual - Page 39
Changing a Voice or the tempo after recording MIDI, data format
 |
View all Yamaha CLP-480 manuals
Add to My Manuals
Save this manual to your list of manuals |
Page 39 highlights
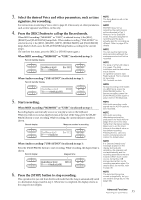
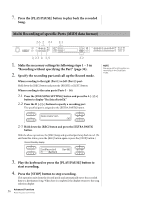
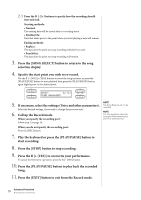
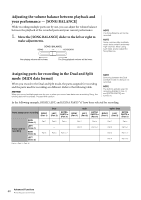
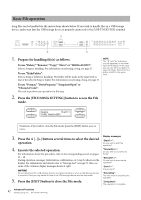
Changing a Voice or the tempo after recording (MIDI data format) For the MIDI Song, you can change the Voice and tempo after recording to change a feel or to set a more suitable tempo. You can also change these elements in the middle of a Song. 1. Select the Song you wish to change. For instructions, refer to page 27. 2. Select the settings (Voice and other parameters). After the setting is completed, press the [SONG SELECT] button to return to the song selection display (in step 1). NOTICE The settings made here will be saved to the selected MIDI Song as soon as you execute step 4. Note that this cannot be restored to the previous status. 3. Press the [REC] button then confirm whether or not the desired Part lamp flashes in red. If not, hold the [REC] button and press the desired Part button so that the corresponding lamp flashes. 4. Press the [STOP] and [REC] buttons simultaneously to actually change the settings as made in step 2. 5. Press the B [+ (YES)] button to overwrite the settings to the MIDI Song selected in step 1. This operation exits from the Record mode and automatically overwrites the Song. To cancel the Overwrite operation, press the B [- (NO)] button. 6. Press the [PLAY/PAUSE] button to start playback of the changed Song. NOTE The time signature cannot be changed. Data that can be recorded to MIDI Songs Data for each Part • Note data (your keyboard performance) • Voice selection • Pedal (Damper/Soft/Sostenuto) • Reverb Send - "ReverbSend" • Chorus Send - "ChorusSend" • DSP effect Depth - "DSPDepth" • Sound brightness - "Brightness" • Resonance effect setting - "HarmonicContent" • Octave setting - "Octave" • Volume setting for each Voice - "Volume" • Pan for each Voice • Fine pitch adjustment between two Voices (Dual only) - "Detune" • Volume change in response to playing strength for each Voice - "TouchSense" Data commonly for all Parts • Scale • Tempo • Time Signature • Reverb Type • Chorus Type • DSP Effect Type NOTE The note data, pedal (Damper/ Soft/Sostenuto) data, octave setting and time signature cannot be changed after recording. 39 Advanced Functions Recording your performance
-
 1
1 -
2
-
3
-
4
-
5
-
6
-
7
-
8
-
9
-
10
-
11
-
12
-
13
-
14
-
15
-
16
-
17
-
18
-
19
-
20
-
21
-
22
-
23
-
24
-
25
-
26
-
27
-
28
-
29
-
30
-
31
-
32
-
33
-
 34
34 -
 35
35 -
 36
36 -
 37
37 -
 38
38 -
 39
39 -
 40
40 -
 41
41 -
 42
42 -
 43
43 -
 44
44 -
45
-
46
-
47
-
48
-
49
-
50
-
51
-
52
-
53
-
54
-
55
-
56
-
57
-
58
-
59
-
60
-
61
-
62
-
63
-
64
-
65
-
66
-
67
-
68
-
69
-
70
-
71
-
72
-
73
-
74
-
75
-
76
-
77
-
78
-
79
-
80
-
81
-
82
-
83
-
84
-
85
-
86
-
87
-
88
-
89
-
90
-
91
-
92
-
93
-
94
-
95
-
96
 |
 |