3Ware 7000-2 User Guide - Page 4

3Ware 7000-2 - Escalade RAID Controller Manual
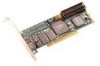
Page 4 highlights

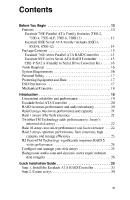
3ware Escalade ATA RAID Controller User Guide Step 3. Install system drivers ...30 Step 4. Install 3DM ...31 Hardware Installation ...33 To remove an existing Escalade ATA RAID Controller ...33 Installing a Parallel ATA RAID Controller ...34 Connect the interface cables to the Escalade ATA RAID Controller ...34 Install the Escalade ATA RAID Controller in the computer 35 Connect the drives to the interface cables ...36 Installing a Serial ATA RAID Controller ...38 Connect the interface cables to the Escalade Serial ATA RAID Controller ...38 Connect the drives to the interface cables ...40 Check your installation and close the case ...42 Check motherboard boot sequence ...42 3ware Disk Array Configuration Utility ...43 Hot spare and hot swap ...43 BIOS Screen ...43 3DM Configure Page ...44 Invoking the 3ware BIOS tool ...44 Exiting the 3ware BIOS tool ...45 Determining your configuration ...46 Displaying advance details ...48 Creating a disk array ...48 Determining your configuration ...50 Specifying a Hot Spare ...54 Changing an existing configuration ...55 Modifying a disk array ...55 Deleting a disk array ...55 How to maintain or verify a disk array ...56 Rebuilding a mirrored disk array ...57 Rebuilding a RAID 5 disk array ...59 Windows Installation ...67 Windows NT®4.0 Installation ...68 iv

  • 1
  • 2
  • 3
  • 4
  • 5
  • 6
  • 7
  • 8
  • 9
  • 10
  • 11
  • 12
  • 13
  • 14
  • 15
  • 16
  • 17
  • 18
  • 19
  • 20
  • 21
  • 22
  • 23
  • 24
  • 25
  • 26
  • 27
  • 28
  • 29
  • 30
  • 31
  • 32
  • 33
  • 34
  • 35
  • 36
  • 37
  • 38
  • 39
  • 40
  • 41
  • 42
  • 43
  • 44
  • 45
  • 46
  • 47
  • 48
  • 49
  • 50
  • 51
  • 52
  • 53
  • 54
  • 55
  • 56
  • 57
  • 58
  • 59
  • 60
  • 61
  • 62
  • 63
  • 64
  • 65
  • 66
  • 67
  • 68
  • 69
  • 70
  • 71
  • 72
  • 73
  • 74
  • 75
  • 76
  • 77
  • 78
  • 79
  • 80
  • 81
  • 82
  • 83
  • 84
  • 85
  • 86
  • 87
  • 88
  • 89
  • 90
  • 91
  • 92
  • 93
  • 94
  • 95
  • 96
  • 97
  • 98
  • 99
  • 100
  • 101
  • 102
  • 103
  • 104
  • 105
  • 106
  • 107
  • 108
  • 109
  • 110
  • 111
  • 112
  • 113
  • 114
  • 115
  • 116
  • 117
  • 118
  • 119
  • 120
  • 121
  • 122
  • 123
  • 124
  • 125
  • 126
  • 127
  • 128
  • 129
  • 130
  • 131
  • 132
  • 133
  • 134
  • 135
  • 136
  • 137
  • 138
  • 139
  • 140
  • 141
  • 142
  • 143
  • 144
  • 145
  • 146
  • 147
  • 148
  • 149
  • 150
  • 151
  • 152
  • 153
  • 154
  • 155
  • 156
  • 157
  • 158
  • 159
  • 160
  • 161
  • 162
  • 163
  • 164
  • 165
  • 166
  • 167
  • 168
  • 169
  • 170
  • 171
  • 172
  • 173
  • 174
  • 175
  • 176
  • 177
  • 178
  • 179
  • 180
  • 181
  • 182
  • 183
  • 184
  • 185
  • 186
  • 187
  • 188
  • 189
  • 190
  • 191
  • 192
  • 193
  • 194
  • 195
  • 196

3ware Escalade ATA RAID Controller
User Guide
iv
Step 3. Install system drivers . . . . . . . . . . . . . . . . . . . . . . . . . . 30
Step 4. Install 3DM
. . . . . . . . . . . . . . . . . . . . . . . . . . . . . . . . . 31
Hardware Installation . . . . . . . . . . . . . . . . . . . . . . . . . . . . . . . . 33
To remove an existing Escalade ATA RAID Controller . . . . . 33
Installing a Parallel ATA RAID Controller . . . . . . . . . . . . . . . 34
Connect the interface cables to the Escalade ATA RAID
Controller . . . . . . . . . . . . . . . . . . . . . . . . . . . . . . . . . . . . . 34
Install the Escalade ATA RAID Controller in the computer
35
Connect the drives to the interface cables . . . . . . . . . . . . . . . 36
Installing a Serial ATA RAID Controller
. . . . . . . . . . . . . . . . 38
Connect the interface cables to the Escalade Serial ATA
RAID Controller
. . . . . . . . . . . . . . . . . . . . . . . . . . . . . . . 38
Connect the drives to the interface cables . . . . . . . . . . . . . . . 40
Check your installation and close the case . . . . . . . . . . . . . . . . 42
Check motherboard boot sequence
. . . . . . . . . . . . . . . . . . . . . 42
3ware Disk Array Configuration Utility . . . . . . . . . . . . . . . . . . 43
Hot spare and hot swap
. . . . . . . . . . . . . . . . . . . . . . . . . . . . . . 43
BIOS Screen
. . . . . . . . . . . . . . . . . . . . . . . . . . . . . . . . . . . . . 43
3DM Configure Page
. . . . . . . . . . . . . . . . . . . . . . . . . . . . . . 44
Invoking the 3ware BIOS tool . . . . . . . . . . . . . . . . . . . . . . . . . 44
Exiting the 3ware BIOS tool
. . . . . . . . . . . . . . . . . . . . . . . . . . 45
Determining your configuration . . . . . . . . . . . . . . . . . . . . . . . . 46
Displaying advance details . . . . . . . . . . . . . . . . . . . . . . . . . . . . 48
Creating a disk array
. . . . . . . . . . . . . . . . . . . . . . . . . . . . . . . . 48
Determining your configuration . . . . . . . . . . . . . . . . . . . . . . . . 50
Specifying a Hot Spare
. . . . . . . . . . . . . . . . . . . . . . . . . . . . . . 54
Changing an existing configuration . . . . . . . . . . . . . . . . . . . . . 55
Modifying a disk array . . . . . . . . . . . . . . . . . . . . . . . . . . . . . . . 55
Deleting a disk array
. . . . . . . . . . . . . . . . . . . . . . . . . . . . . . . . 55
How to maintain or verify a disk array
. . . . . . . . . . . . . . . . . . 56
Rebuilding a mirrored disk array . . . . . . . . . . . . . . . . . . . . . . . 57
Rebuilding a RAID 5 disk array
. . . . . . . . . . . . . . . . . . . . . . . 59
Windows Installation
. . . . . . . . . . . . . . . . . . . . . . . . . . . . . . . . 67
Windows NT®4.0 Installation
. . . . . . . . . . . . . . . . . . . . . . . . . 68