3Ware 7000-2 User Guide - Page 56
3Ware 7000-2 - Escalade RAID Controller Manual
 |
UPC - 693494700022
View all 3Ware 7000-2 manuals
Add to My Manuals
Save this manual to your list of manuals |
Page 56 highlights
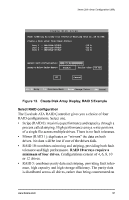
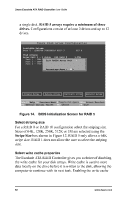
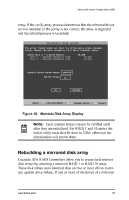
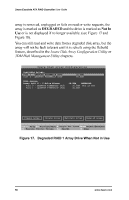
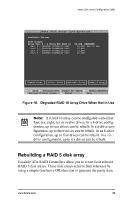
3ware Escalade ATA RAID Controller User Guide 3ware Disk Array Configuration Available Drives: Disk Arrays: *Array Unit 0 - 4 drive 64K RAID 0 Port 0 - QUANTUM FIREBALLP LM30 Port 1 - QUANTUM FIREBALLP LM30 Port 2 - QUANTUM FIREBALLP LM30 Port 3 - QUANTUM FIREBALLP LM30 120.0GB 30.0GB 30.0GB 30.0GB 30.0GB Create Array Delete Array Maintain Array Rebuild Array Alt-F1 Help Previous/Next $ Toggle Hot Spare Enter Select/Deselect F8 Done Esc Cancel F6 Restore Initial Values Figure 15. Delete Disk Array Display Navigate to the Delete Array button and hit Enter to bring up the Delete Disk Array display. Check that the correct drives are listed. Select the OK key to confirm deleting the array or Cancel to reject it. Recall that the array is not actually deleted and no data will be overwritten until you have finished making all your changes and selected the F8 key. How to maintain or verify a disk array The Maintain Disk Array (see Figure 16) shows the current disk array configuration that you have selected. The array's Write Cache State can be changed. Refer to Select write cache properties paragraph in the Creating a disk array section. Verify Array can be specified as no or yes. The default is no. Yes launches a foreground process that checks the data integrity of a fault tolerant 56 www.3ware.com
-
 1
1 -
2
-
3
-
4
-
5
-
6
-
7
-
8
-
9
-
10
-
11
-
12
-
13
-
14
-
15
-
16
-
17
-
18
-
19
-
20
-
21
-
22
-
23
-
24
-
25
-
26
-
27
-
28
-
29
-
30
-
31
-
32
-
33
-
34
-
35
-
36
-
37
-
38
-
39
-
40
-
41
-
42
-
43
-
44
-
45
-
46
-
47
-
48
-
49
-
50
-
 51
51 -
 52
52 -
 53
53 -
 54
54 -
 55
55 -
 56
56 -
 57
57 -
 58
58 -
 59
59 -
 60
60 -
 61
61 -
62
-
63
-
64
-
65
-
66
-
67
-
68
-
69
-
70
-
71
-
72
-
73
-
74
-
75
-
76
-
77
-
78
-
79
-
80
-
81
-
82
-
83
-
84
-
85
-
86
-
87
-
88
-
89
-
90
-
91
-
92
-
93
-
94
-
95
-
96
-
97
-
98
-
99
-
100
-
101
-
102
-
103
-
104
-
105
-
106
-
107
-
108
-
109
-
110
-
111
-
112
-
113
-
114
-
115
-
116
-
117
-
118
-
119
-
120
-
121
-
122
-
123
-
124
-
125
-
126
-
127
-
128
-
129
-
130
-
131
-
132
-
133
-
134
-
135
-
136
-
137
-
138
-
139
-
140
-
141
-
142
-
143
-
144
-
145
-
146
-
147
-
148
-
149
-
150
-
151
-
152
-
153
-
154
-
155
-
156
-
157
-
158
-
159
-
160
-
161
-
162
-
163
-
164
-
165
-
166
-
167
-
168
-
169
-
170
-
171
-
172
-
173
-
174
-
175
-
176
-
177
-
178
-
179
-
180
-
181
-
182
-
183
-
184
-
185
-
186
-
187
-
188
-
189
-
190
-
191
-
192
-
193
-
194
-
195
-
196
 |
 |