3Ware 7000-2 User Guide - Page 65
3Ware 7000-2 - Escalade RAID Controller Manual
 |
UPC - 693494700022
View all 3Ware 7000-2 manuals
Add to My Manuals
Save this manual to your list of manuals |
Page 65 highlights
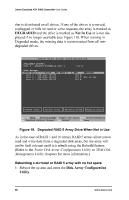
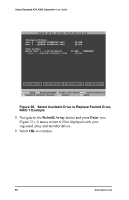
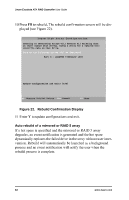
3ware Disk Array Configuration Utility Auto rebuild on power failure During driver startup 3ware's auto rebuild feature sets a flag indicating that the driver loaded. Upon an orderly shutdown the flag is rewritten, indicating a clean shutdown. During the next system power cycle the firmware queries the flag. For a RAID 1 or 10 configuration, if there was a problem, the firmware degrades the secondary drive in the array and starts the background rebuild of the mirrored drive. When the rebuild is complete the two halves of the mirror are redundant again. For a RAID 5 configuration, if there is a problem, the firmware starts the background verification that checks that the parity matches the data. Cancelling and restarting a rebuild with a new drive Currently, a rebuild cannot be cancelled using the 3DM software, but a rebuild can be aborted by physically removing the disk used to replace the degraded drive. Abort a rebuild by following the applicable procedure below. If your system has hot swap carriers: 1 Remove the disk while the system is powered. The rebuild will be immediately aborted. 2 Go to the Configure screen and click the box in front of the disk drive that was removed. Click on Remove Drive. 3 Add another drive and click on the box in front of this port. Click on Add Drive. The drive is called "RAID Disk". 4 Click the boxes in front of the RAID Disk and the degraded array. Select Rebuild. The rebuild starts with the new disk drive. If your system does not have hot swap carriers: 1 Power down the system and remove the disk drive that caused the array to become degraded. 2 Add a different disk drive to rebuild the array. 3 Press Alt + F3 at Boot time to enter 3ware BIOS. 4 Select the degraded array and the newly added drive. 5 Select Rebuild. www.3ware.com 65
-
 1
1 -
2
-
3
-
4
-
5
-
6
-
7
-
8
-
9
-
10
-
11
-
12
-
13
-
14
-
15
-
16
-
17
-
18
-
19
-
20
-
21
-
22
-
23
-
24
-
25
-
26
-
27
-
28
-
29
-
30
-
31
-
32
-
33
-
34
-
35
-
36
-
37
-
38
-
39
-
40
-
41
-
42
-
43
-
44
-
45
-
46
-
47
-
48
-
49
-
50
-
51
-
52
-
53
-
54
-
55
-
56
-
57
-
58
-
59
-
 60
60 -
 61
61 -
 62
62 -
 63
63 -
 64
64 -
 65
65 -
 66
66 -
 67
67 -
 68
68 -
 69
69 -
 70
70 -
71
-
72
-
73
-
74
-
75
-
76
-
77
-
78
-
79
-
80
-
81
-
82
-
83
-
84
-
85
-
86
-
87
-
88
-
89
-
90
-
91
-
92
-
93
-
94
-
95
-
96
-
97
-
98
-
99
-
100
-
101
-
102
-
103
-
104
-
105
-
106
-
107
-
108
-
109
-
110
-
111
-
112
-
113
-
114
-
115
-
116
-
117
-
118
-
119
-
120
-
121
-
122
-
123
-
124
-
125
-
126
-
127
-
128
-
129
-
130
-
131
-
132
-
133
-
134
-
135
-
136
-
137
-
138
-
139
-
140
-
141
-
142
-
143
-
144
-
145
-
146
-
147
-
148
-
149
-
150
-
151
-
152
-
153
-
154
-
155
-
156
-
157
-
158
-
159
-
160
-
161
-
162
-
163
-
164
-
165
-
166
-
167
-
168
-
169
-
170
-
171
-
172
-
173
-
174
-
175
-
176
-
177
-
178
-
179
-
180
-
181
-
182
-
183
-
184
-
185
-
186
-
187
-
188
-
189
-
190
-
191
-
192
-
193
-
194
-
195
-
196
 |
 |