Brother International ADS-2500We Users Guide - Page 35
Status Monitor, Administrator, User Restriction Function, Secure Function Lock, Submit
 |
View all Brother International ADS-2500We manuals
Add to My Manuals
Save this manual to your list of manuals |
Page 35 highlights
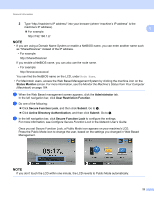
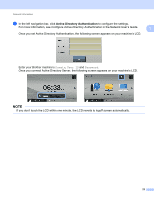
General Information 2 Type "http://machine's IP address/" into your browser (where "machine's IP address" is the machine's IP address). 1 For example: http://192.168.1.2/ NOTE • If you are using a Domain Name System or enable a NetBIOS name, you can enter another name such as "SharedScanner" instead of the IP address. • For example: http://SharedScanner/ If you enable a NetBIOS name, you can also use the node name. • For example: http://brwxxxxxxxxxxxx/ You can find the NetBIOS name on the LCD, under Node Name. • For Macintosh users, access the Web Based Management System by clicking the machine icon on the Status Monitor screen. For more information, see the Monitor the Machine's Status from Your Computer (Macintosh) on page 164. 2 When the Web Based management screen appears, click the Administrator tab. In the left navigation bar, click User Restriction Function. 3 Do one of the following: Click Secure Function Lock, and then click Submit. Go to 4. Click Active Directory Authentication, and then click Submit. Go to 5. 4 In the left navigation bar, click Secure Function Lock to configure the settings. For more information, see Configure Secure Function Lock in the Network User's Guide. Once you set Secure Function Lock, a Public Mode icon appears on your machine's LCD. Press the Public Mode icon to change the user, based on the settings you changed in Web Based Management. NOTE If you don't touch the LCD within one minute, the LCD reverts to Public Mode automatically. 22
-
 1
1 -
2
-
3
-
4
-
5
-
6
-
7
-
8
-
9
-
10
-
11
-
12
-
13
-
14
-
15
-
16
-
17
-
18
-
19
-
20
-
21
-
22
-
23
-
24
-
25
-
26
-
27
-
28
-
29
-
 30
30 -
 31
31 -
 32
32 -
 33
33 -
 34
34 -
 35
35 -
 36
36 -
 37
37 -
 38
38 -
 39
39 -
 40
40 -
41
-
42
-
43
-
44
-
45
-
46
-
47
-
48
-
49
-
50
-
51
-
52
-
53
-
54
-
55
-
56
-
57
-
58
-
59
-
60
-
61
-
62
-
63
-
64
-
65
-
66
-
67
-
68
-
69
-
70
-
71
-
72
-
73
-
74
-
75
-
76
-
77
-
78
-
79
-
80
-
81
-
82
-
83
-
84
-
85
-
86
-
87
-
88
-
89
-
90
-
91
-
92
-
93
-
94
-
95
-
96
-
97
-
98
-
99
-
100
-
101
-
102
-
103
-
104
-
105
-
106
-
107
-
108
-
109
-
110
-
111
-
112
-
113
-
114
-
115
-
116
-
117
-
118
-
119
-
120
-
121
-
122
-
123
-
124
-
125
-
126
-
127
-
128
-
129
-
130
-
131
-
132
-
133
-
134
-
135
-
136
-
137
-
138
-
139
-
140
-
141
-
142
-
143
-
144
-
145
-
146
-
147
-
148
-
149
-
150
-
151
-
152
-
153
-
154
-
155
-
156
-
157
-
158
-
159
-
160
-
161
-
162
-
163
-
164
-
165
-
166
-
167
-
168
-
169
-
170
-
171
-
172
-
173
-
174
-
175
-
176
-
177
-
178
-
179
-
180
-
181
-
182
-
183
-
184
-
185
-
186
-
187
-
188
-
189
-
190
-
191
-
192
-
193
-
194
-
195
-
196
-
197
-
198
-
199
-
200
-
201
-
202
-
203
-
204
-
205
-
206
-
207
-
208
-
209
-
210
-
211
-
212
-
213
-
214
-
215
-
216
-
217
-
218
-
219
-
220
-
221
-
222
-
223
-
224
-
225
-
226
-
227
-
228
-
229
-
230
-
231
-
232
-
233
-
234
-
235
-
236
-
237
 |
 |
