Brother International MFC-9700 Users Manual - English - Page 149
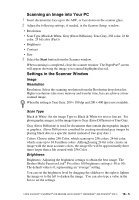
Scanning an Image into Your PC, Settings in the Scanner Window, Image, Resolution, Scan Type
 |
View all Brother International MFC-9700 manuals
Add to My Manuals
Save this manual to your list of manuals |
Page 149 highlights
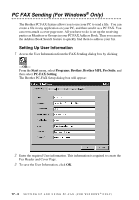
Scanning an Image into Your PC 1 Insert document(s) face up in the ADF, or face down on the scanner glass. 2 Adjust the following settings, if needed, in the Scanner Setup window: • Resolution • Scan Type (Black & White, Gray [Error Diffusion], True Gray, 256 color, 24 bit color, 24 bit color (Fast)) • Brightness • Contrast • Size 3 Select the Start button from the Scanner window. When scanning is completed, close the scanner window. The PaperPort® screen will appear showing the image you scanned highlighted in red. Settings in the Scanner Window Image Resolution Resolution: Select the scanning resolution from the Resolution drop down list. Higher resolutions take more memory and transfer time, but can achieve a finer scanned image. When the setting is True Gray, 200 × 100 dpi and 200 × 400 dpi is not available. Scan Type Black & White: Set the image Type to Black & White for text or line art. For photographic images, set the image type to Gray (Error Diffusion) or True Gray. Gray (Error Diffusion) is used for documents that contain photographic images or graphics. (Error Diffusion is a method for creating simulated gray images by placing black dots in a specific matrix instead of true gray dots.) Colors: Choose either 256 Color, which scans up to 256 colors, 24-bit color, which scans up to 16.8 million colors. Although using 24-bit color creates an image with the most accurate colors, the image file will be approximately three times larger than a file created with 256 Color. Brightness Brightness: Adjusting the brightness settings to obtain the best image. The Brother Multi-Function Link® Pro offers 100 brightness settings (-50 to 50). The default value is 0, representing an "average" setting. You can set the brightness level by dragging the slidebar to the right to lighten the image or to the left to darken the image. You can also type a value in the box to set the settings. USING SCANSOFT™ PAPERPORT® FOR BROTHER AND SCANSOFT™ TEXTBRIDGE® (FOR WINDOWS® ONLY) 16 - 5
-
 1
1 -
2
-
3
-
4
-
5
-
6
-
7
-
8
-
9
-
10
-
11
-
12
-
13
-
14
-
15
-
16
-
17
-
18
-
19
-
20
-
21
-
22
-
23
-
24
-
25
-
26
-
27
-
28
-
29
-
30
-
31
-
32
-
33
-
34
-
35
-
36
-
37
-
38
-
39
-
40
-
41
-
42
-
43
-
44
-
45
-
46
-
47
-
48
-
49
-
50
-
51
-
52
-
53
-
54
-
55
-
56
-
57
-
58
-
59
-
60
-
61
-
62
-
63
-
64
-
65
-
66
-
67
-
68
-
69
-
70
-
71
-
72
-
73
-
74
-
75
-
76
-
77
-
78
-
79
-
80
-
81
-
82
-
83
-
84
-
85
-
86
-
87
-
88
-
89
-
90
-
91
-
92
-
93
-
94
-
95
-
96
-
97
-
98
-
99
-
100
-
101
-
102
-
103
-
104
-
105
-
106
-
107
-
108
-
109
-
110
-
111
-
112
-
113
-
114
-
115
-
116
-
117
-
118
-
119
-
120
-
121
-
122
-
123
-
124
-
125
-
126
-
127
-
128
-
129
-
130
-
131
-
132
-
133
-
134
-
135
-
136
-
137
-
138
-
139
-
140
-
141
-
142
-
143
-
 144
144 -
 145
145 -
 146
146 -
 147
147 -
 148
148 -
 149
149 -
 150
150 -
 151
151 -
 152
152 -
 153
153 -
 154
154 -
155
-
156
-
157
-
158
-
159
-
160
-
161
-
162
-
163
-
164
-
165
-
166
-
167
-
168
-
169
-
170
-
171
-
172
-
173
-
174
-
175
-
176
-
177
-
178
-
179
-
180
-
181
-
182
-
183
-
184
-
185
-
186
-
187
-
188
-
189
-
190
-
191
-
192
-
193
-
194
-
195
-
196
-
197
-
198
-
199
-
200
-
201
-
202
-
203
-
204
-
205
-
206
-
207
-
208
-
209
-
210
-
211
-
212
-
213
-
214
-
215
-
216
-
217
-
218
-
219
-
220
-
221
-
222
-
223
-
224
-
225
-
226
-
227
-
228
 |
 |
