Dell Broadcom NetXtreme Family of Adapters Broadcom NetXtreme II Network Adapt - Page 132
One-Time Disable, CTRL+R Method
 |
View all Dell Broadcom NetXtreme Family of Adapters manuals
Add to My Manuals
Save this manual to your list of manuals |
Page 132 highlights
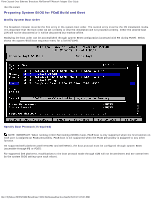
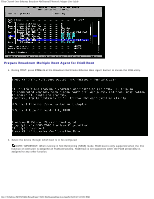
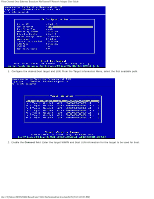
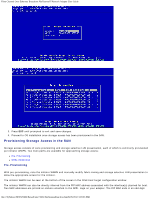
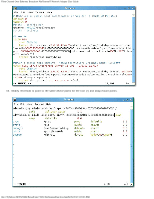
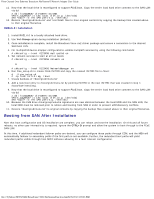
Fibre Channel Over Ethernet: Broadcom NetXtreme II Network Adapter User Guide The WWPN is 20:00: + . For example, if the FIP MAC is 00:10:18:11:22:33, then the WWPN will be 20:00:00:10:18:11:22:33. NOTE: The default WWPN is 20:00: + . The default WWNN is 10:00: + . NOTE: In Dell FlexAddress configurations, the SAN/FIP MAC may be overridden by the blade chassis management system. CTRL+R Method The CTRL+R method allows you to use the boot initiator to bring up the link and login into all available fabrics and targets. Using this method, you can ensure that the initiator is logged into the fabric/target before making provisioning changes, and as such, can provision without manually typing in WWPNs. 1. Configure at least one boot target through CCM as described above. 2. Allow the system to attempt to boot through the selected initiator. 3. Once the initiator boot starts, it will commence with DCBX sync, FIP Discovery, Fabric Login, Target Login, and LUN readiness checks. As each of these phases completes, if the initiator is unable to proceed to the next phase, MBA will present the option to press CTRL+R. 4. Once CTRL+R has been activated, the boot initiator will maintain a link in whatever phase has most recently succeeded and allow you time to make the necessary provisioning corrections to proceed to the next phase. 5. If the initiator logs into the fabric, but is unable to log into the target, a CTRL+R will pause the boot process and allow you to configure fabric zoning. 6. Once zoning is complete, the initiator will automatically log into all visible targets. If the initiator is unable to discover the designated LUN on the designated target as provisioned in step 1, CTRL+R will pause the boot process and allow you to configure selective LUN presentation. 7. The boot initiator will periodically poll the LUN for readiness, and once the user has provisioned access to the LUN, the boot process will automatically proceed. NOTE: This does not preclude the need to put the boot initiator into one-time disable mode as described in OneTime Disable. One-Time Disable Broadcom's FCoE ROM is implemented as Boot Entry Vector (BEV). In this implementation, the Option ROM only connects to the target once it has been selected by BIOS as the chosen boot device. This is different from other implementations that will connect to the boot device even if another device has been selected by the system BIOS. For OS installation over the FCoE path, it is necessary to instruct the Option ROM to bypass FCoE and skip to CD/DVD installation media. As instructed earlier, the boot order must be configured with Broadcom boot first and installation media second. Furthermore, during OS installation, it is required to bypass the FCoE boot and pass through to the installation media for boot. It is required to do this by disabling the FCoE boot ROM from booting, and not by simply allowing the FCoE ROM to attempt to boot and allowing the BIOS to fail through and boot the installation media. Finally, it is required that the FCoE ROM successfully discover and test the readiness of the desired boot LUN in order for installation to proceed successfully. Failure to allow the boot ROM to discover the LUN and do a coordinated bypass will result in a failure to properly install the O/S to the LUN. In order to affect this coordinated bypass, there are two choices: Once the FCoE boot ROM discovers a ready target LUN, it will prompt you to press CTRL+D within 4 seconds to Stop booting from the target. Press CTRL+D, and proceed to boot from the installation media. From CCM, set the Option ROM setting under MBA settings to One Time Disable. With this setting, the FCoE ROM will load once and automatically bypass once the ready LUN is discovered. On the subsequent reboot after installation, the option ROM will automatically revert to Enable. Wait through all option ROM banners. Once FCoE Boot is invoked, it will connect to the target, and provide a 4 second window to press CTRL+D to invoke the bypass. Press CTRL+D to proceed to installation. file:///T|/htdocs/NETWORK/BroadCom/71921/NetXtremeII/en/fcoe.htm[9/26/2012 3:29:33 PM]
-
 1
1 -
2
-
3
-
4
-
5
-
6
-
7
-
8
-
9
-
10
-
11
-
12
-
13
-
14
-
15
-
16
-
17
-
18
-
19
-
20
-
21
-
22
-
23
-
24
-
25
-
26
-
27
-
28
-
29
-
30
-
31
-
32
-
33
-
34
-
35
-
36
-
37
-
38
-
39
-
40
-
41
-
42
-
43
-
44
-
45
-
46
-
47
-
48
-
49
-
50
-
51
-
52
-
53
-
54
-
55
-
56
-
57
-
58
-
59
-
60
-
61
-
62
-
63
-
64
-
65
-
66
-
67
-
68
-
69
-
70
-
71
-
72
-
73
-
74
-
75
-
76
-
77
-
78
-
79
-
80
-
81
-
82
-
83
-
84
-
85
-
86
-
87
-
88
-
89
-
90
-
91
-
92
-
93
-
94
-
95
-
96
-
97
-
98
-
99
-
100
-
101
-
102
-
103
-
104
-
105
-
106
-
107
-
108
-
109
-
110
-
111
-
112
-
113
-
114
-
115
-
116
-
117
-
118
-
119
-
120
-
121
-
122
-
123
-
124
-
125
-
126
-
 127
127 -
 128
128 -
 129
129 -
 130
130 -
 131
131 -
 132
132 -
 133
133 -
 134
134 -
 135
135 -
 136
136 -
 137
137 -
138
-
139
-
140
-
141
-
142
-
143
-
144
-
145
-
146
-
147
-
148
-
149
-
150
-
151
-
152
-
153
-
154
-
155
-
156
-
157
-
158
-
159
-
160
-
161
-
162
-
163
-
164
-
165
-
166
-
167
-
168
-
169
-
170
-
171
-
172
-
173
-
174
-
175
-
176
-
177
-
178
-
179
-
180
-
181
-
182
-
183
-
184
-
185
-
186
-
187
-
188
-
189
-
190
-
191
-
192
-
193
-
194
-
195
-
196
-
197
-
198
-
199
-
200
-
201
-
202
-
203
-
204
-
205
-
206
-
207
-
208
-
209
-
210
-
211
-
212
-
213
-
214
-
215
-
216
-
217
-
218
-
219
-
220
-
221
-
222
-
223
-
224
 |
 |
