Dell Broadcom NetXtreme Family of Adapters Broadcom NetXtreme II Network Adapt - Page 186
Viewing BASP Statistics, Saving and Restoring a Team Configuration
 |
View all Dell Broadcom NetXtreme Family of Adapters manuals
Add to My Manuals
Save this manual to your list of manuals |
Page 186 highlights
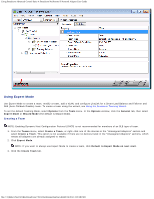
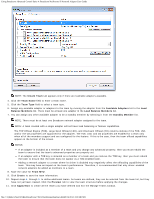
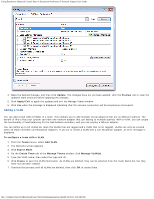
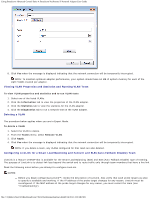
Using Broadcom Advanced Control Suite 4: Broadcom NetXtreme II Network Adapter User Guide A probe target must be on the same subnet as the team, have a valid (not a broadcast, multicast, or unicast), statically-assigned IP address, and be highly available (always on). To ensure network connectivity to the probe target, ping the probe target from the team. You can specify up to four probe targets. The IP address assigned to either a probe target or team member cannot have a zero as the first or last octet. To configure LiveLink 1. From the Teams menu, select Edit Team. 2. Click Expert Mode (to configure LiveLink using the Teaming Wizard, see Using the Broadcom Teaming Wizard). 3. In the Manage Teams window, click the Edit Team tab. 4. Select Enable LiveLink. The LiveLink Configuration options appear below. 5. It is recommended to accept the default values for Probe interval (the number of seconds between each retransmission of a link packet to the probe target) and Probe maximum retries (the number of consecutively missed responses from a probe target before a failover is triggered). To specify different values, click the desired probe interval in the Probe interval (seconds) list and click the desired maximum number of probe retries in the Probe maximum retries list. 6. Set the Probe VLAN ID to correspond with the VLAN where the probe target(s) resides. This will apply the appropriate VLAN tag to the link packet based on the shared configuration of the attached switch port(s). NOTE: Each LiveLink enabled team can only communicate with Probe Targets on a single VLAN. Also, VLAN ID 0 is equivalent to an untagged network. 7. Select Probe Target 1 and type the target IP address for one or all probe targets. NOTE: Only the first probe target is required. You can specify up to 3 additional probe targets to serve as backups by assigning IP addresses to the other probe targets. 8. Select one of the listed team members and type the member IP address. NOTE: All of the member IP addresses must be in the same subnet as the probe targets. 9. Click Update. Repeat these steps for each of the other listed team members. 10. Click Apply/Exit. Saving and Restoring a Team Configuration To save a configuration 1. From the File menu, select Team Save As. 2. Type the path and file name of the new configuration file, and then click Save. The configuration file is a text file that can be viewed by any text editor. The file contains information about both the adapter and the team configuration. To restore a configuration 1. From the File menu, select Team Restore. 2. Click the name of the file to be restored, and then click Open. NOTE: If necessary, go to the folder where the file is located. 3. Click Apply. 4. Click Yes when the message is displayed indicating that the network connection will be temporarily interrupted. 5. If a configuration is already loaded, a message is displayed that asks if you want to save your current configuration. Click Yes to save the current configuration. Otherwise, the configuration data that is currently loaded is lost. Note: The team may take a very long time to restore if the team is configured with multiple VLANs and each VLAN is configured with one or more static IP addresses. Viewing BASP Statistics The Statistics section shows performance information about the network adapters that are on a team. To view BASP Statistics information for any team member adapter or the team as a whole, click the name of the adapter or team file:///T|/htdocs/NETWORK/BroadCom/71921/NetXtremeII/en/bacs.htm[9/26/2012 3:29:48 PM]
-
 1
1 -
2
-
3
-
4
-
5
-
6
-
7
-
8
-
9
-
10
-
11
-
12
-
13
-
14
-
15
-
16
-
17
-
18
-
19
-
20
-
21
-
22
-
23
-
24
-
25
-
26
-
27
-
28
-
29
-
30
-
31
-
32
-
33
-
34
-
35
-
36
-
37
-
38
-
39
-
40
-
41
-
42
-
43
-
44
-
45
-
46
-
47
-
48
-
49
-
50
-
51
-
52
-
53
-
54
-
55
-
56
-
57
-
58
-
59
-
60
-
61
-
62
-
63
-
64
-
65
-
66
-
67
-
68
-
69
-
70
-
71
-
72
-
73
-
74
-
75
-
76
-
77
-
78
-
79
-
80
-
81
-
82
-
83
-
84
-
85
-
86
-
87
-
88
-
89
-
90
-
91
-
92
-
93
-
94
-
95
-
96
-
97
-
98
-
99
-
100
-
101
-
102
-
103
-
104
-
105
-
106
-
107
-
108
-
109
-
110
-
111
-
112
-
113
-
114
-
115
-
116
-
117
-
118
-
119
-
120
-
121
-
122
-
123
-
124
-
125
-
126
-
127
-
128
-
129
-
130
-
131
-
132
-
133
-
134
-
135
-
136
-
137
-
138
-
139
-
140
-
141
-
142
-
143
-
144
-
145
-
146
-
147
-
148
-
149
-
150
-
151
-
152
-
153
-
154
-
155
-
156
-
157
-
158
-
159
-
160
-
161
-
162
-
163
-
164
-
165
-
166
-
167
-
168
-
169
-
170
-
171
-
172
-
173
-
174
-
175
-
176
-
177
-
178
-
179
-
180
-
 181
181 -
 182
182 -
 183
183 -
 184
184 -
 185
185 -
 186
186 -
 187
187 -
 188
188 -
 189
189 -
 190
190 -
 191
191 -
192
-
193
-
194
-
195
-
196
-
197
-
198
-
199
-
200
-
201
-
202
-
203
-
204
-
205
-
206
-
207
-
208
-
209
-
210
-
211
-
212
-
213
-
214
-
215
-
216
-
217
-
218
-
219
-
220
-
221
-
222
-
223
-
224
 |
 |