Dell Broadcom NetXtreme Family of Adapters Broadcom NetXtreme II Network Adapt - Page 63
Inserting the NetXtreme II Monolithic Driver in a WinPE 2.0 Image, Windows PE Tools Command prompt.
 |
View all Dell Broadcom NetXtreme Family of Adapters manuals
Add to My Manuals
Save this manual to your list of manuals |
Page 63 highlights
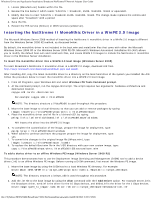
Windows Driver and Application Installation: Broadcom NetXtreme II Network Adapter User Guide 1. Locate [Manufacturer] header within the file. 2. Review the line below it which reads: %brcm% = broadcom, ntx86, ntamd64, ntia64 or equivalent. 3. Modify that line to read: %brcm% = broadcom.ntx86, ntamd64, ntia64. The change made replaces the comma and space after "broadcom" with a period. 4. Save the file. 5. Restart the RIS service (binlsvc) or WDS services (wdsserver). Inserting the NetXtreme II Monolithic Driver in a WinPE 2.0 Image The Microsoft Windows Server 2008 method of inserting the NetXtreme II monolithic driver in a WinPe 2.0 image is different from the Windows Server 2008 R2 method, as discussed below. By default, the monolithic driver is not included in the boot.wim and install.wim files that come with either the Microsoft Windows Server 2008 CD or the Windows Server 2008 R2 CD. Microsoft's Windows Automated Installation Kit (AIK) allows you to modify the default boot.wim and install.wim files, and create WinPE 2.0 images to include the NetXtreme II monolithic driver in the Windows Server installation. To insert the monolithic driver into a WinPE 2.0 boot image (Windows Server 2008) To insert Broadcom's NetXtreme II monolithic driver in a WinPE 2.0 image, download AIK from http://www.microsoft.com/download/en/default.aspx and install. After installing AIK, copy the latest monolithic driver to a directory on the local hard drive of the system you installed the AIK. Follow the procedure below to insert the monolithic driver into a WinPE 2.0 boot image. 1. From All Programs, open Windows AIK and select Windows PE Tools Command prompt. 2. At the command prompt, run the copype.cmd script. The script requires two arguments: hardware architecture and destination location. copype.cmd For example: copype x86 c:\VistaPEx86 NOTE: The directory structure c:\VistaPEx86 is used throughout this procedure. 3. Mount the base image to a local directory so that you can add or remove packages by typing: imagex /mountrw c:\VistaPEx86\winpe.wim 1 c:\VistaPEx86\mount 4. Place the monolithic driver and inf file in c:\drivers\x32\ by typing: peimg /inf=c:\Drivers\x32\b06nd.inf c:\VistaPEx86\mount\windows AIK inserts the driver into the WinPE 2.0 image. 5. To complete the customization of the image, prepare the image for deployment, type: peimg /prep c:\VistaPEx86\mount\windows 6. When asked to continue and have the program prepare the image for deployment, type: yes 7. To commit the changes to the original image file (Winpe.wim), type: imagex /unmount c:\VistaPEx86\mount /commit 8. To replace the default Boot.wim file in the \ISO directory with your new custom image, type: copy c:\VistaPex86\winpe.wim c:\VistaPEx86\ISO\sources\boot.wim To add a device driver to an offline Windows PE image (Windows Server 2008 R2) This procedure demonstrates how to use the Deployment Image Servicing and Management (DISM) tool to add a device driver (.inf) to an offline Windows PE image. Before running a DISM command, first mount the Windows PE image. 1. Mount the base image by using the DISM tool to a local Windows PE directory. For example: Dism /Mount-WIM /WimFile:c:\winpe_x86\winpe.wim /index:1 /MountDir:c:\winpe_x86\mount NOTE: The directory structure c:\winpe_x86 is used throughout this procedure. 2. Add the .inf file to the base image by using the dism command with the /Add-Driver option. For example Driver.inf is the Broadcom driver, evnd.inf is the driver for the 10 Gbps devices, and b06nd.inf is the driver for the 1 Gbps devices. Dism /image: /Add-Driver /Driver:c:\winpe_x86\mount\Windows\driver.inf file:///T|/htdocs/NETWORK/BroadCom/71921/NetXtremeII/en/umwindrv.htm[9/26/2012 3:28:57 PM]
-
 1
1 -
2
-
3
-
4
-
5
-
6
-
7
-
8
-
9
-
10
-
11
-
12
-
13
-
14
-
15
-
16
-
17
-
18
-
19
-
20
-
21
-
22
-
23
-
24
-
25
-
26
-
27
-
28
-
29
-
30
-
31
-
32
-
33
-
34
-
35
-
36
-
37
-
38
-
39
-
40
-
41
-
42
-
43
-
44
-
45
-
46
-
47
-
48
-
49
-
50
-
51
-
52
-
53
-
54
-
55
-
56
-
57
-
 58
58 -
 59
59 -
 60
60 -
 61
61 -
 62
62 -
 63
63 -
 64
64 -
 65
65 -
 66
66 -
 67
67 -
 68
68 -
69
-
70
-
71
-
72
-
73
-
74
-
75
-
76
-
77
-
78
-
79
-
80
-
81
-
82
-
83
-
84
-
85
-
86
-
87
-
88
-
89
-
90
-
91
-
92
-
93
-
94
-
95
-
96
-
97
-
98
-
99
-
100
-
101
-
102
-
103
-
104
-
105
-
106
-
107
-
108
-
109
-
110
-
111
-
112
-
113
-
114
-
115
-
116
-
117
-
118
-
119
-
120
-
121
-
122
-
123
-
124
-
125
-
126
-
127
-
128
-
129
-
130
-
131
-
132
-
133
-
134
-
135
-
136
-
137
-
138
-
139
-
140
-
141
-
142
-
143
-
144
-
145
-
146
-
147
-
148
-
149
-
150
-
151
-
152
-
153
-
154
-
155
-
156
-
157
-
158
-
159
-
160
-
161
-
162
-
163
-
164
-
165
-
166
-
167
-
168
-
169
-
170
-
171
-
172
-
173
-
174
-
175
-
176
-
177
-
178
-
179
-
180
-
181
-
182
-
183
-
184
-
185
-
186
-
187
-
188
-
189
-
190
-
191
-
192
-
193
-
194
-
195
-
196
-
197
-
198
-
199
-
200
-
201
-
202
-
203
-
204
-
205
-
206
-
207
-
208
-
209
-
210
-
211
-
212
-
213
-
214
-
215
-
216
-
217
-
218
-
219
-
220
-
221
-
222
-
223
-
224
 |
 |