Dell DX6000G Hardware Owner's Manual - Page 138
Integrated Storage Controller Card on iDRAC6 Express Card
 |
View all Dell DX6000G manuals
Add to My Manuals
Save this manual to your list of manuals |
Page 138 highlights
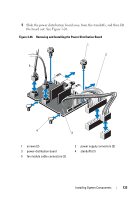
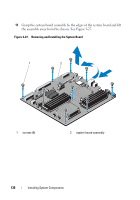
• SAS backplane power cable connector • System board power cable connectors 11 Replace the expansion-card risers. See "Removing the Front Bezel" on page 79. 12 Install all expansion cards. See "Installing an Expansion Card" on page 89. 13 Reinstall the integrated storage controller card. See "Installing the Integrated Storage Controller Card" on page 93. After connecting the SAS cables to the controller, make sure to place the cables under the guide on the end of riser 1. 14 If applicable, reconnect the RAID battery cable to the PERC controller card. 15 If applicable, reinstall the iDRAC6 Enterprise card. See "Installing an iDRAC6 Enterprise Card" on page 102. 16 If applicable, reinstall the iDRAC6 Express card. See "Installing an iDRAC6 Express Card" on page 100. 17 Replace the system board shroud. See "Installing the System Board Shroud" on page 99. 18 Close the system. See "Closing the System" on page 81. 19 Reconnect the system to its electrical outlet and turn the system on, including any attached peripherals. 20 If applicable, replace the front bezel. See "Installing the Front Bezel" on page 79. 138 Installing System Components
-
 1
1 -
2
-
3
-
4
-
5
-
6
-
7
-
8
-
9
-
10
-
11
-
12
-
13
-
14
-
15
-
16
-
17
-
18
-
19
-
20
-
21
-
22
-
23
-
24
-
25
-
26
-
27
-
28
-
29
-
30
-
31
-
32
-
33
-
34
-
35
-
36
-
37
-
38
-
39
-
40
-
41
-
42
-
43
-
44
-
45
-
46
-
47
-
48
-
49
-
50
-
51
-
52
-
53
-
54
-
55
-
56
-
57
-
58
-
59
-
60
-
61
-
62
-
63
-
64
-
65
-
66
-
67
-
68
-
69
-
70
-
71
-
72
-
73
-
74
-
75
-
76
-
77
-
78
-
79
-
80
-
81
-
82
-
83
-
84
-
85
-
86
-
87
-
88
-
89
-
90
-
91
-
92
-
93
-
94
-
95
-
96
-
97
-
98
-
99
-
100
-
101
-
102
-
103
-
104
-
105
-
106
-
107
-
108
-
109
-
110
-
111
-
112
-
113
-
114
-
115
-
116
-
117
-
118
-
119
-
120
-
121
-
122
-
123
-
124
-
125
-
126
-
127
-
128
-
129
-
130
-
131
-
132
-
 133
133 -
 134
134 -
 135
135 -
 136
136 -
 137
137 -
 138
138 -
 139
139 -
 140
140 -
 141
141 -
 142
142 -
 143
143 -
144
-
145
-
146
-
147
-
148
-
149
-
150
-
151
-
152
-
153
-
154
-
155
-
156
-
157
-
158
-
159
-
160
-
161
-
162
-
163
-
164
-
165
-
166
-
167
-
168
-
169
-
170
-
171
-
172
-
173
-
174
 |
 |