Dell DX6000G Hardware Owner's Manual - Page 90
Connect any cables to the expansion card., Close the system. See Closing the System
 |
View all Dell DX6000G manuals
Add to My Manuals
Save this manual to your list of manuals |
Page 90 highlights
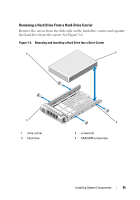
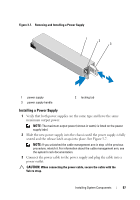
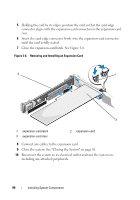
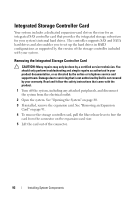
5 Holding the card by its edges, position the card so that the card-edge connector aligns with the expansion-card connector on the expansion-card riser. 6 Insert the card-edge connector firmly into the expansion-card connector until the card is fully seated. 7 Close the expansion-card latch. See Figure 3-8. Figure 3-8. Removing and Installing an Expansion Card 3 1 2 1 expansion-card latch 3 expansion-card riser 2 expansion card 8 Connect any cables to the expansion card. 9 Close the system. See "Closing the System" on page 81. 10 Reconnect the system to its electrical outlet and turn the system on, including any attached peripherals. 90 Installing System Components
-
 1
1 -
2
-
3
-
4
-
5
-
6
-
7
-
8
-
9
-
10
-
11
-
12
-
13
-
14
-
15
-
16
-
17
-
18
-
19
-
20
-
21
-
22
-
23
-
24
-
25
-
26
-
27
-
28
-
29
-
30
-
31
-
32
-
33
-
34
-
35
-
36
-
37
-
38
-
39
-
40
-
41
-
42
-
43
-
44
-
45
-
46
-
47
-
48
-
49
-
50
-
51
-
52
-
53
-
54
-
55
-
56
-
57
-
58
-
59
-
60
-
61
-
62
-
63
-
64
-
65
-
66
-
67
-
68
-
69
-
70
-
71
-
72
-
73
-
74
-
75
-
76
-
77
-
78
-
79
-
80
-
81
-
82
-
83
-
84
-
 85
85 -
 86
86 -
 87
87 -
 88
88 -
 89
89 -
 90
90 -
 91
91 -
 92
92 -
 93
93 -
 94
94 -
 95
95 -
96
-
97
-
98
-
99
-
100
-
101
-
102
-
103
-
104
-
105
-
106
-
107
-
108
-
109
-
110
-
111
-
112
-
113
-
114
-
115
-
116
-
117
-
118
-
119
-
120
-
121
-
122
-
123
-
124
-
125
-
126
-
127
-
128
-
129
-
130
-
131
-
132
-
133
-
134
-
135
-
136
-
137
-
138
-
139
-
140
-
141
-
142
-
143
-
144
-
145
-
146
-
147
-
148
-
149
-
150
-
151
-
152
-
153
-
154
-
155
-
156
-
157
-
158
-
159
-
160
-
161
-
162
-
163
-
164
-
165
-
166
-
167
-
168
-
169
-
170
-
171
-
172
-
173
-
174
 |
 |
90
Installing System Components
5
Holding the card by its edges, position the card so that the card-edge
connector aligns with the expansion-card connector on the expansion-card
riser.
6
Insert the card-edge connector firmly into the expansion-card connector
until the card is fully seated.
7
Close the expansion-card latch. See Figure 3-8.
Figure 3-8.
Removing and Installing an Expansion Card
8
Connect any cables to the expansion card.
9
Close the system. See "Closing the System" on page 81.
10
Reconnect the system to its electrical outlet and turn the system on,
including any attached peripherals.
1
expansion-card latch
2
expansion card
3
expansion-card riser
2
1
3