Dell PowerEdge 1955 Hardware Owner's Manual (PDF) - Page 103
Troubleshooting the Keyboard, Keyboard/Video/Mouse KVM custom cable
 |
View all Dell PowerEdge 1955 manuals
Add to My Manuals
Save this manual to your list of manuals |
Page 103 highlights
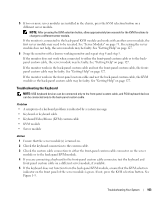
5 If two or more server modules are installed in the chassis, press the KVM selection button on a different server module. NOTE: After pressing the KVM selection button, allow approximately two seconds for the KVM functions to change to a different server module. If the monitor is connected to the back-panel KVM module and works with another server module, the first server module may need to be reseated. See "Server Modules" on page 73. If reseating the server module does not help, the server module may be faulty. See "Getting Help" on page 127. 6 Swap the monitor with a known-working monitor and repeat step 4 and step 5. If the monitor does not work when connected to either the front-panel custom cable or to the backpanel custom cable, the server module may be faulty. See "Getting Help" on page 127. If the monitor works in the back-panel custom cable and not the front-panel custom cable, the frontpanel custom cable may be faulty. See "Getting Help" on page 127. If the monitor works in the front-panel custom cable and not the back-panel custom cable, the KVM module or the back-panel custom cable may be faulty. See "Getting Help" on page 127. Troubleshooting the Keyboard NOTE: USB keyboard devices can be connected only to the front-panel custom cable, and PS/2 keyboard devices can be connected only to the back-panel custom cable. Problem • A symptom of a keyboard problem is indicated by a system message • Keyboard or keyboard cable • Keyboard/Video/Mouse (KVM) custom cable • KVM module • Server module Action 1 Ensure that the server module(s) is turned on. 2 Check the keyboard connection to the custom cable. 3 Check the custom cable connection to either the front-panel custom cable connector on the server module or to the back-panel KVM module. 4 If you are connecting a keyboard to the front-panel custom cable connector, test the keyboard and front-panel custom cable on a different server module, if available. 5 If the keyboard does not function from the back-panel KVM module, ensure that the KVM selection indicator on the front panel of the server module is green. If not, press the KVM selection button. See Figure 1-3. Troubleshooting Your System 103
-
 1
1 -
2
-
3
-
4
-
5
-
6
-
7
-
8
-
9
-
10
-
11
-
12
-
13
-
14
-
15
-
16
-
17
-
18
-
19
-
20
-
21
-
22
-
23
-
24
-
25
-
26
-
27
-
28
-
29
-
30
-
31
-
32
-
33
-
34
-
35
-
36
-
37
-
38
-
39
-
40
-
41
-
42
-
43
-
44
-
45
-
46
-
47
-
48
-
49
-
50
-
51
-
52
-
53
-
54
-
55
-
56
-
57
-
58
-
59
-
60
-
61
-
62
-
63
-
64
-
65
-
66
-
67
-
68
-
69
-
70
-
71
-
72
-
73
-
74
-
75
-
76
-
77
-
78
-
79
-
80
-
81
-
82
-
83
-
84
-
85
-
86
-
87
-
88
-
89
-
90
-
91
-
92
-
93
-
94
-
95
-
96
-
97
-
 98
98 -
 99
99 -
 100
100 -
 101
101 -
 102
102 -
 103
103 -
 104
104 -
 105
105 -
 106
106 -
 107
107 -
 108
108 -
109
-
110
-
111
-
112
-
113
-
114
-
115
-
116
-
117
-
118
-
119
-
120
-
121
-
122
-
123
-
124
-
125
-
126
-
127
-
128
-
129
-
130
-
131
-
132
-
133
-
134
-
135
-
136
-
137
-
138
-
139
-
140
-
141
-
142
-
143
-
144
-
145
-
146
-
147
-
148
-
149
-
150
-
151
-
152
-
153
-
154
-
155
-
156
-
157
-
158
-
159
-
160
 |
 |