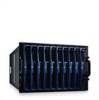
Dell PowerEdge 1955 Hardware Owner's Manual (PDF) - Page 63
DRAC/MC Firmware Requirements, KVM Module, Removing a KVM Module, Installing a KVM Module - configuration guide
 |
View all Dell PowerEdge 1955 manuals
Add to My Manuals
Save this manual to your list of manuals |
Page 63 highlights
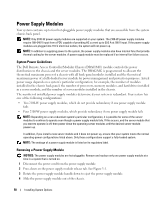
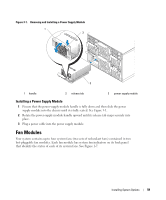
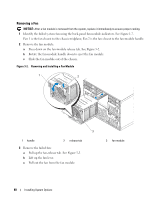
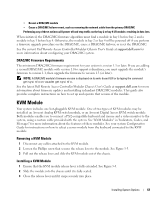
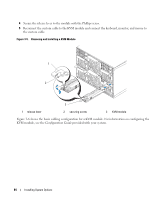
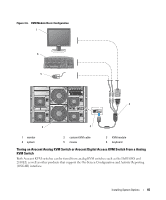
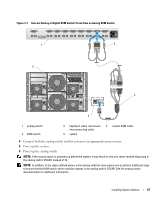
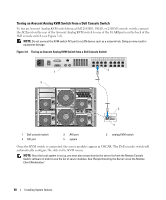
• Reseat a DRAC/MC module • Cause a DRAC/MC failover event, such as removing the network cable from the primary DRAC/MC Performing any of these actions will power off and stop traffic on the bay 2 or bay 4 I/O module, resulting in data loss. When initiated, the DRAC/MC firmware algorithm must find a module in bay 1 before bay 2 and a module in bay 3 before bay 4. Otherwise, the module in bay 2 or bay 4 will be powered off if you perform a firmware upgrade procedure on the DRAC/MC, cause a DRAC/MC failover, or reset the DRAC/MC. See the current Dell Remote Access Controller/Modular Chassis User's Guide at support.dell.com for more information about configuring your DRAC/MC system. DRAC/MC Firmware Requirements The minimum DRAC/MC firmware requirement for your system is version 1.3 or later. If you are adding a second DRAC/MC module with version 1.0 to support redundancy, you must upgrade the module's firmware to version 1.1, then upgrade the firmware to version 1.3 (or later). NOTE: A DRAC/MC module's firmware version is displayed on its web-based GUI or by typing the command getsysinfo or racadm getsysinfo. See the latest Dell Remote Access Controller/Modular Chassis User's Guide at support.dell.com for more information about firmware updates and installing redundant DRAC/MC modules. This guide also provides complete instructions on how to set up and operate that version of the module. KVM Module Your system includes one hot-pluggable KVM module. One of two types of KVM modules may be installed: an Avocent Analog KVM switch module, or an Avocent Digital Access KVM switch module. Both modules enable you to connect a PS/2-compatible keyboard and mouse and a video monitor to the system, using a custom cable provided with the system. See "KVM Modules" in "Indicators, Codes, and Messages" for more information about the features of these modules. See your system Configuration Guide for instructions on how to select a server module from the keyboard connected to the KVM module. Removing a KVM Module 1 Disconnect any cables attached to the KVM module. 2 Loosen the Phillips screw that secures the release lever to the module. See Figure 3-5. 3 Pull out the release lever and slide the KVM module out of the chassis. Installing a KVM Module 1 Ensure that the KVM module release lever is fully extended. See Figure 3-5. 2 Slide the module into the chassis until it is fully seated. 3 Close the release lever until it snaps securely into place. Installing System Options 63
-
 1
1 -
2
-
3
-
4
-
5
-
6
-
7
-
8
-
9
-
10
-
11
-
12
-
13
-
14
-
15
-
16
-
17
-
18
-
19
-
20
-
21
-
22
-
23
-
24
-
25
-
26
-
27
-
28
-
29
-
30
-
31
-
32
-
33
-
34
-
35
-
36
-
37
-
38
-
39
-
40
-
41
-
42
-
43
-
44
-
45
-
46
-
47
-
48
-
49
-
50
-
51
-
52
-
53
-
54
-
55
-
56
-
57
-
 58
58 -
 59
59 -
 60
60 -
 61
61 -
 62
62 -
 63
63 -
 64
64 -
 65
65 -
 66
66 -
 67
67 -
 68
68 -
69
-
70
-
71
-
72
-
73
-
74
-
75
-
76
-
77
-
78
-
79
-
80
-
81
-
82
-
83
-
84
-
85
-
86
-
87
-
88
-
89
-
90
-
91
-
92
-
93
-
94
-
95
-
96
-
97
-
98
-
99
-
100
-
101
-
102
-
103
-
104
-
105
-
106
-
107
-
108
-
109
-
110
-
111
-
112
-
113
-
114
-
115
-
116
-
117
-
118
-
119
-
120
-
121
-
122
-
123
-
124
-
125
-
126
-
127
-
128
-
129
-
130
-
131
-
132
-
133
-
134
-
135
-
136
-
137
-
138
-
139
-
140
-
141
-
142
-
143
-
144
-
145
-
146
-
147
-
148
-
149
-
150
-
151
-
152
-
153
-
154
-
155
-
156
-
157
-
158
-
159
-
160
 |
 |