Dell PowerEdge 1955 Hardware Owner's Manual (PDF) - Page 119
System Diagnostics Testing Options, Using the Advanced Testing Options, Diagnostics, Advanced Testing
 |
View all Dell PowerEdge 1955 manuals
Add to My Manuals
Save this manual to your list of manuals |
Page 119 highlights
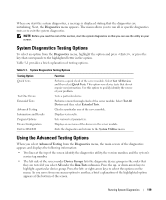
When you start the system diagnostics, a message is displayed stating that the diagnostics are initializing. Next, the Diagnostics menu appears. The menu allows you to run all or specific diagnostics tests or to exit the system diagnostics. NOTE: Before you read the rest of this section, start the system diagnostics so that you can see the utility on your screen. System Diagnostics Testing Options To select an option from the Diagnostics menu, highlight the option and press , or press the key that corresponds to the highlighted letter in the option. Table 5-1 provides a brief explanation of testing options. Table 5-1. System Diagnostics Testing Options Testing Option Quick Tests Test One Device Extended Tests Advanced Testing Information and Results Program Options Device Configuration Exit to MS-DOS Function Performs a quick check of the server module. Select Test All Devices and then select Quick Tests. This option runs device tests that do not require user interaction. Use this option to quickly identify the source of your problem. Tests a particular device. Performs a more thorough check of the server module. Select Test All Devices and then select Extended Tests. Checks a particular area of the server module. Displays test results. Sets various test parameters. Displays an overview of the devices in the server module. Exits the diagnostics and returns to the System Utilities menu. Using the Advanced Testing Options When you select Advanced Testing from the Diagnostics menu, the main screen of the diagnostics appears and displays the following information: • Two lines at the top of the screen identify the diagnostics utility, the version number, and the system's service tag number. • The left side of the screen under Device Groups lists the diagnostic device groups in the order that they are tested if you select All under the Run Tests submenu. Press the up- or down-arrow keys to highlight a particular device group. Press the left- or right-arrow keys to select the options on the menu. As you move from one menu option to another, a brief explanation of the highlighted option appears at the bottom of the screen. Running System Diagnostics 119
-
 1
1 -
2
-
3
-
4
-
5
-
6
-
7
-
8
-
9
-
10
-
11
-
12
-
13
-
14
-
15
-
16
-
17
-
18
-
19
-
20
-
21
-
22
-
23
-
24
-
25
-
26
-
27
-
28
-
29
-
30
-
31
-
32
-
33
-
34
-
35
-
36
-
37
-
38
-
39
-
40
-
41
-
42
-
43
-
44
-
45
-
46
-
47
-
48
-
49
-
50
-
51
-
52
-
53
-
54
-
55
-
56
-
57
-
58
-
59
-
60
-
61
-
62
-
63
-
64
-
65
-
66
-
67
-
68
-
69
-
70
-
71
-
72
-
73
-
74
-
75
-
76
-
77
-
78
-
79
-
80
-
81
-
82
-
83
-
84
-
85
-
86
-
87
-
88
-
89
-
90
-
91
-
92
-
93
-
94
-
95
-
96
-
97
-
98
-
99
-
100
-
101
-
102
-
103
-
104
-
105
-
106
-
107
-
108
-
109
-
110
-
111
-
112
-
113
-
 114
114 -
 115
115 -
 116
116 -
 117
117 -
 118
118 -
 119
119 -
 120
120 -
 121
121 -
 122
122 -
 123
123 -
 124
124 -
125
-
126
-
127
-
128
-
129
-
130
-
131
-
132
-
133
-
134
-
135
-
136
-
137
-
138
-
139
-
140
-
141
-
142
-
143
-
144
-
145
-
146
-
147
-
148
-
149
-
150
-
151
-
152
-
153
-
154
-
155
-
156
-
157
-
158
-
159
-
160
 |
 |