Dell Precision 330 User's Guide - Page 100
Removing an Expansion Card
 |
View all Dell Precision 330 manuals
Add to My Manuals
Save this manual to your list of manuals |
Page 100 highlights
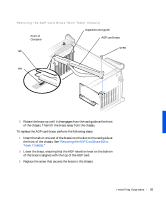
www.dell.com | support.dell.com 9 Replace the computer cover, reconnect the computer and peripherals to their electrical outlets, and turn them on. NOTE: If enabled, the Chassis Intrusion option will cause the following message to be displayed at the next system start-up: ALERT! Cover was previously removed. 10 If you installed a sound card, perform the following steps: a Enter system setup, select Integrated Devices and change the setting for Sound to Off. b Connect external audio devices to the sound card's connectors. Do not connect external audio devices to the microphone, lineout, or line-in connectors on the system back panel (see "BackPanel Connectors and Indicators"). 11 If you installed an add-in NIC, perform the following steps: a Enter system setup, select Integrated Devices and change the setting for Network Interface Card to Off. b Connect the network cable to the add-in NIC's connectors. Do not connect the network cable to the integrated NIC connector on the system back panel (see "Back-Panel Connectors and Indicators"). Removing an Expansion Card CAUTION: Before you perform this procedure, see "Safety First- For You and Your Computer." 1 Turn off the computer and peripherals, disconnect them from their electrical outlets, wait at least 5 seconds, and then remove the computer cover. 2 If you have a mini tower chassis and you are removing an AGP card, remove the AGP card brace. 3 If necessary, disconnect any cables connected to the card. 4 Remove the screw that secures the expansion card bracket to the chassis. Save the screw to use when installing the expansion card or filler bracket later in this procedure. 100 Ins ta l l i n g Up g r a d es
-
 1
1 -
2
-
3
-
4
-
5
-
6
-
7
-
8
-
9
-
10
-
11
-
12
-
13
-
14
-
15
-
16
-
17
-
18
-
19
-
20
-
21
-
22
-
23
-
24
-
25
-
26
-
27
-
28
-
29
-
30
-
31
-
32
-
33
-
34
-
35
-
36
-
37
-
38
-
39
-
40
-
41
-
42
-
43
-
44
-
45
-
46
-
47
-
48
-
49
-
50
-
51
-
52
-
53
-
54
-
55
-
56
-
57
-
58
-
59
-
60
-
61
-
62
-
63
-
64
-
65
-
66
-
67
-
68
-
69
-
70
-
71
-
72
-
73
-
74
-
75
-
76
-
77
-
78
-
79
-
80
-
81
-
82
-
83
-
84
-
85
-
86
-
87
-
88
-
89
-
90
-
91
-
92
-
93
-
94
-
 95
95 -
 96
96 -
 97
97 -
 98
98 -
 99
99 -
 100
100 -
 101
101 -
 102
102 -
 103
103 -
 104
104 -
 105
105 -
106
-
107
-
108
-
109
-
110
-
111
-
112
-
113
-
114
-
115
-
116
-
117
-
118
-
119
-
120
-
121
-
122
-
123
-
124
-
125
-
126
-
127
-
128
-
129
-
130
-
131
-
132
-
133
-
134
-
135
-
136
-
137
-
138
-
139
-
140
-
141
-
142
-
143
-
144
-
145
-
146
-
147
-
148
-
149
-
150
-
151
-
152
-
153
-
154
-
155
-
156
-
157
-
158
-
159
-
160
-
161
-
162
-
163
-
164
-
165
-
166
-
167
-
168
-
169
-
170
-
171
-
172
-
173
-
174
-
175
-
176
-
177
-
178
-
179
-
180
-
181
-
182
-
183
-
184
-
185
-
186
-
187
-
188
-
189
-
190
-
191
-
192
-
193
-
194
-
195
-
196
-
197
-
198
-
199
-
200
-
201
-
202
-
203
-
204
-
205
-
206
-
207
-
208
-
209
-
210
-
211
-
212
-
213
-
214
-
215
-
216
-
217
-
218
-
219
-
220
 |
 |
