Dell Precision 330 User's Guide - Page 86
Installing a Hard Drive in a Desktop Chassis
 |
View all Dell Precision 330 manuals
Add to My Manuals
Save this manual to your list of manuals |
Page 86 highlights
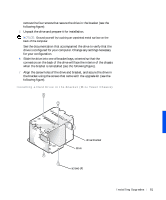
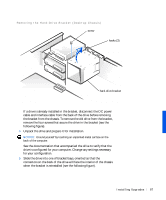
www.dell.com | support.dell.com 13 Replace the front panel. 14 Replace the computer cover, reconnect the computer and peripherals to their electrical outlets, and turn them on. NOTE: If enabled, the Chassis Intrusion option will cause the following message to be displayed at the next system start-up: ALERT! Cover was previously removed. 15 Enter system setup, and update the drive settings. After you update the system settings, exit system setup and reboot the computer. 16 Partition and logically format the drive before proceeding to the next step. See the operating system's documentation for instructions. 17 Run the Dell Diagnostics to test the drive. 18 If the hard drive you installed is the primary drive, install the operating system on the drive. See the operating system's documentation for instructions. Installing a Hard Drive in a Desktop Chassis NOTE: If you are replacing a hard drive that contains data you want to keep, be sure to back up your files before you begin this procedure. CAUTION: Before you perform this procedure, see "Safety First- For You and Your Computer." 1 Turn off the computer and peripherals, disconnect them from their electrical outlets, wait at least 5 seconds, and then remove the computer cover. 2 Rotate the power supply away from the system board. 3 Remove the drive bracket from the chassis. Remove the screw holding the drive bracket in the chassis. Lift the drive bracket up to disengage it from the latch on the externally accessible drive bay and the three hooks on the front of the chassis (see the following figure). 86 Instal ling Upgrades
-
 1
1 -
2
-
3
-
4
-
5
-
6
-
7
-
8
-
9
-
10
-
11
-
12
-
13
-
14
-
15
-
16
-
17
-
18
-
19
-
20
-
21
-
22
-
23
-
24
-
25
-
26
-
27
-
28
-
29
-
30
-
31
-
32
-
33
-
34
-
35
-
36
-
37
-
38
-
39
-
40
-
41
-
42
-
43
-
44
-
45
-
46
-
47
-
48
-
49
-
50
-
51
-
52
-
53
-
54
-
55
-
56
-
57
-
58
-
59
-
60
-
61
-
62
-
63
-
64
-
65
-
66
-
67
-
68
-
69
-
70
-
71
-
72
-
73
-
74
-
75
-
76
-
77
-
78
-
79
-
80
-
 81
81 -
 82
82 -
 83
83 -
 84
84 -
 85
85 -
 86
86 -
 87
87 -
 88
88 -
 89
89 -
 90
90 -
 91
91 -
92
-
93
-
94
-
95
-
96
-
97
-
98
-
99
-
100
-
101
-
102
-
103
-
104
-
105
-
106
-
107
-
108
-
109
-
110
-
111
-
112
-
113
-
114
-
115
-
116
-
117
-
118
-
119
-
120
-
121
-
122
-
123
-
124
-
125
-
126
-
127
-
128
-
129
-
130
-
131
-
132
-
133
-
134
-
135
-
136
-
137
-
138
-
139
-
140
-
141
-
142
-
143
-
144
-
145
-
146
-
147
-
148
-
149
-
150
-
151
-
152
-
153
-
154
-
155
-
156
-
157
-
158
-
159
-
160
-
161
-
162
-
163
-
164
-
165
-
166
-
167
-
168
-
169
-
170
-
171
-
172
-
173
-
174
-
175
-
176
-
177
-
178
-
179
-
180
-
181
-
182
-
183
-
184
-
185
-
186
-
187
-
188
-
189
-
190
-
191
-
192
-
193
-
194
-
195
-
196
-
197
-
198
-
199
-
200
-
201
-
202
-
203
-
204
-
205
-
206
-
207
-
208
-
209
-
210
-
211
-
212
-
213
-
214
-
215
-
216
-
217
-
218
-
219
-
220
 |
 |
