Dell Precision 330 User's Guide - Page 64
Removing the Front Panel, Mini Tower Chassis, Then rotate the top of the panel toward the chassis
 |
View all Dell Precision 330 manuals
Add to My Manuals
Save this manual to your list of manuals |
Page 64 highlights
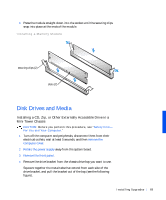
www.dell.com | support.dell.com Removing the Front Panel (Mini Tower Chassis) front-panel release button front-panel latches (2) front-panel tabs (2) retaining hooks (2) While pressing the front-panel release button, rotate the top of the panel outward, away from the chassis. Lift the panel away from the chassis. To replace the front panel, fit the two front-panel retaining hooks into the recessed slots at the bottom of the chassis. See "Removing the Front Panel (Mini Tower Chassis)." Then rotate the top of the panel toward the chassis until the front-panel latches snap into the tabs on the front panel. 64 Instal ling Upgrades
-
 1
1 -
2
-
3
-
4
-
5
-
6
-
7
-
8
-
9
-
10
-
11
-
12
-
13
-
14
-
15
-
16
-
17
-
18
-
19
-
20
-
21
-
22
-
23
-
24
-
25
-
26
-
27
-
28
-
29
-
30
-
31
-
32
-
33
-
34
-
35
-
36
-
37
-
38
-
39
-
40
-
41
-
42
-
43
-
44
-
45
-
46
-
47
-
48
-
49
-
50
-
51
-
52
-
53
-
54
-
55
-
56
-
57
-
58
-
 59
59 -
 60
60 -
 61
61 -
 62
62 -
 63
63 -
 64
64 -
 65
65 -
 66
66 -
 67
67 -
 68
68 -
 69
69 -
70
-
71
-
72
-
73
-
74
-
75
-
76
-
77
-
78
-
79
-
80
-
81
-
82
-
83
-
84
-
85
-
86
-
87
-
88
-
89
-
90
-
91
-
92
-
93
-
94
-
95
-
96
-
97
-
98
-
99
-
100
-
101
-
102
-
103
-
104
-
105
-
106
-
107
-
108
-
109
-
110
-
111
-
112
-
113
-
114
-
115
-
116
-
117
-
118
-
119
-
120
-
121
-
122
-
123
-
124
-
125
-
126
-
127
-
128
-
129
-
130
-
131
-
132
-
133
-
134
-
135
-
136
-
137
-
138
-
139
-
140
-
141
-
142
-
143
-
144
-
145
-
146
-
147
-
148
-
149
-
150
-
151
-
152
-
153
-
154
-
155
-
156
-
157
-
158
-
159
-
160
-
161
-
162
-
163
-
164
-
165
-
166
-
167
-
168
-
169
-
170
-
171
-
172
-
173
-
174
-
175
-
176
-
177
-
178
-
179
-
180
-
181
-
182
-
183
-
184
-
185
-
186
-
187
-
188
-
189
-
190
-
191
-
192
-
193
-
194
-
195
-
196
-
197
-
198
-
199
-
200
-
201
-
202
-
203
-
204
-
205
-
206
-
207
-
208
-
209
-
210
-
211
-
212
-
213
-
214
-
215
-
216
-
217
-
218
-
219
-
220
 |
 |

64
Installing Upgrades
www.dell.com | support.dell.com
Removing the Front Panel (Mini Tower Chassis)
While pressing the front-panel release button, rotate the top of the panel
outward, away from the chassis. Lift the panel away from the chassis.
To replace the front panel, fit the two front-panel retaining hooks into the
recessed slots at the bottom of the chassis. See "
Removing the Front Panel
(Mini Tower Chassis)
." Then rotate the top of the panel toward the chassis
until the front-panel latches snap into the tabs on the front panel.
retaining hooks (2)
front-panel release
button
front-panel
latches (2)
front-panel tabs (2)