Dell Precision 330 User's Guide - Page 82
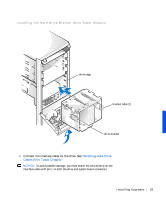
Reinstall the hard-drive bracket in the chassis see the following
 |
View all Dell Precision 330 manuals
Add to My Manuals
Save this manual to your list of manuals |
Page 82 highlights
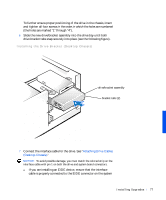
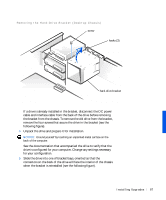
www.dell.com | support.dell.com NOTE: Orient the drive in the bracket so that its bottom will face the left side of the chassis when the bracket is installed in the chassis. 8 Reinstall the hard-drive bracket in the chassis (see the following figure). Insert the drive bracket into the chassis, sliding it in until the tabs snap into place. Rotate the drive door upward to the chassis until it snaps securely into place. NOTE: When you rotate the drive door back into place, ensure that the tabs on the drive door are inserted between the drive bracket and the drive cage. NOTE: Be sure to fold down the drive door handle so that the front panel can be replaced on the chassis. 82 Instal ling Upgrades
-
 1
1 -
2
-
3
-
4
-
5
-
6
-
7
-
8
-
9
-
10
-
11
-
12
-
13
-
14
-
15
-
16
-
17
-
18
-
19
-
20
-
21
-
22
-
23
-
24
-
25
-
26
-
27
-
28
-
29
-
30
-
31
-
32
-
33
-
34
-
35
-
36
-
37
-
38
-
39
-
40
-
41
-
42
-
43
-
44
-
45
-
46
-
47
-
48
-
49
-
50
-
51
-
52
-
53
-
54
-
55
-
56
-
57
-
58
-
59
-
60
-
61
-
62
-
63
-
64
-
65
-
66
-
67
-
68
-
69
-
70
-
71
-
72
-
73
-
74
-
75
-
76
-
 77
77 -
 78
78 -
 79
79 -
 80
80 -
 81
81 -
 82
82 -
 83
83 -
 84
84 -
 85
85 -
 86
86 -
 87
87 -
88
-
89
-
90
-
91
-
92
-
93
-
94
-
95
-
96
-
97
-
98
-
99
-
100
-
101
-
102
-
103
-
104
-
105
-
106
-
107
-
108
-
109
-
110
-
111
-
112
-
113
-
114
-
115
-
116
-
117
-
118
-
119
-
120
-
121
-
122
-
123
-
124
-
125
-
126
-
127
-
128
-
129
-
130
-
131
-
132
-
133
-
134
-
135
-
136
-
137
-
138
-
139
-
140
-
141
-
142
-
143
-
144
-
145
-
146
-
147
-
148
-
149
-
150
-
151
-
152
-
153
-
154
-
155
-
156
-
157
-
158
-
159
-
160
-
161
-
162
-
163
-
164
-
165
-
166
-
167
-
168
-
169
-
170
-
171
-
172
-
173
-
174
-
175
-
176
-
177
-
178
-
179
-
180
-
181
-
182
-
183
-
184
-
185
-
186
-
187
-
188
-
189
-
190
-
191
-
192
-
193
-
194
-
195
-
196
-
197
-
198
-
199
-
200
-
201
-
202
-
203
-
204
-
205
-
206
-
207
-
208
-
209
-
210
-
211
-
212
-
213
-
214
-
215
-
216
-
217
-
218
-
219
-
220
 |
 |

82
Installing Upgrades
www.dell.com | support.dell.com
NOTE:
Orient the drive in the bracket so that its bottom will face the left
side of the chassis when the bracket is installed in the chassis.
8
Reinstall the hard-drive bracket in the chassis (see the following
figure).
Insert the drive bracket into the chassis, sliding it in until the tabs snap
into place. Rotate the drive door upward to the chassis until it snaps
securely into place.
NOTE:
When you rotate the drive door back into place, ensure that the
tabs on the drive door are inserted between the drive bracket and the drive
cage.
NOTE:
Be sure to fold down the drive door handle so that the front panel
can be replaced on the chassis.