Dell Precision 330 User's Guide - Page 73
Hold the front panel with the outside facing you. Press the ends of - system fan
 |
View all Dell Precision 330 manuals
Add to My Manuals
Save this manual to your list of manuals |
Page 73 highlights
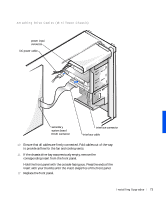
Attaching Drive Cables (Mini Tower Chassis) power input connector DC power cable secondary system board EIDE connector interface connector interface cable 10 Ensure that all cables are firmly connected. Fold cables out of the way to provide airflow for the fan and cooling vents. 11 If the chassis drive bay was previously empty, remove the corresponding insert from the front panel. Hold the front panel with the outside facing you. Press the ends of the insert with your thumbs until the insert snaps free of the front panel. 12 Replace the front panel. Instal ling Upgr ades 73
-
 1
1 -
2
-
3
-
4
-
5
-
6
-
7
-
8
-
9
-
10
-
11
-
12
-
13
-
14
-
15
-
16
-
17
-
18
-
19
-
20
-
21
-
22
-
23
-
24
-
25
-
26
-
27
-
28
-
29
-
30
-
31
-
32
-
33
-
34
-
35
-
36
-
37
-
38
-
39
-
40
-
41
-
42
-
43
-
44
-
45
-
46
-
47
-
48
-
49
-
50
-
51
-
52
-
53
-
54
-
55
-
56
-
57
-
58
-
59
-
60
-
61
-
62
-
63
-
64
-
65
-
66
-
67
-
 68
68 -
 69
69 -
 70
70 -
 71
71 -
 72
72 -
 73
73 -
 74
74 -
 75
75 -
 76
76 -
 77
77 -
 78
78 -
79
-
80
-
81
-
82
-
83
-
84
-
85
-
86
-
87
-
88
-
89
-
90
-
91
-
92
-
93
-
94
-
95
-
96
-
97
-
98
-
99
-
100
-
101
-
102
-
103
-
104
-
105
-
106
-
107
-
108
-
109
-
110
-
111
-
112
-
113
-
114
-
115
-
116
-
117
-
118
-
119
-
120
-
121
-
122
-
123
-
124
-
125
-
126
-
127
-
128
-
129
-
130
-
131
-
132
-
133
-
134
-
135
-
136
-
137
-
138
-
139
-
140
-
141
-
142
-
143
-
144
-
145
-
146
-
147
-
148
-
149
-
150
-
151
-
152
-
153
-
154
-
155
-
156
-
157
-
158
-
159
-
160
-
161
-
162
-
163
-
164
-
165
-
166
-
167
-
168
-
169
-
170
-
171
-
172
-
173
-
174
-
175
-
176
-
177
-
178
-
179
-
180
-
181
-
182
-
183
-
184
-
185
-
186
-
187
-
188
-
189
-
190
-
191
-
192
-
193
-
194
-
195
-
196
-
197
-
198
-
199
-
200
-
201
-
202
-
203
-
204
-
205
-
206
-
207
-
208
-
209
-
210
-
211
-
212
-
213
-
214
-
215
-
216
-
217
-
218
-
219
-
220
 |
 |

Installing Upgrades
73
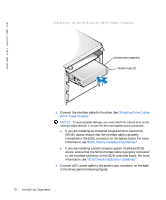
Attaching Drive Cables (Mini Tower Chassis)
10
Ensure that all cables are firmly connected. Fold cables out of the way
to provide airflow for the fan and cooling vents.
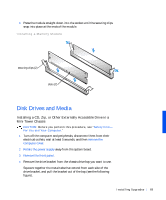
11
If the chassis drive bay was previously empty, remove the
corresponding insert from the front panel.
Hold the front panel with the outside facing you. Press the ends of the
insert with your thumbs until the insert snaps free of the front panel.
12
Replace the front panel.
DC power cable
power input
connector
interface cable
interface connector
secondary
system board
EIDE connector