Dell Precision 330 User's Guide - Page 80
Remove the front panel, If a drive is already installed in the bracket, disconnect the DC power
 |
View all Dell Precision 330 manuals
Add to My Manuals
Save this manual to your list of manuals |
Page 80 highlights
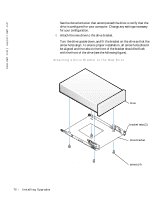
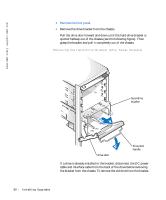
www.dell.com | support.dell.com 3 Remove the front panel. 4 Remove the drive bracket from the chassis. Pull the drive door forward and down until the hard-drive bracket is ejected halfway out of the chassis (see the following figure). Then grasp the bracket and pull it completely out of the chassis. Removing the Hard-Drive Bracket (Mini Tower Chassis) hard-drive bracket drive door drive door handle If a drive is already installed in the bracket, disconnect the DC power cable and interface cable from the back of the drive before removing the bracket from the chassis. To remove the old drive from the bracket, 80 Instal ling Upgrades
-
 1
1 -
2
-
3
-
4
-
5
-
6
-
7
-
8
-
9
-
10
-
11
-
12
-
13
-
14
-
15
-
16
-
17
-
18
-
19
-
20
-
21
-
22
-
23
-
24
-
25
-
26
-
27
-
28
-
29
-
30
-
31
-
32
-
33
-
34
-
35
-
36
-
37
-
38
-
39
-
40
-
41
-
42
-
43
-
44
-
45
-
46
-
47
-
48
-
49
-
50
-
51
-
52
-
53
-
54
-
55
-
56
-
57
-
58
-
59
-
60
-
61
-
62
-
63
-
64
-
65
-
66
-
67
-
68
-
69
-
70
-
71
-
72
-
73
-
74
-
 75
75 -
 76
76 -
 77
77 -
 78
78 -
 79
79 -
 80
80 -
 81
81 -
 82
82 -
 83
83 -
 84
84 -
 85
85 -
86
-
87
-
88
-
89
-
90
-
91
-
92
-
93
-
94
-
95
-
96
-
97
-
98
-
99
-
100
-
101
-
102
-
103
-
104
-
105
-
106
-
107
-
108
-
109
-
110
-
111
-
112
-
113
-
114
-
115
-
116
-
117
-
118
-
119
-
120
-
121
-
122
-
123
-
124
-
125
-
126
-
127
-
128
-
129
-
130
-
131
-
132
-
133
-
134
-
135
-
136
-
137
-
138
-
139
-
140
-
141
-
142
-
143
-
144
-
145
-
146
-
147
-
148
-
149
-
150
-
151
-
152
-
153
-
154
-
155
-
156
-
157
-
158
-
159
-
160
-
161
-
162
-
163
-
164
-
165
-
166
-
167
-
168
-
169
-
170
-
171
-
172
-
173
-
174
-
175
-
176
-
177
-
178
-
179
-
180
-
181
-
182
-
183
-
184
-
185
-
186
-
187
-
188
-
189
-
190
-
191
-
192
-
193
-
194
-
195
-
196
-
197
-
198
-
199
-
200
-
201
-
202
-
203
-
204
-
205
-
206
-
207
-
208
-
209
-
210
-
211
-
212
-
213
-
214
-
215
-
216
-
217
-
218
-
219
-
220
 |
 |

80
Installing Upgrades
www.dell.com | support.dell.com
3
Remove the front panel
.
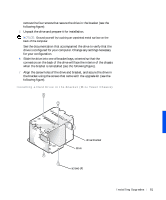
4
Remove the drive bracket from the chassis.
Pull the drive door forward and down until the hard-drive bracket is
ejected halfway out of the chassis (see the following figure). Then
grasp the bracket and pull it completely out of the chassis.
Removing the Hard-Drive Bracket (Mini Tower Chassis)
If a drive is already installed in the bracket, disconnect the DC power
cable and interface cable from the back of the drive before removing
the bracket from the chassis. To remove the old drive from the bracket,
hard-drive
bracket
drive door
handle
drive door