Dell Precision 330 User's Guide - Page 98
Insert the expansion card into the expansion-card connector.
 |
View all Dell Precision 330 manuals
Add to My Manuals
Save this manual to your list of manuals |
Page 98 highlights
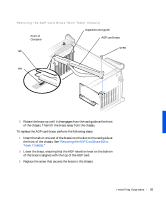
www.dell.com | support.dell.com 4 Remove the screw that secures the expansion-slot filler bracket to the chassis, and remove the bracket from the chassis (see the following figure). Save the screw to use when installing the expansion card later in this procedure. Removing the Filler Bracket screw filler bracket CAUTION: Some network interface controllers (NICs) automatically start up the system when they are connected to a network. To guard against electrical shock, be sure to unplug your computer from its electrical outlet before installing any expansion cards. Verify that the standby power indicator on the system board is off. To locate this indicator, see "System Board Components." 5 Insert the expansion card into the expansion-card connector. If the expansion card is full-length, insert the end of the card into the expansion-card guide bracket as you lower the card toward its connector on the system board. Insert the card firmly into the expansion-card connector on the system board (see the following figure). 98 Instal ling Upgrades
-
 1
1 -
2
-
3
-
4
-
5
-
6
-
7
-
8
-
9
-
10
-
11
-
12
-
13
-
14
-
15
-
16
-
17
-
18
-
19
-
20
-
21
-
22
-
23
-
24
-
25
-
26
-
27
-
28
-
29
-
30
-
31
-
32
-
33
-
34
-
35
-
36
-
37
-
38
-
39
-
40
-
41
-
42
-
43
-
44
-
45
-
46
-
47
-
48
-
49
-
50
-
51
-
52
-
53
-
54
-
55
-
56
-
57
-
58
-
59
-
60
-
61
-
62
-
63
-
64
-
65
-
66
-
67
-
68
-
69
-
70
-
71
-
72
-
73
-
74
-
75
-
76
-
77
-
78
-
79
-
80
-
81
-
82
-
83
-
84
-
85
-
86
-
87
-
88
-
89
-
90
-
91
-
92
-
 93
93 -
 94
94 -
 95
95 -
 96
96 -
 97
97 -
 98
98 -
 99
99 -
 100
100 -
 101
101 -
 102
102 -
 103
103 -
104
-
105
-
106
-
107
-
108
-
109
-
110
-
111
-
112
-
113
-
114
-
115
-
116
-
117
-
118
-
119
-
120
-
121
-
122
-
123
-
124
-
125
-
126
-
127
-
128
-
129
-
130
-
131
-
132
-
133
-
134
-
135
-
136
-
137
-
138
-
139
-
140
-
141
-
142
-
143
-
144
-
145
-
146
-
147
-
148
-
149
-
150
-
151
-
152
-
153
-
154
-
155
-
156
-
157
-
158
-
159
-
160
-
161
-
162
-
163
-
164
-
165
-
166
-
167
-
168
-
169
-
170
-
171
-
172
-
173
-
174
-
175
-
176
-
177
-
178
-
179
-
180
-
181
-
182
-
183
-
184
-
185
-
186
-
187
-
188
-
189
-
190
-
191
-
192
-
193
-
194
-
195
-
196
-
197
-
198
-
199
-
200
-
201
-
202
-
203
-
204
-
205
-
206
-
207
-
208
-
209
-
210
-
211
-
212
-
213
-
214
-
215
-
216
-
217
-
218
-
219
-
220
 |
 |
