Epson C3500 Technical Reference Guide - Page 140
Trouble, Description, Recovery method, Image, Illustra, Replacing Fanfold Paper with Roll
 |
View all Epson C3500 manuals
Add to My Manuals
Save this manual to your list of manuals |
Page 140 highlights
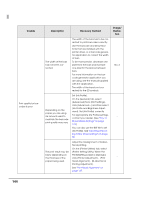
Trouble Description Recovery method Image/ Illustra- tion The LCD displays the See "Error Recovery Method" on An error has occurred - content of the error. page 152. The print result is faded or has lines (black/ white) (Lines printed while feeding by 25.4 mm/1 inch could be improved; however, you cannot remove them completely.) There are missing dots. The shutters on the platen on the outer side of the paper are set to open. Perform nozzle check and check whether print nozzles are clogged. If the print nozzles are clogged, perform head cleaning. Hold down the cleaning button for more than three seconds to start head cleaning. When [Printing operation mode] is set to other than [Anti-missing Dot mode], missing dots are permitted. When no missing dots can be permitted, change [Printing operation mode] to [Anti-missing Dot mode]. See "Nozzle Check Mode Settings" on page 118. When the shutters on the platen on the outer side of the paper are set to open, air current may cause printing trouble, and white lines may be printed. Follow the instructions on the label on the top of the printer, and set the shutters on the platen. See "Shutter Adjustment" on page 40. No. 1 No. 2 Check the paper you are using and the [Media Type] settings. The paper you are using differs from the For more information, see step 9 in paper set in the "Replacing Roll Paper with Fanfold - [Media Type]. Paper" on page 66, or step 10 in "Replacing Fanfold Paper with Roll Paper" on page 76. 140
-
 1
1 -
2
-
3
-
4
-
5
-
6
-
7
-
8
-
9
-
10
-
11
-
12
-
13
-
14
-
15
-
16
-
17
-
18
-
19
-
20
-
21
-
22
-
23
-
24
-
25
-
26
-
27
-
28
-
29
-
30
-
31
-
32
-
33
-
34
-
35
-
36
-
37
-
38
-
39
-
40
-
41
-
42
-
43
-
44
-
45
-
46
-
47
-
48
-
49
-
50
-
51
-
52
-
53
-
54
-
55
-
56
-
57
-
58
-
59
-
60
-
61
-
62
-
63
-
64
-
65
-
66
-
67
-
68
-
69
-
70
-
71
-
72
-
73
-
74
-
75
-
76
-
77
-
78
-
79
-
80
-
81
-
82
-
83
-
84
-
85
-
86
-
87
-
88
-
89
-
90
-
91
-
92
-
93
-
94
-
95
-
96
-
97
-
98
-
99
-
100
-
101
-
102
-
103
-
104
-
105
-
106
-
107
-
108
-
109
-
110
-
111
-
112
-
113
-
114
-
115
-
116
-
117
-
118
-
119
-
120
-
121
-
122
-
123
-
124
-
125
-
126
-
127
-
128
-
129
-
130
-
131
-
132
-
133
-
134
-
 135
135 -
 136
136 -
 137
137 -
 138
138 -
 139
139 -
 140
140 -
 141
141 -
 142
142 -
 143
143 -
 144
144 -
 145
145 -
146
-
147
-
148
-
149
-
150
-
151
-
152
-
153
-
154
-
155
-
156
-
157
-
158
-
159
-
160
-
161
-
162
-
163
-
164
-
165
-
166
-
167
-
168
-
169
-
170
-
171
-
172
-
173
-
174
-
175
-
176
-
177
-
178
-
179
-
180
-
181
-
182
-
183
-
184
-
185
-
186
-
187
-
188
-
189
-
190
-
191
-
192
-
193
-
194
-
195
-
196
-
197
-
198
-
199
-
200
-
201
-
202
-
203
-
204
-
205
-
206
-
207
-
208
-
209
-
210
-
211
-
212
-
213
-
214
-
215
-
216
-
217
-
218
-
219
-
220
-
221
-
222
-
223
-
224
-
225
-
226
-
227
-
228
-
229
-
230
-
231
-
232
-
233
-
234
-
235
-
236
-
237
-
238
-
239
-
240
 |
 |
