Epson NX User Manual - Page 120
Setting the Cache Test and User Control Options, Setting the High Vertical Refresh Rate
 |
View all Epson NX manuals
Add to My Manuals
Save this manual to your list of manuals |
Page 120 highlights
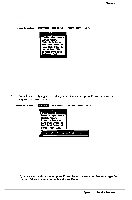
Running the SETUP Program Setting the Cache Test and User Control Options Using SETUP, you can enable or disable the computer's internal cache (built into the microprocessor) or external cache (built into an optional cache module). The default setting for both cache options is Enabled. Disable the cache if it malfunctions or if you are using timing-loop-dependent software that requires a slower system speed. Power-on diagnostic testing of the cache can also be disabled, if you are receiving cache errors that prevent you from using the computer. The default setting is Enabled. Setting the High Vertical Refresh Rate SETUP allows you to set the vertical refresh rare for system screen resolutions. The default rates and optional settings are shown in the table below: Table B-5 Vertical Refresh Rate Options Saving Your Settings After you have made your selections for SETUP, press Esc to exit. You see the following prompt: Save and Exit No Save and Exit Return to Setup To save the settings in the CMOS RAM, highlight Save ,and exit and press Enter. To exit SETUP without saving your changes, press / to highlight No Save and Exit; then press Enter. To remain in SETUP, select Return to Setup and press Enter; the exit menu disappears. Note You can also save your settings and remain in SETUP by pressing F1O any time in the program. You see a message Changes Saved; then press any key and return to SETUP. If you saved your changes, the SETUP program resets your system and the computer performs its power-on diagnostic tests (except if you are using the SETUP program on the Reference disk). If power-on diagnostics detects a problem, however, you see an error message and a prompt to run SETUP. Follow the instructions on the screen to run SETUP again to correct it. (You may need to turn the computer off and then on again.) B-14 Epson NX Service Manual
-
 1
1 -
2
-
3
-
4
-
5
-
6
-
7
-
8
-
9
-
10
-
11
-
12
-
13
-
14
-
15
-
16
-
17
-
18
-
19
-
20
-
21
-
22
-
23
-
24
-
25
-
26
-
27
-
28
-
29
-
30
-
31
-
32
-
33
-
34
-
35
-
36
-
37
-
38
-
39
-
40
-
41
-
42
-
43
-
44
-
45
-
46
-
47
-
48
-
49
-
50
-
51
-
52
-
53
-
54
-
55
-
56
-
57
-
58
-
59
-
60
-
61
-
62
-
63
-
64
-
65
-
66
-
67
-
68
-
69
-
70
-
71
-
72
-
73
-
74
-
75
-
76
-
77
-
78
-
79
-
80
-
81
-
82
-
83
-
84
-
85
-
86
-
87
-
88
-
89
-
90
-
91
-
92
-
93
-
94
-
95
-
96
-
97
-
98
-
99
-
100
-
101
-
102
-
103
-
104
-
105
-
106
-
107
-
108
-
109
-
110
-
111
-
112
-
113
-
114
-
 115
115 -
 116
116 -
 117
117 -
 118
118 -
 119
119 -
 120
120 -
 121
121 -
 122
122 -
 123
123 -
 124
124 -
 125
125 -
126
-
127
-
128
-
129
-
130
-
131
-
132
-
133
-
134
-
135
-
136
-
137
-
138
-
139
-
140
-
141
-
142
-
143
-
144
-
145
-
146
-
147
-
148
-
149
-
150
-
151
-
152
-
153
-
154
 |
 |
