Epson NX User Manual - Page 131
Fomatting, Reformatting a Used Disk, Selecting an Option, Selecting, Drive, a New
 |
View all Epson NX manuals
Add to My Manuals
Save this manual to your list of manuals |
Page 131 highlights
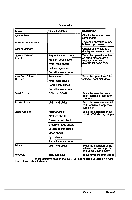
System Utilities Fomatting a New Disk To format a new hard disk that has never been formatted, select the Format option. You may need to modify the defective track table to add bad tracks when you format the disk Many hard disk drives come with a printed list of bad tracks, but the bad tracks am not flagged on the disk Other hard disks (such as Epson's disks) come with the bad tracks already flagged. Reformatting a Used Disk To reformat a disk you have been using, follow these steps: 1 Use the Non-destructive surface analysis option to check for unflagged bad tracks. 2 If errors occur during the non-destructive surface analysis, back up your hard disk to diskettes. 3 Run the Destructive surface analysis option to update the defective track table. 4 Run the Format option to format the disk. Selecting an Option When you use this program, you often need to select an option from a menu. There am two ways to do this: cl Use the arrow keys ( ) to highlight the option and press Enter. cl Type the number of the option and press Enter. You can select almost any option that appears on the screen using either method. Selecting a Drive If you have more than one hard disk drive, you see this prompt: Enter drive number ? (l/2) Select 1 for the first hard disk or 2 for the second hard disk Then see the instructions below for the Hard Disk Format Menu option you want to use. Epson NX Service Manual B-25
-
 1
1 -
2
-
3
-
4
-
5
-
6
-
7
-
8
-
9
-
10
-
11
-
12
-
13
-
14
-
15
-
16
-
17
-
18
-
19
-
20
-
21
-
22
-
23
-
24
-
25
-
26
-
27
-
28
-
29
-
30
-
31
-
32
-
33
-
34
-
35
-
36
-
37
-
38
-
39
-
40
-
41
-
42
-
43
-
44
-
45
-
46
-
47
-
48
-
49
-
50
-
51
-
52
-
53
-
54
-
55
-
56
-
57
-
58
-
59
-
60
-
61
-
62
-
63
-
64
-
65
-
66
-
67
-
68
-
69
-
70
-
71
-
72
-
73
-
74
-
75
-
76
-
77
-
78
-
79
-
80
-
81
-
82
-
83
-
84
-
85
-
86
-
87
-
88
-
89
-
90
-
91
-
92
-
93
-
94
-
95
-
96
-
97
-
98
-
99
-
100
-
101
-
102
-
103
-
104
-
105
-
106
-
107
-
108
-
109
-
110
-
111
-
112
-
113
-
114
-
115
-
116
-
117
-
118
-
119
-
120
-
121
-
122
-
123
-
124
-
125
-
 126
126 -
 127
127 -
 128
128 -
 129
129 -
 130
130 -
 131
131 -
 132
132 -
 133
133 -
 134
134 -
 135
135 -
 136
136 -
137
-
138
-
139
-
140
-
141
-
142
-
143
-
144
-
145
-
146
-
147
-
148
-
149
-
150
-
151
-
152
-
153
-
154
 |
 |
