Epson NX User Manual - Page 66
Installing a Drive In the Horizontal Position, Removing/Installing Drive Panels
 |
View all Epson NX manuals
Add to My Manuals
Save this manual to your list of manuals |
Page 66 highlights
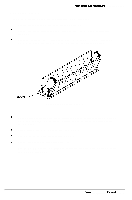
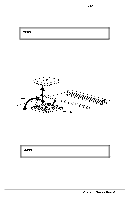
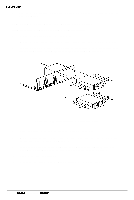
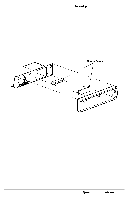
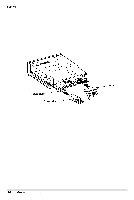
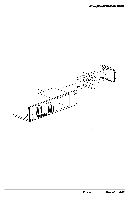
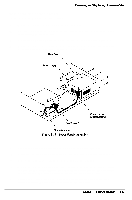
Removing and Replacing Subassemblies Installing a Drive In the Horizontal Position Note On an IDE drive, set any necessary jumpers and take note of the hard disk type number on the label (if present); see your hard disk drive documentation for instructions. If a second hard disk drive is installed, the jumpers on both of the hard disk drives may need to be moved. Follow these steps to install a drive in the horizontal position: 1 Remove the computer's cover as described on page 3-2. 2 If you are installing a drive in the lower drive bay, remove the two retaining screws securing the drive slot cover to the front of the lower drive bay and remove it. Also, remove the drive slot cover from the front panel. (See Figure 3-10.) Store the cover in a safe place. Figure 3-10 Removing/Installing Drive Panels 3 Attach the two mounting rails to the appropriate holes on the sides of the drive with four screws, as shown below. The mounting rails are included with the system and if removed from a drive they should be stored in a safe place for future use. 4 If you are installing a 5¼-inch diskette drive, turn it so that the diskette drive release latch is above the slot. If installing a 3½-inch diskette drive, turn it so that the eject button is below the slot. If installing a hard disk drive, turn it so that the component side is down. Align the mounting rails on each side of the drive with the notch on each side of the drive bay and slide the drive into the bay. 5 Secure the drive mounting rails to the front of the chassis with the two retaining screws removed in step 2 above. Epson NX Service Manual 3-13
-
 1
1 -
2
-
3
-
4
-
5
-
6
-
7
-
8
-
9
-
10
-
11
-
12
-
13
-
14
-
15
-
16
-
17
-
18
-
19
-
20
-
21
-
22
-
23
-
24
-
25
-
26
-
27
-
28
-
29
-
30
-
31
-
32
-
33
-
34
-
35
-
36
-
37
-
38
-
39
-
40
-
41
-
42
-
43
-
44
-
45
-
46
-
47
-
48
-
49
-
50
-
51
-
52
-
53
-
54
-
55
-
56
-
57
-
58
-
59
-
60
-
 61
61 -
 62
62 -
 63
63 -
 64
64 -
 65
65 -
 66
66 -
 67
67 -
 68
68 -
 69
69 -
 70
70 -
 71
71 -
72
-
73
-
74
-
75
-
76
-
77
-
78
-
79
-
80
-
81
-
82
-
83
-
84
-
85
-
86
-
87
-
88
-
89
-
90
-
91
-
92
-
93
-
94
-
95
-
96
-
97
-
98
-
99
-
100
-
101
-
102
-
103
-
104
-
105
-
106
-
107
-
108
-
109
-
110
-
111
-
112
-
113
-
114
-
115
-
116
-
117
-
118
-
119
-
120
-
121
-
122
-
123
-
124
-
125
-
126
-
127
-
128
-
129
-
130
-
131
-
132
-
133
-
134
-
135
-
136
-
137
-
138
-
139
-
140
-
141
-
142
-
143
-
144
-
145
-
146
-
147
-
148
-
149
-
150
-
151
-
152
-
153
-
154
 |
 |
