Epson NX User Manual - Page 57
Replacing the Cover,
 |
View all Epson NX manuals
Add to My Manuals
Save this manual to your list of manuals |
Page 57 highlights
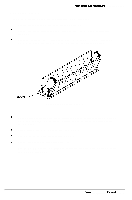
System Unit Replacing the Cover To replace the computer's cover, follow these steps: 1 Facing the front of the computer, position the cover so the lips on its bottom edges slide under the guiderails along both sides of the computer case, as shown in Figure 3-3. Chassis Cover Figure 3-3 Replacing the Cover 2 Lower the cover and slide it straight back over the computer until it stops against the rear panel. 3 Replace the three cover retaining screws as shown in Figure 3- 1. 4 Reconnect the computer to the monitor, printer, keyboard, mouse, and any other peripheral devices. Then reconnect the power cable to the back of the computer and to an electrical outlet. 3-4 Epson NX Service Manual
-
 1
1 -
2
-
3
-
4
-
5
-
6
-
7
-
8
-
9
-
10
-
11
-
12
-
13
-
14
-
15
-
16
-
17
-
18
-
19
-
20
-
21
-
22
-
23
-
24
-
25
-
26
-
27
-
28
-
29
-
30
-
31
-
32
-
33
-
34
-
35
-
36
-
37
-
38
-
39
-
40
-
41
-
42
-
43
-
44
-
45
-
46
-
47
-
48
-
49
-
50
-
51
-
 52
52 -
 53
53 -
 54
54 -
 55
55 -
 56
56 -
 57
57 -
 58
58 -
 59
59 -
 60
60 -
 61
61 -
 62
62 -
63
-
64
-
65
-
66
-
67
-
68
-
69
-
70
-
71
-
72
-
73
-
74
-
75
-
76
-
77
-
78
-
79
-
80
-
81
-
82
-
83
-
84
-
85
-
86
-
87
-
88
-
89
-
90
-
91
-
92
-
93
-
94
-
95
-
96
-
97
-
98
-
99
-
100
-
101
-
102
-
103
-
104
-
105
-
106
-
107
-
108
-
109
-
110
-
111
-
112
-
113
-
114
-
115
-
116
-
117
-
118
-
119
-
120
-
121
-
122
-
123
-
124
-
125
-
126
-
127
-
128
-
129
-
130
-
131
-
132
-
133
-
134
-
135
-
136
-
137
-
138
-
139
-
140
-
141
-
142
-
143
-
144
-
145
-
146
-
147
-
148
-
149
-
150
-
151
-
152
-
153
-
154
 |
 |

System
Unit
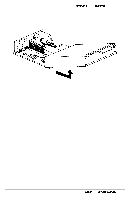
Replacing the Cover
To replace the computer’s cover, follow these steps:
1
Facing the front of the computer, position the cover so the lips on its bottom edges
slide under the guiderails along both sides of the computer case, as shown in
Figure 3-3.
Chassis
Cover
Figure 3-3
Replacing the Cover
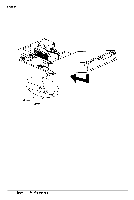
2
Lower the cover and slide it straight back over the computer until it stops against the
rear panel.
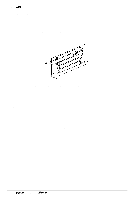
3
Replace the three cover retaining screws as shown in Figure 3- 1.
4
Reconnect the computer to the monitor, printer, keyboard, mouse, and any other
peripheral devices. Then reconnect the power cable to the back of the computer and to
an electrical outlet.
3-4
Epson
NX
Service
Manual