Epson NX User Manual - Page 122
Starting the System Diagnostics Program, Run the SETUP
 |
View all Epson NX manuals
Add to My Manuals
Save this manual to your list of manuals |
Page 122 highlights
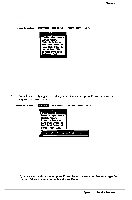
Performing System Diagnostics Starting the System Diagnostics Program Follow these steps to start the System diagnostics program: 1 Insert the Reference diskette in drive A and turn on the computer. Note Always boot the computer from the Reference diskette to start System diagnostics. This clears any terminate-and-stay-resident (TSR) programs or other utilities from memory and frees it for use by the diagnostics program. 2 At the A: prompt, type DIAG and press Enter. 3 You see a menu bar at the top of the screen with Items Detected highlighted Press Enter. 4 You see a list of all the testable devices the computer detects in your system. If the list is correct, go to page B-19. 5 If the list is not correct, press + to select Quit and press Enter. Run the SETUP program to make sure any missing devices ate configured properly. When the list is correct, you can run diagnostic tests on each device. If you do not want to test a device, you can remove it from the list. You can also add a device to the list. B-16 Epson NX Service Manual
-
 1
1 -
2
-
3
-
4
-
5
-
6
-
7
-
8
-
9
-
10
-
11
-
12
-
13
-
14
-
15
-
16
-
17
-
18
-
19
-
20
-
21
-
22
-
23
-
24
-
25
-
26
-
27
-
28
-
29
-
30
-
31
-
32
-
33
-
34
-
35
-
36
-
37
-
38
-
39
-
40
-
41
-
42
-
43
-
44
-
45
-
46
-
47
-
48
-
49
-
50
-
51
-
52
-
53
-
54
-
55
-
56
-
57
-
58
-
59
-
60
-
61
-
62
-
63
-
64
-
65
-
66
-
67
-
68
-
69
-
70
-
71
-
72
-
73
-
74
-
75
-
76
-
77
-
78
-
79
-
80
-
81
-
82
-
83
-
84
-
85
-
86
-
87
-
88
-
89
-
90
-
91
-
92
-
93
-
94
-
95
-
96
-
97
-
98
-
99
-
100
-
101
-
102
-
103
-
104
-
105
-
106
-
107
-
108
-
109
-
110
-
111
-
112
-
113
-
114
-
115
-
116
-
 117
117 -
 118
118 -
 119
119 -
 120
120 -
 121
121 -
 122
122 -
 123
123 -
 124
124 -
 125
125 -
 126
126 -
 127
127 -
128
-
129
-
130
-
131
-
132
-
133
-
134
-
135
-
136
-
137
-
138
-
139
-
140
-
141
-
142
-
143
-
144
-
145
-
146
-
147
-
148
-
149
-
150
-
151
-
152
-
153
-
154
 |
 |
